Inventory 플러그인 등록
이 문서는 개발 완료된 SpaceONE 플러그인을 등록하고 테스트하는 방법을 안내합니다.
1. 환경 구성
플러그인 등록에 앞서 다음과 같은 환경 구성이 필요합니다.
1) 엔드포인트 설정
1-1) Inventory 플러그인을 등록하기 위해서는 Identity, Inventory, Repository 서비스의 gRPC 엔드포인트가 필요합니다.
추가된 서비스들의 엔드포인트들은 아래와 같습니다.
api_key: eyJ...
endpoints:
  plugin: grpc://localhost:50051
  identity: grpc://localhost:8083
  inventory: grpc://localhost:8084
  repository: grpc://localhost:8085
2) 포트포워딩
포트포워딩을 설정하면 로컬 환경에서 각 마이크로서비스로 gRPC 통신을 할 수 있습니다.
이슈가 생겼을 경우 아래 명령어를 통해 포트를 닫을 수 있습니다.
kill $(ps aux | grep 'kubectl port-forward' | awk '{print $2}')만약 위 명령어로 kubectl port-forward 관련된 프로세스를 모두 종료 시켰다면,
포트포워딩 | SpaceONE 설치을 통해 다시 Console, Console API, Console API V2 마이크로서비스의 포트포워딩을 설정하고, 위에서 설정했었던 Identity, Inventory, Repository 서비스의 포트포워딩을 다시 설정해주세요.
총 6개의 마이크로서비스에 대한 포트포워딩이 필요합니다.
2-1) 이제 총 6개의 마이크로서비스에 대한 포트포워딩이 완료되었습니다. 이용할 수 있는 API 목록을 한 번 확인해봅시다.
명령의 결과는 아래와 같습니다. 이 명령을 통해 사용할 수 있는 마이크로서비스의 API 목록을 확인할 수 있습니다.
 Service    | Resource             | Short Names             | Verb
------------+----------------------+-------------------------+-----------------------------------------------------------------------------------------------------------------------------------------
 plugin     | Health               |                         | Check, Watch
 plugin     | ServerInfo           |                         | get_version
 plugin     | Collector            |                         | init, verify, collect
 plugin     | Job                  |                         | get_tasks
 identity   | Health               |                         | Check, Watch
 identity   | ServerInfo           |                         | get_version
 identity   | APIKey               | api_key                 | create, enable, disable, delete, get, list, stat
 identity   | Authorization        |                         | verify
 identity   | Domain               | domain                  | create, update, change_auth_plugin, update_plugin, verify_plugin, delete, enable, disable, get, list, stat, get_public_key
 identity   | DomainOwner          |                         | create, update, delete, get
 identity   | Endpoint             | endpoint                | list
 identity   | Policy               | policy                  | create, update, delete, get, list, stat
 identity   | Project              | project                 | create, update, delete, get, list, stat, add_member, modify_member, remove_member, list_members
 identity   | ProjectGroup         | project_group, pg       | create, update, delete, get, list, stat, add_member, modify_member, remove_member, list_members, list_projects
 identity   | Provider             | provider                | create, update, delete, get, list, stat
 identity   | Role                 | role                    | create, update, delete, get, list, stat
 identity   | RoleBinding          | role_binding, rb        | create, update, delete, get, list, stat
 identity   | ServiceAccount       | service_account, sa     | create, update, delete, get, list, stat
 identity   | Token                | token                   | issue, refresh
 identity   | User                 | user                    | create, update, verify_email, confirm_email, reset_password, set_required_actions, enable, disable, delete, get, list, stat, find, sync
 inventory  | Health               |                         | Check, Watch
 inventory  | ServerInfo           |                         | get_version
 inventory  | ChangeHistory        | change_history          | list, stat
 inventory  | CloudService         | cloud_service, cs       | create, update, delete, get, list, analyze, stat
 inventory  | CloudServiceQuerySet | cloud_service_query_set | create, update, delete, run, test, enable, disable, get, list, stat
 inventory  | CloudServiceStats    | cloud_service_stats     | list, analyze, stat
 inventory  | CloudServiceType     | cloud_service_type, cst | create, update, delete, get, list, stat
 inventory  | Collector            | collector               | create, update, update_plugin, verify_plugin, delete, get, list, stat, collect
 inventory  | CollectorRule        | collector_rule, cr      | create, update, change_order, delete, get, list, stat
 inventory  | Job                  |                         | delete, get, list, analyze, stat
 inventory  | JobTask              |                         | delete, get, list, stat
 inventory  | Note                 | note                    | create, update, delete, get, list, stat
 inventory  | Region               | region                  | create, update, delete, get, list, stat
 inventory  | ResourceGroup        |                         | create, update, delete, get, list, stat
 repository | Health               |                         | Check, Watch
 repository | ServerInfo           |                         | get_version
 repository | Plugin               | plugin                  | register, update, deregister, enable, disable, get_versions, get, list, stat
 repository | Policy               |                         | create, update, delete, get, list, stat
 repository | Repository           | repository, repo        | register, update, deregister, get, list, stat
 repository | Schema               |                         | create, update, delete, get, list, stat
자세한 API를 확인하려면 Cloudforet API 를 참고하세요.
2. Repository 등록
1) Repository 조회
Managed Repository가 있는 것을 확인할 수 있습니다. Managed Repository는 SpaceONE에서 제공하는 기본 Repository입니다. 로컬 머신에서 플러그인을 등록하기 위해 새로운 Repository를 생성합니다.
 repository_id   | name               | repository_type   | created_at
-----------------+--------------------+-------------------+--------------------------
 repo-managed    | Managed Repository | managed           | 2024-07-15T04:14:07.640Z

 Count: 1 / 1
2) Repository 등록
---
repository_type: local
name: Local Repositoryrepository를 등록하면 아래와 같은 결과가 나옵니다.
---
created_at: '2024-07-25T16:22:58.162Z'
name: Local Repository
repository_id: repo-16a1409f9992
repository_type: local
2-2) 이제 다시 Repository 조회를 해보면, Local Repository가 등록된 것을 확인할 수 있습니다. repository_id의 경우 repo-16a1409f9992와
같이 해시값으로 생성됩니다.
- 유저마다 이
repository_id의 값은 다릅니다.
 repository_id     | name               | repository_type   | created_at
-------------------+--------------------+-------------------+--------------------------
 repo-managed      | Managed Repository | managed           | 2024-07-15T04:14:07.640Z
 repo-16a1409f9992 | Local Repository   | local             | 2024-07-25T16:22:58.162Z

 Count: 2 / 2
3. Schema 생성
Schema는 SpaceONE 콘솔에서 Secret Data를 입력할 때 필요한 템플릿을 제공합니다.
1) Schema 조회
Local Repository를 생성했기 때문에, Local Repository의 Schema를 생성하기 전에 Managed Repository에는 어떤 Schema들이 있는지 확인합니다.
Managed Repository Schema 조회
 name                                    | service_type
-----------------------------------------+--------------------
 aws_access_key                          | secret.credentials
 aws_assume_role                         | secret.credentials
 azure_client_secret                     | secret.credentials
 azure_client_secret_for_cost_management | secret.credentials
 azure_credentials                       | secret.credentials
 azure_subscription_id                   | secret.credentials
 google_cloud_project_id                 | secret.credentials
 google_oauth2_credentials               | secret.credentials
 spaceone_api_key                        | secret.credentials
 telegram_auth_token                     | secret.credentials

 Count: 10 / 10
현재 SpaceONE에서 기본적으로 등록 되어 있는 Managed Repository의 Schema는 위와 같습니다. 이제 위에서 생성한 Local Repository에서 새로운 Schema를 생성해봅시다.
2) Schema 생성
2-1) repository_id로 생성된 Repository의 Schema를 조회하면 아래와 같이 결과가 나옵니다. 아직까지 해당 Repository에 Schema를 생성하지 않았기 때문입니다.
NO DATA2-2) Local Repository에 새로운 Schema를 생성하는 YAML 스펙은 아래와 같습니다.
---
name: portfolio_investment_schema
service_type: secret.credentials
schema:
  properties:
    investment_type:
      minLength: 4.0
      title: Investment Type
      type: string
  required:
    - investment_type
  type: object
labels:
  - Investment
tags:
description: Investment CredentialsLocal Repository에 Schema가 생성됩니다.
---
created_at: '2024-07-25T16:25:31.180Z'
domain_id: domain-9998b2bc254d
labels:
  - Investment
name: portfolio_investment_schema
repository_info:
  name: Local Repository
  repository_id: repo-16a1409f9992
  repository_type: local
schema:
  properties:
    investment_type:
      minLength: 4.0
      title: Investment Type
      type: string
  required:
    - investment_type
  type: object
service_type: secret.credentials
tags:
  description: Investment Credentials
updated_at: '2024-07-25T16:25:31.180Z'
4. Provider 생성
서비스 어카운트에서 3개의 CSP(AWS, Azure, GCP)를 기본적으로 제공하고 있는 것을 확인했습니다.
예제에서 개발한 플러그인은 가격 기준 상위 5개의 암호 화폐를 수집한 것이므로 CSP와는 성격이 조금 다릅니다. 그러나 기본적으로 Provider는 플러그인으로부터 수집된 자원이 어느 곳에서 수집된 자원인 지 나타내는 리소스입니다.
즉, 데이터가 존재한다면, 해당 데이터를 어떤 종류의 Provider로 그룹화할 수 있습니다.
1) Provider 조회
현재 등록되어 있는 Provider는 Default Provider인 AWS, Azure, Google Cloud를 확인할 수 있습니다.
 provider     | name         |   order
--------------+--------------+---------
 aws          | AWS          |       1
 google_cloud | Google Cloud |       2
 azure        | Azure        |       3

 Count: 3 / 3
2) Provider 생성
먼저 Provider를 등록하기 위해 필요한 YAML 스펙을 작성해봅시다.
---
provider: portfolio
name: Portfolio
tags:
  icon: https://www.svgrepo.com/show/195329/mortgage-insurance.svg
  label: Portfolio
template:
  service_account:
    schema:
      properties:
        amount:
          minLength: 4.0
          title: 자산
          type: string
      required:
        - amount
      type: object
capability:
  supported_schema:
    - portfolio_investment_schema
metadata:
  view:
    layouts:
      help:service_account:create:
        name: Creation Help
        options:
          markdown:
            en: "# Getting Started with Portfolio

              Easily manage and track your assets through Portfolio.

              ## Portfolio Type

              Please enter the type of asset. (e.g., savings account, stocks, cryptocurrency)
              "
            ko: "# Portfolio 시작 가이드

              Portfolio를 통해 자산을 쉽게 관리하고 추적하세요.

              ##  Portfolio 타입

              어떤 종류의 자산인지 입력해주세요. (적금, 주식, 암호 화폐 등)
"Provider를 등록하면 아래와 같은 결과가 나옵니다.
---
capability:
  supported_schema:
    - portfolio_investment_schema
created_at: '2024-07-25T16:28:53.209Z'
domain_id: domain-9998b2bc254d
metadata:
  view:
    layouts:
      help:service_account:create:
        name: Creation Help
        options:
          markdown:
            en: '# Getting Started with Portfolio

              Easily manage and track your assets through Portfolio.

              ## Portfolio Type

              Please enter the type of asset. (e.g., savings account, stocks, cryptocurrency) '
            ko: '# Portfolio 시작 가이드

              Portfolio를 통해 자산을 쉽게 관리하고 추적하세요.

              ##  Portfolio 타입

              어떤 종류의 자산인지 입력해주세요. (적금, 주식, 암호 화폐 등) '
name: Portfolio
order: 10
provider: portfolio
tags:
  icon: https://www.svgrepo.com/show/195329/mortgage-insurance.svg
  label: Portfolio
template:
  service_account:
    schema:
      properties:
        amount:
          minLength: 4.0
          title: 자산
          type: string
      required:
        - amount
      type: object
2-3) 다시 Provider를 조회해보면 portfolio라는 provider가 추가된 것을 확인할 수 있습니다.
provider | name | order
--------------+--------------+---------
aws | AWS | 1
google_cloud | Google Cloud | 2
azure | Azure | 3
portfolio | Portfolio | 10
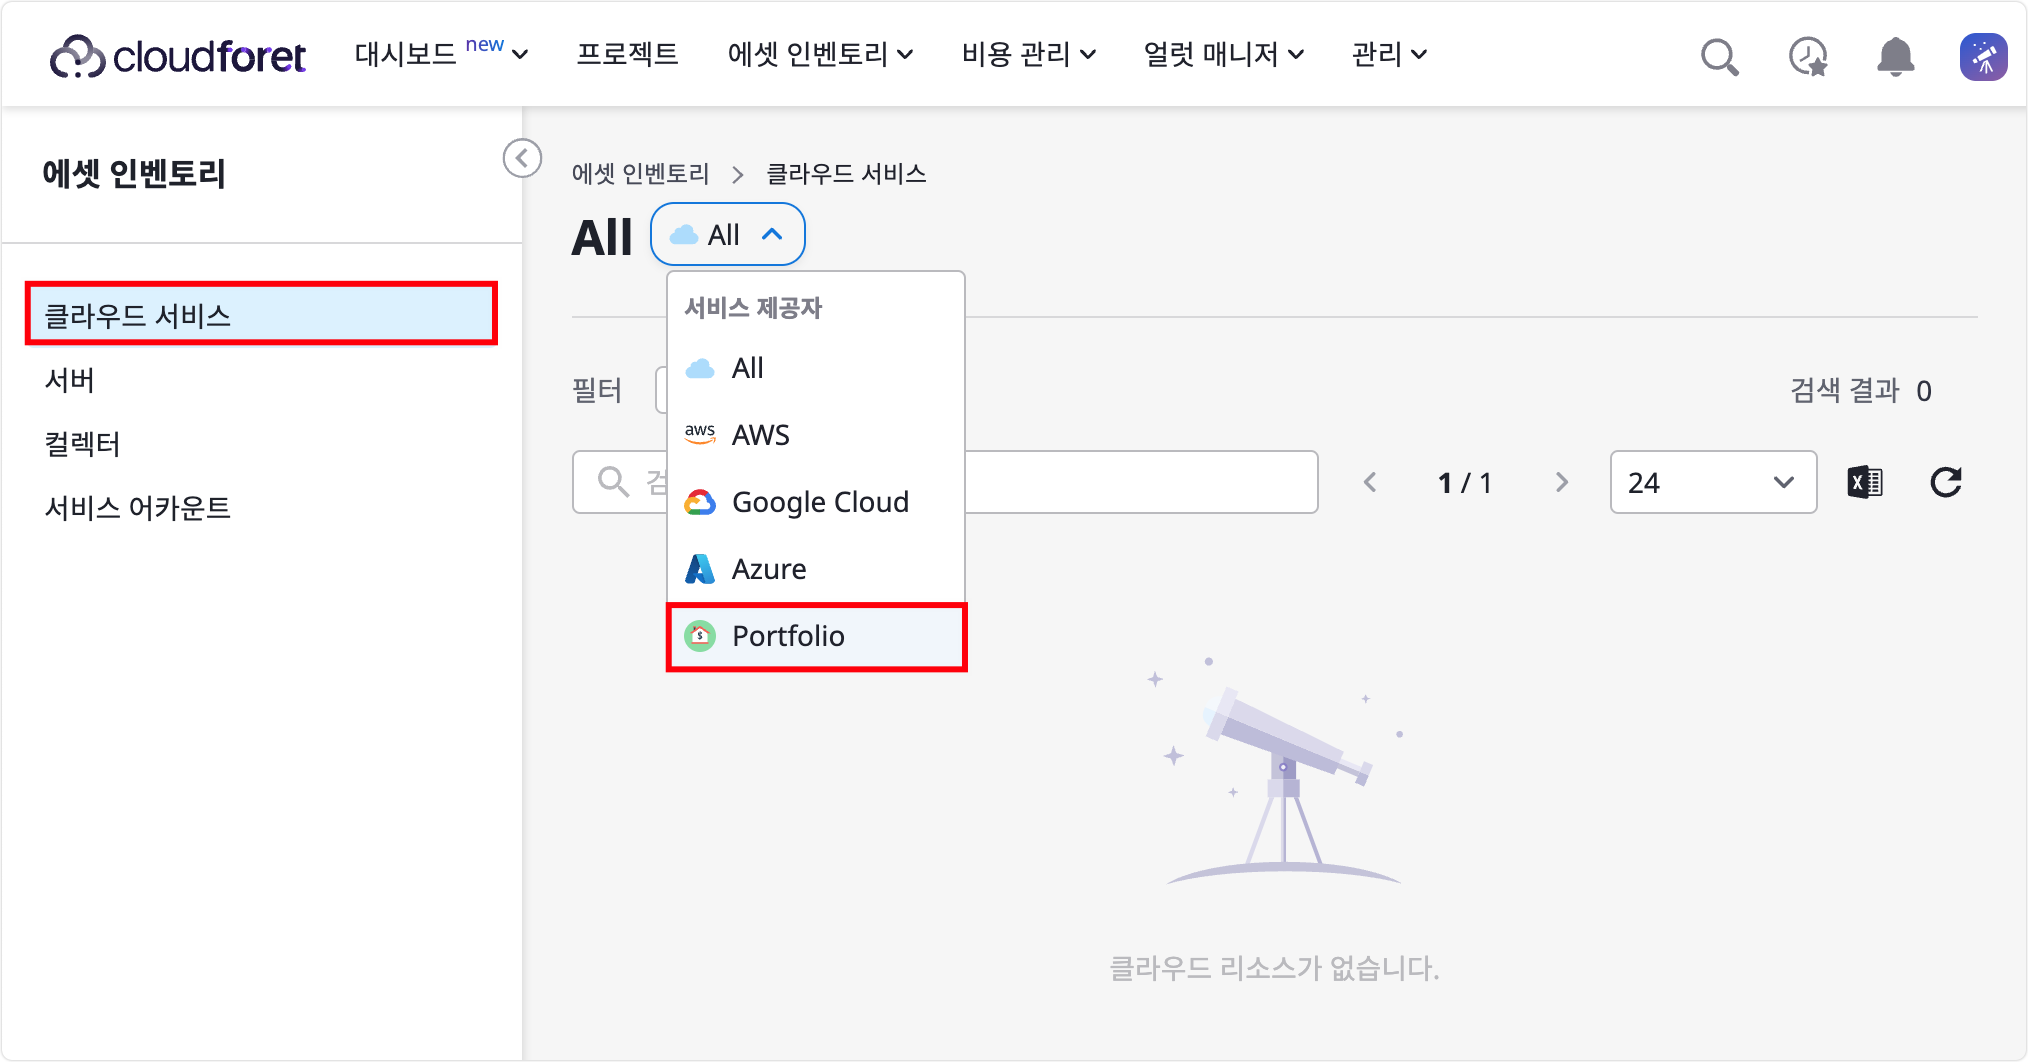
Count: 4 / 42-4) 그리고 클라우드 서비스에서 아래와 같이 ‘Portfolio’ 라는 이름을 가진 서비스 제공자(Provider)도 확인할 수 있습니다.
5. Service Account 생성
SpaceONE에서 Service Account가 하는 기능은 다음과 같습니다.
- Service Account와 Project 리소스를 통해 외부로 부터 수집된 리소스를 그룹화하여 관리할 수 있습니다.
- Service Account는 plugin의 수집 단위를 의미합니다.
예를 들어 Investment라는 Provider가 있다면, Provider 하위에 주식, 암호 화폐, 부동산 등의 Service Account를 생성하고, 프로젝트 생성에서 생성하였던 Portfolio 라는 프로젝트로 그룹화하여 관리할 수 있는 것입니다.
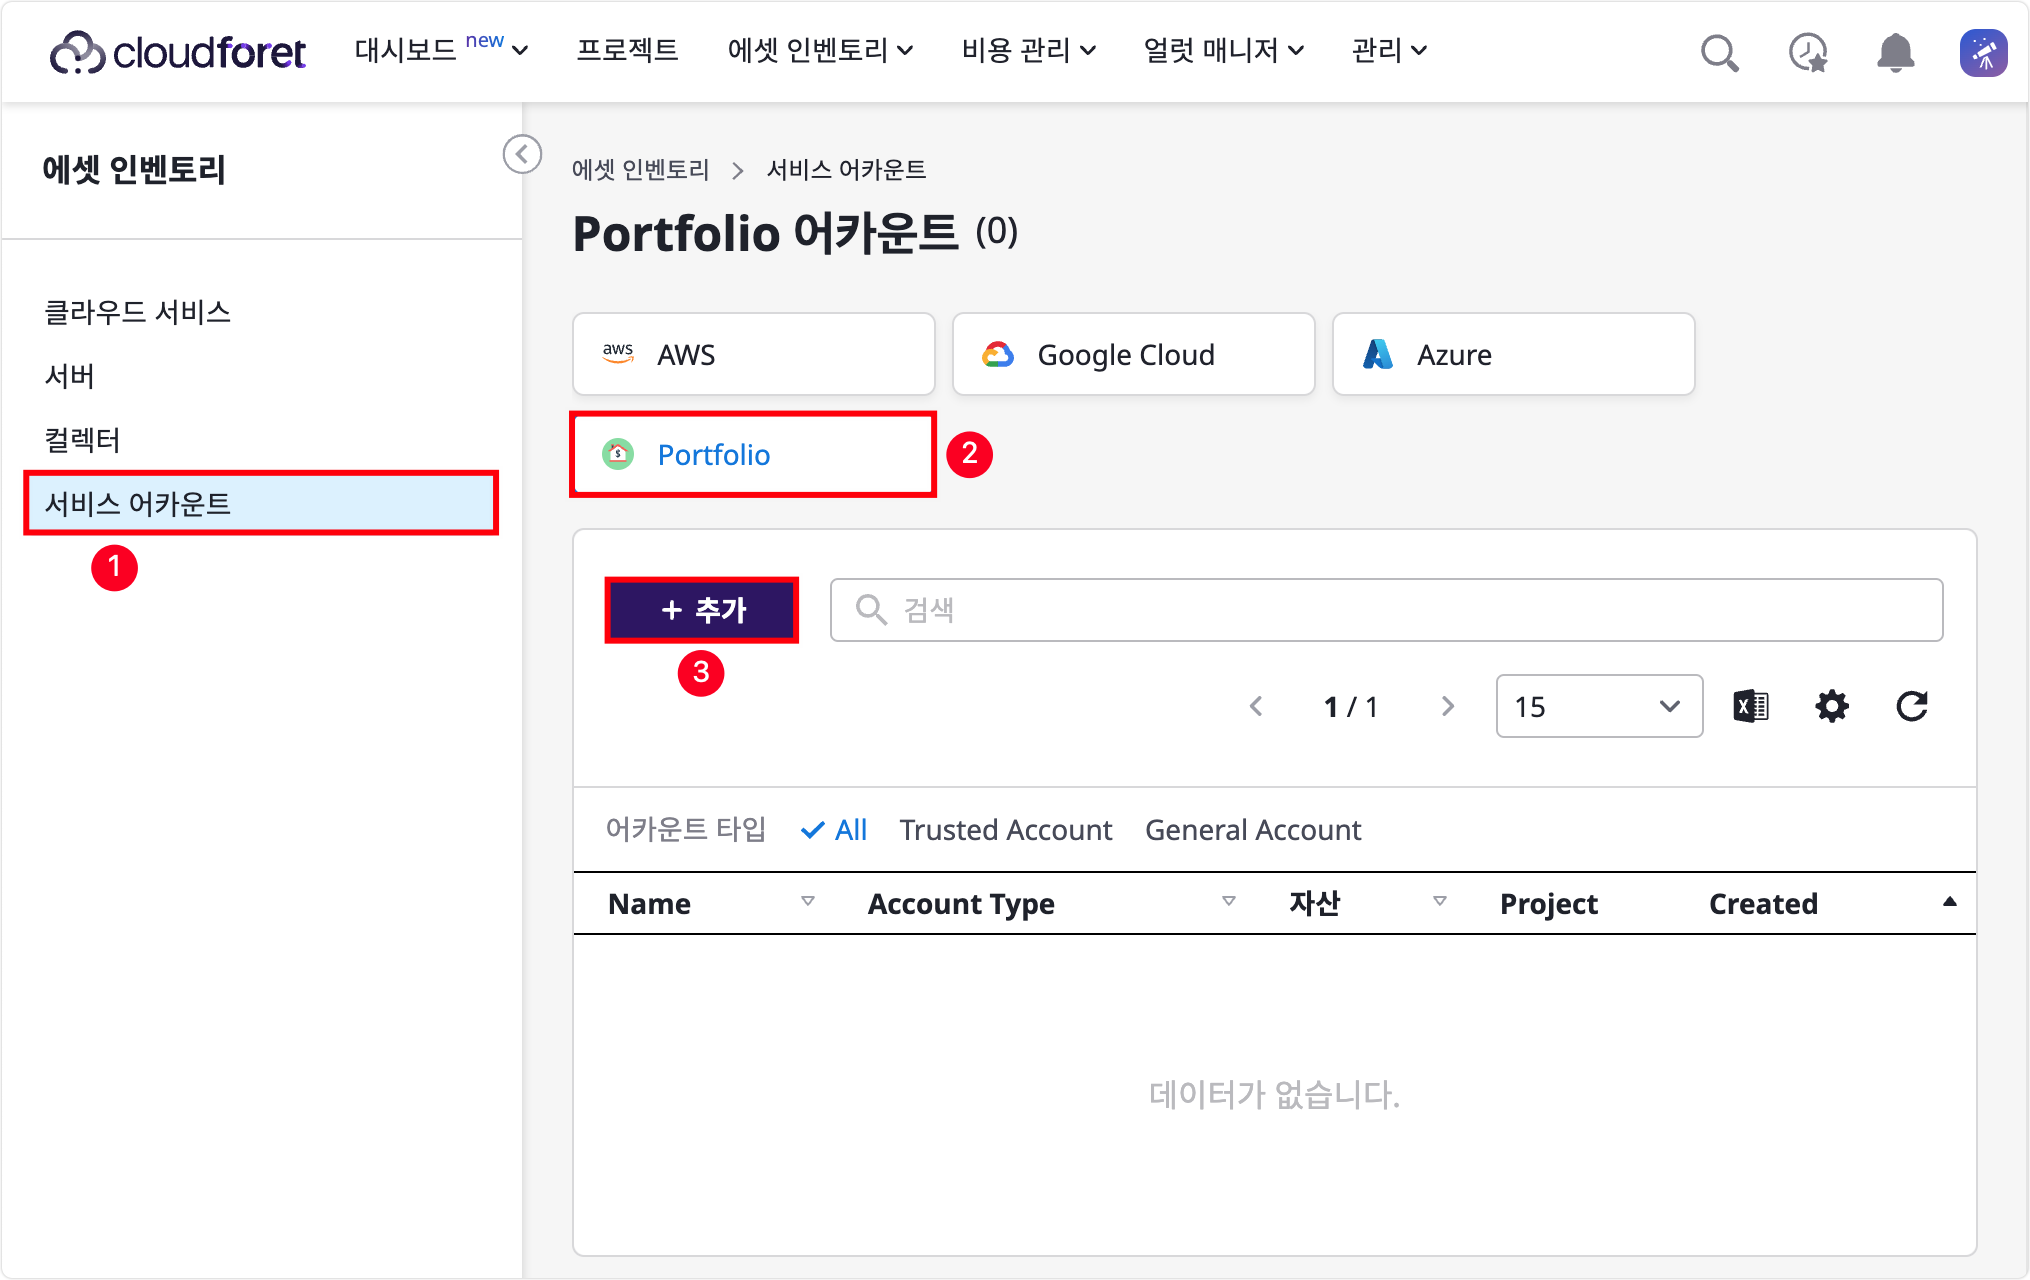
서비스 어카운트 > Portfolio 항목을 클릭한 뒤, [+ 추가] 버튼을 눌러 서비스 어카운트를 생성합니다.
create_provider.yaml파일을 작성한 스펙대로 그대로 보이는 것을 확인할 수 있습니다.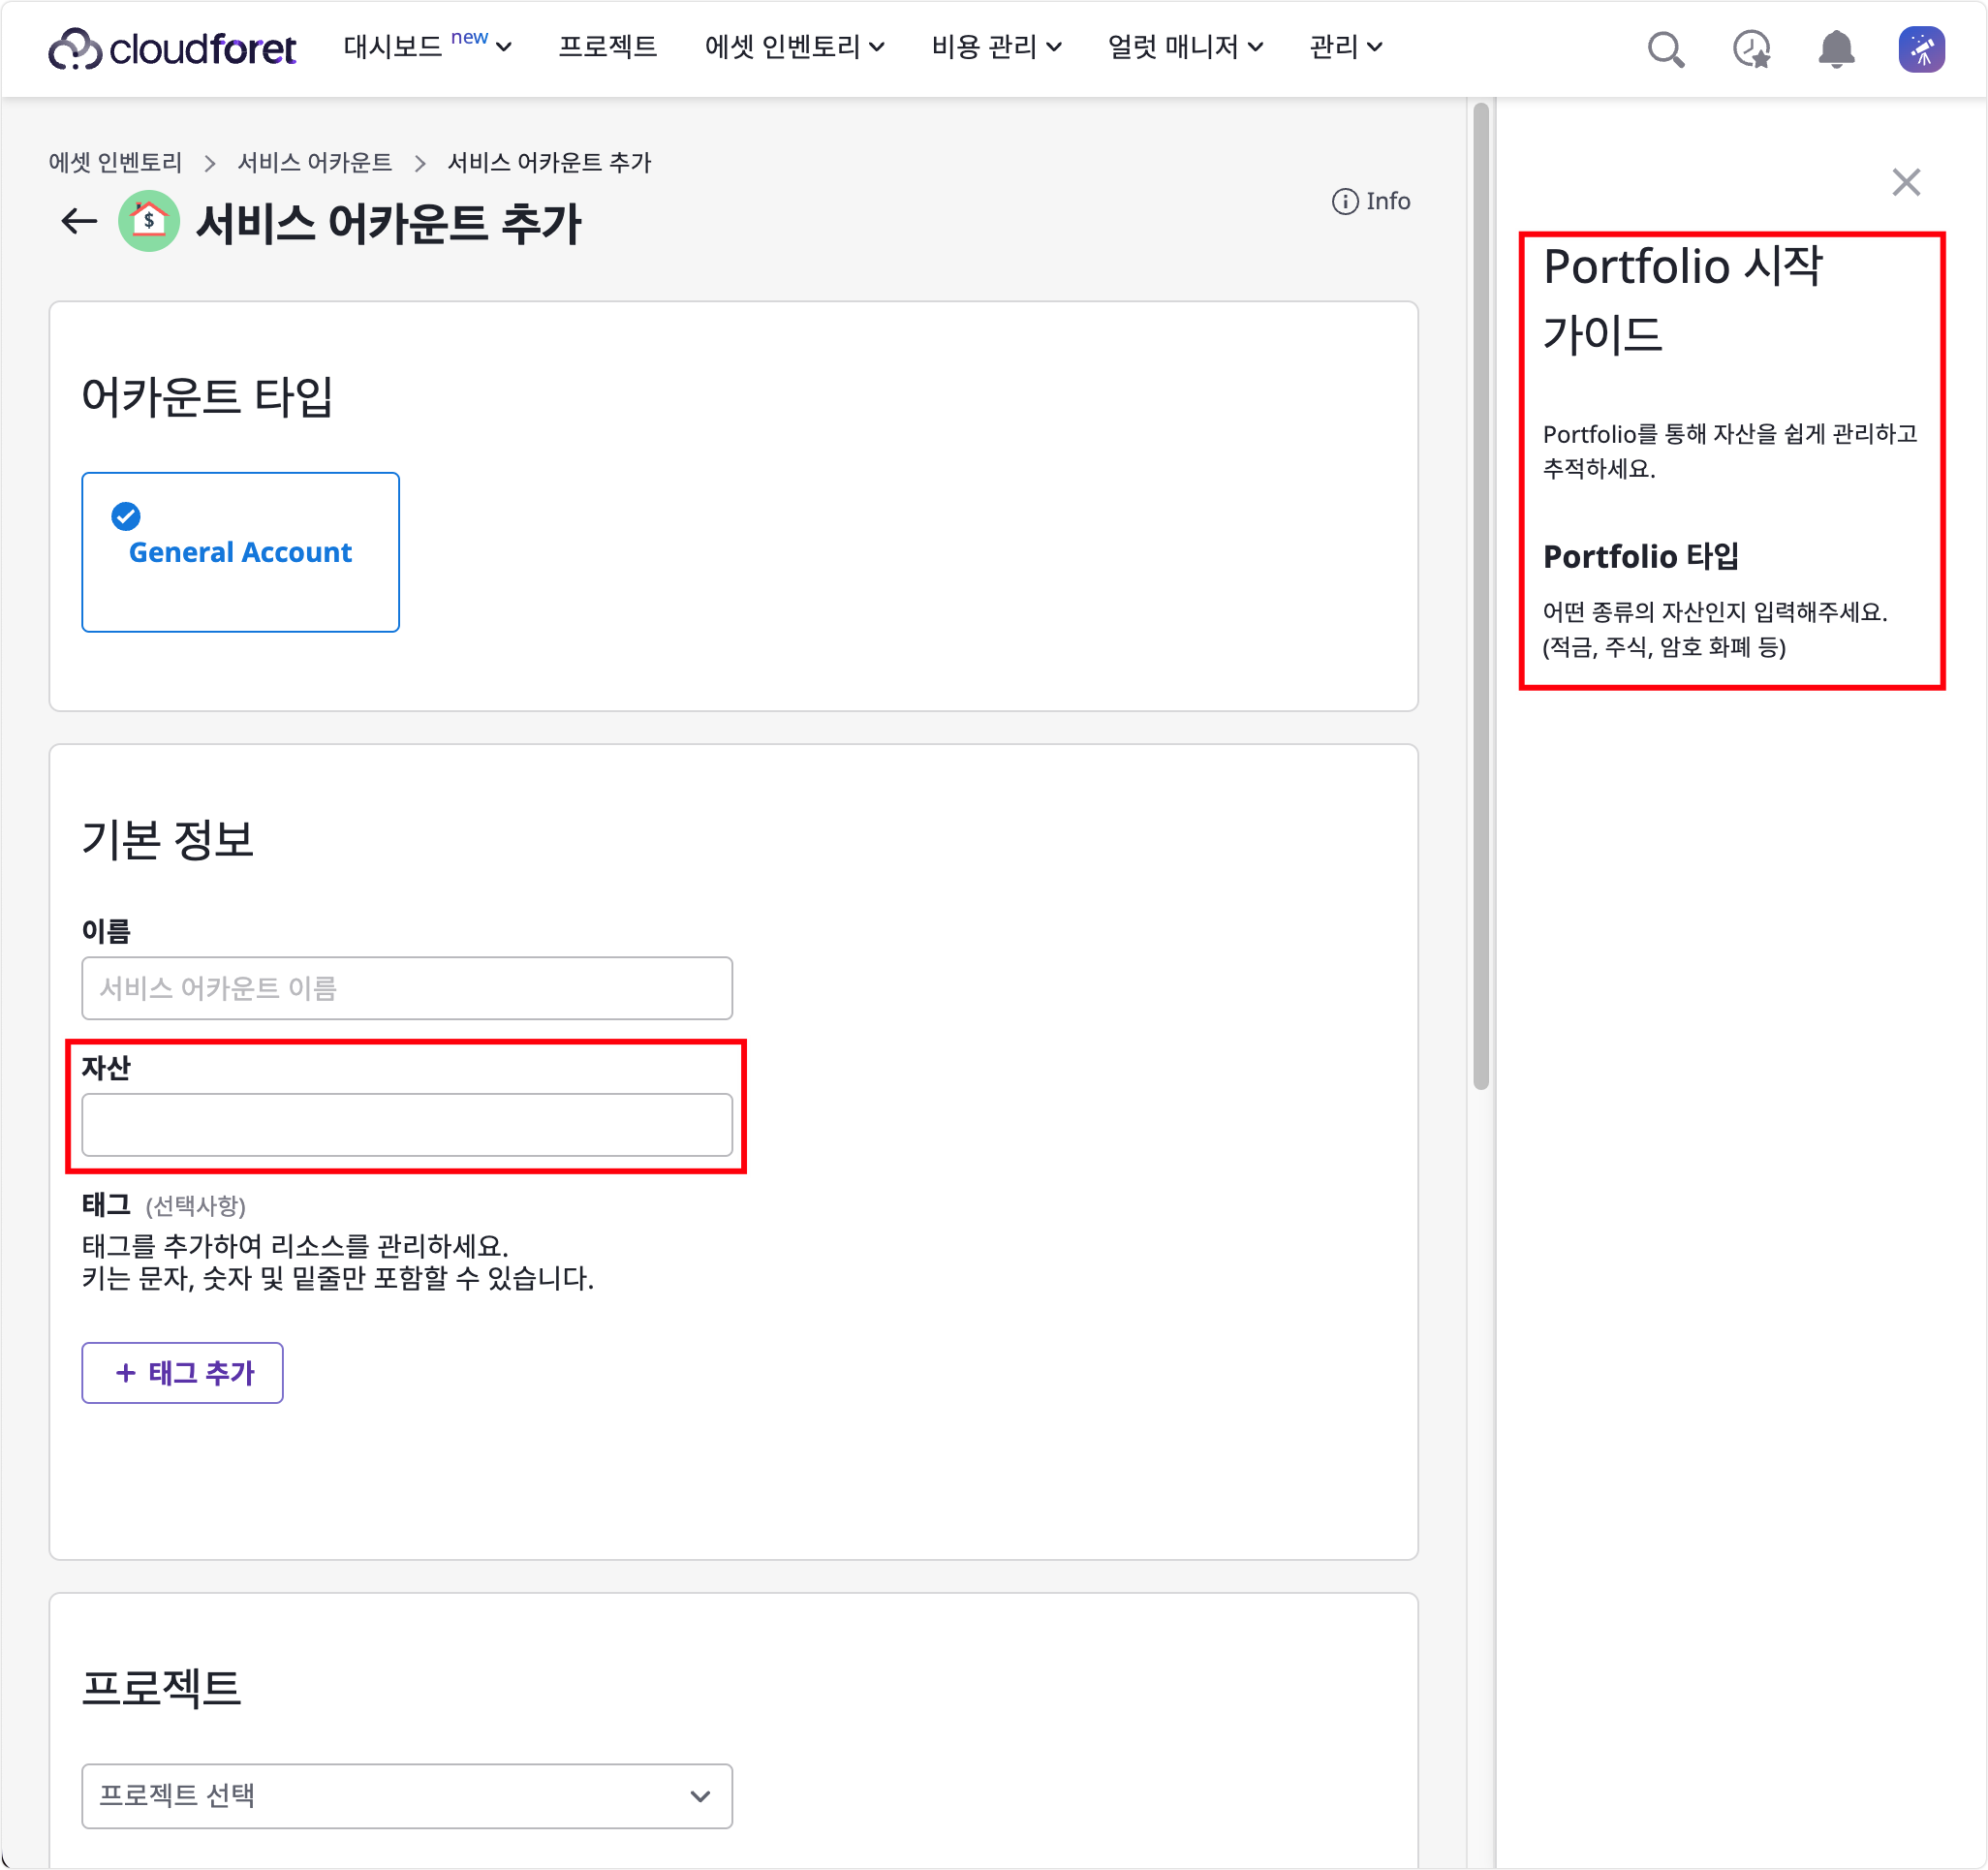
예제에서 개발한 암호 화폐 서비스 어카운트를 추가합니다. YAML 스펙에 작성한 대로 이름과 자산을 입력합니다. 그 외 나머지 정보들도 입력합니다.
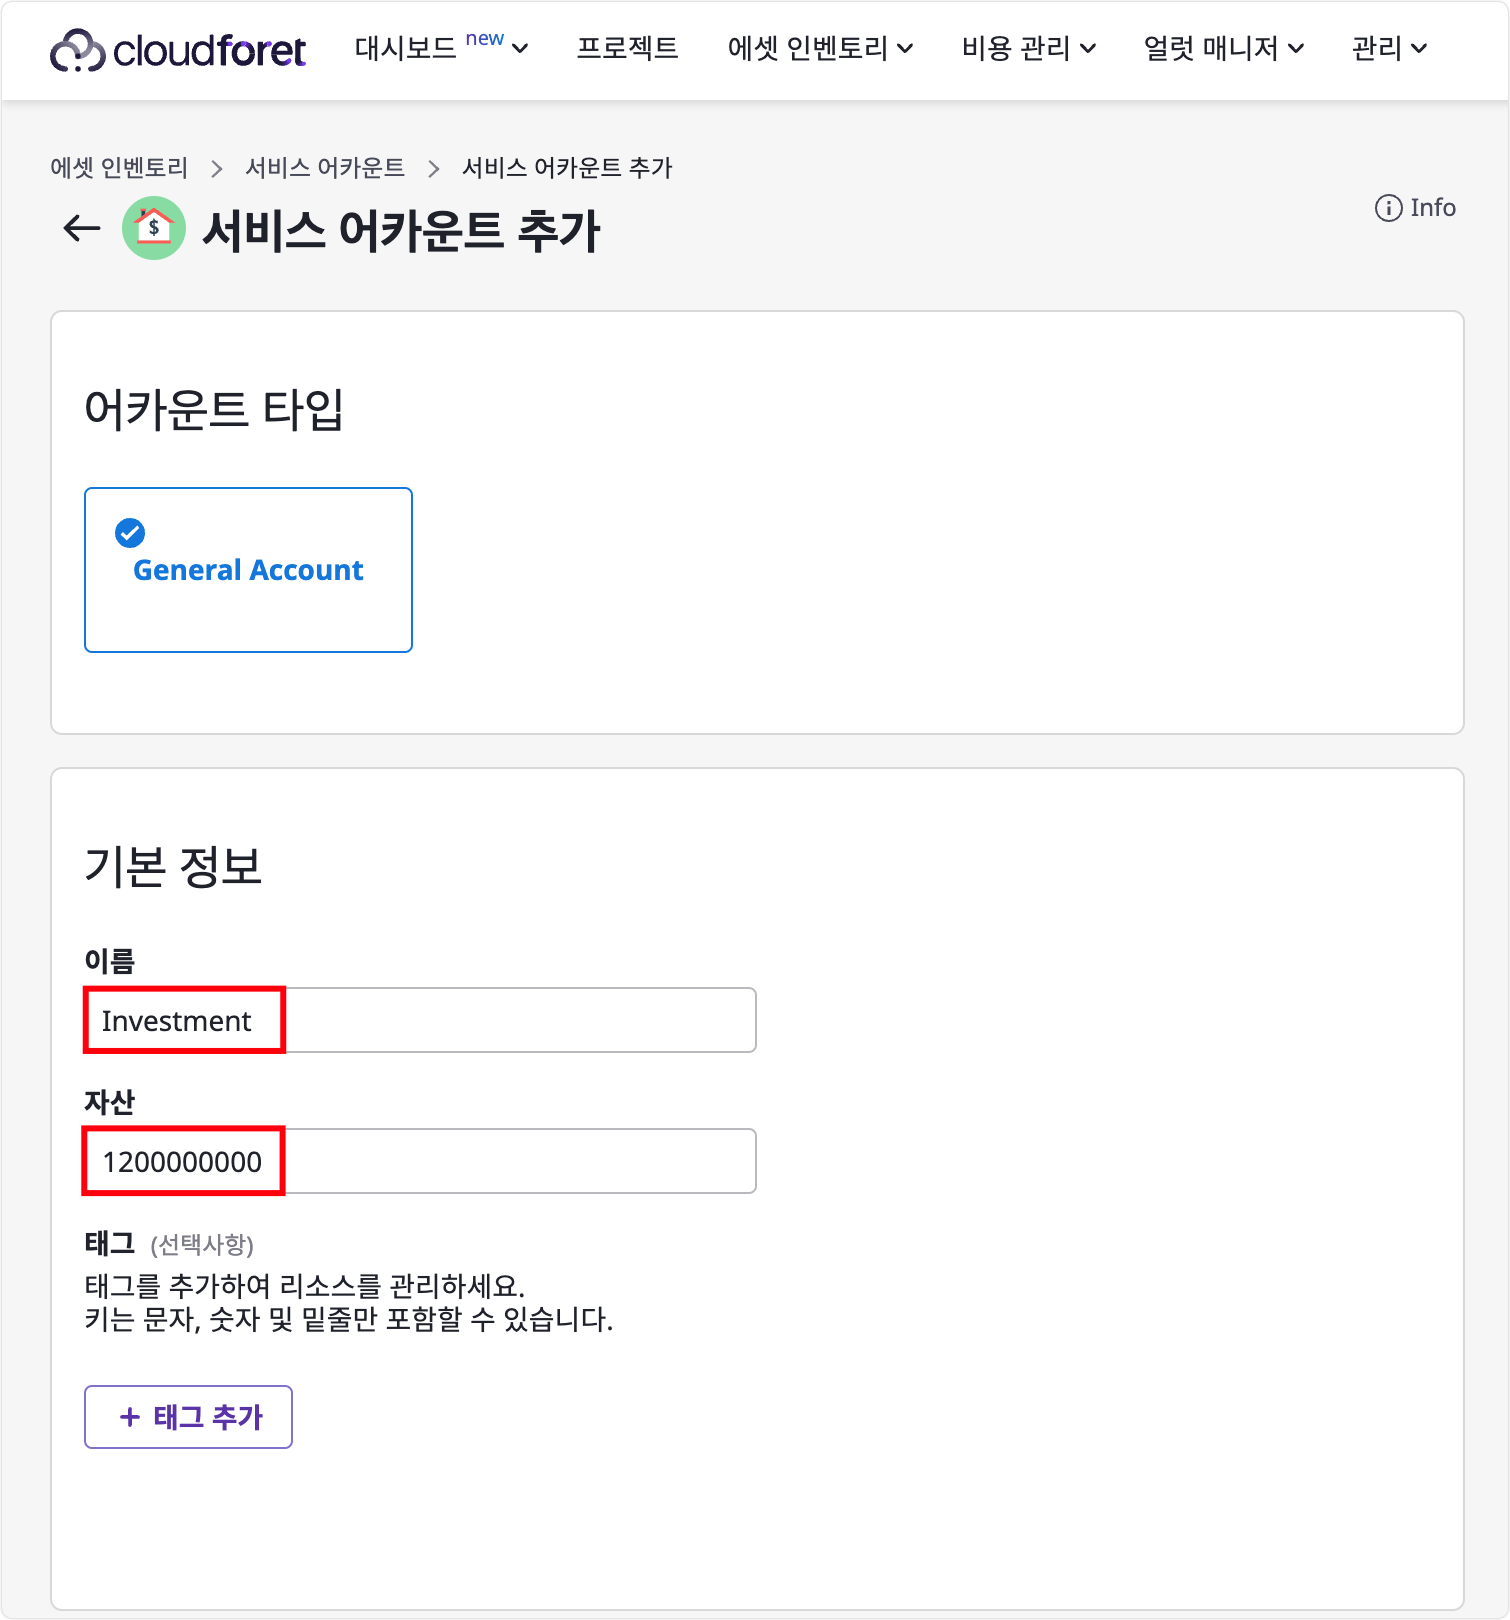
- 이름(name)의 경우 기본적으로 들어가는 값입니다.
- 자산의 경우
create_provider.yaml에서template > service_account > schema > properties > amount에서 정의했던 값입니다.
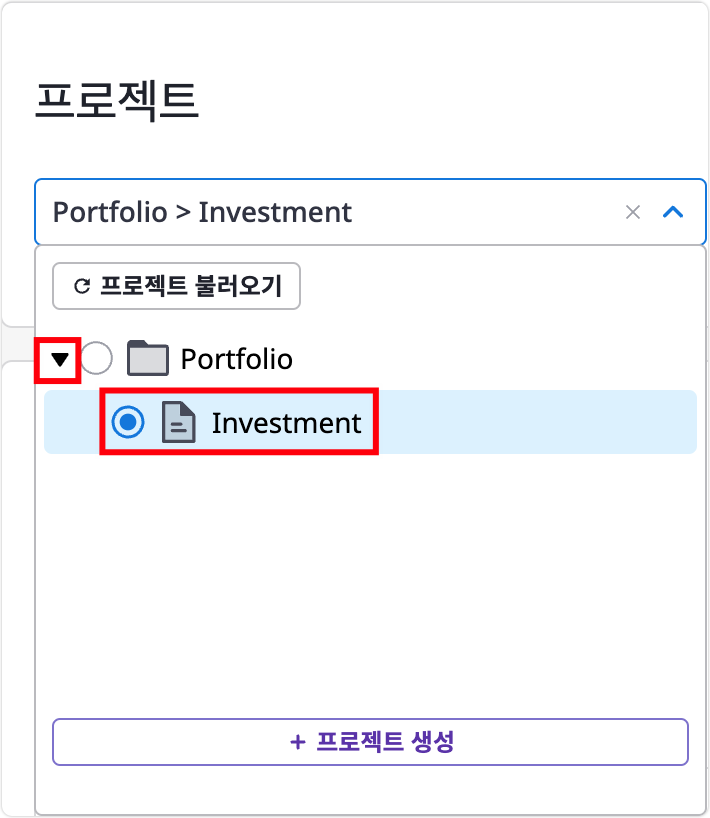
- 프로젝트에는 프로젝트 생성에서 생성한 Portfolio 프로젝트 그룹의 Investment 프로젝트를 선택합니다.
Investment Type의 경우 Schema 생성에서
create_schema.yaml스펙에 정의한schema > properties > investment_type의 값이 들어가게 됩니다. * [추가]* 버튼을 클릭합니다.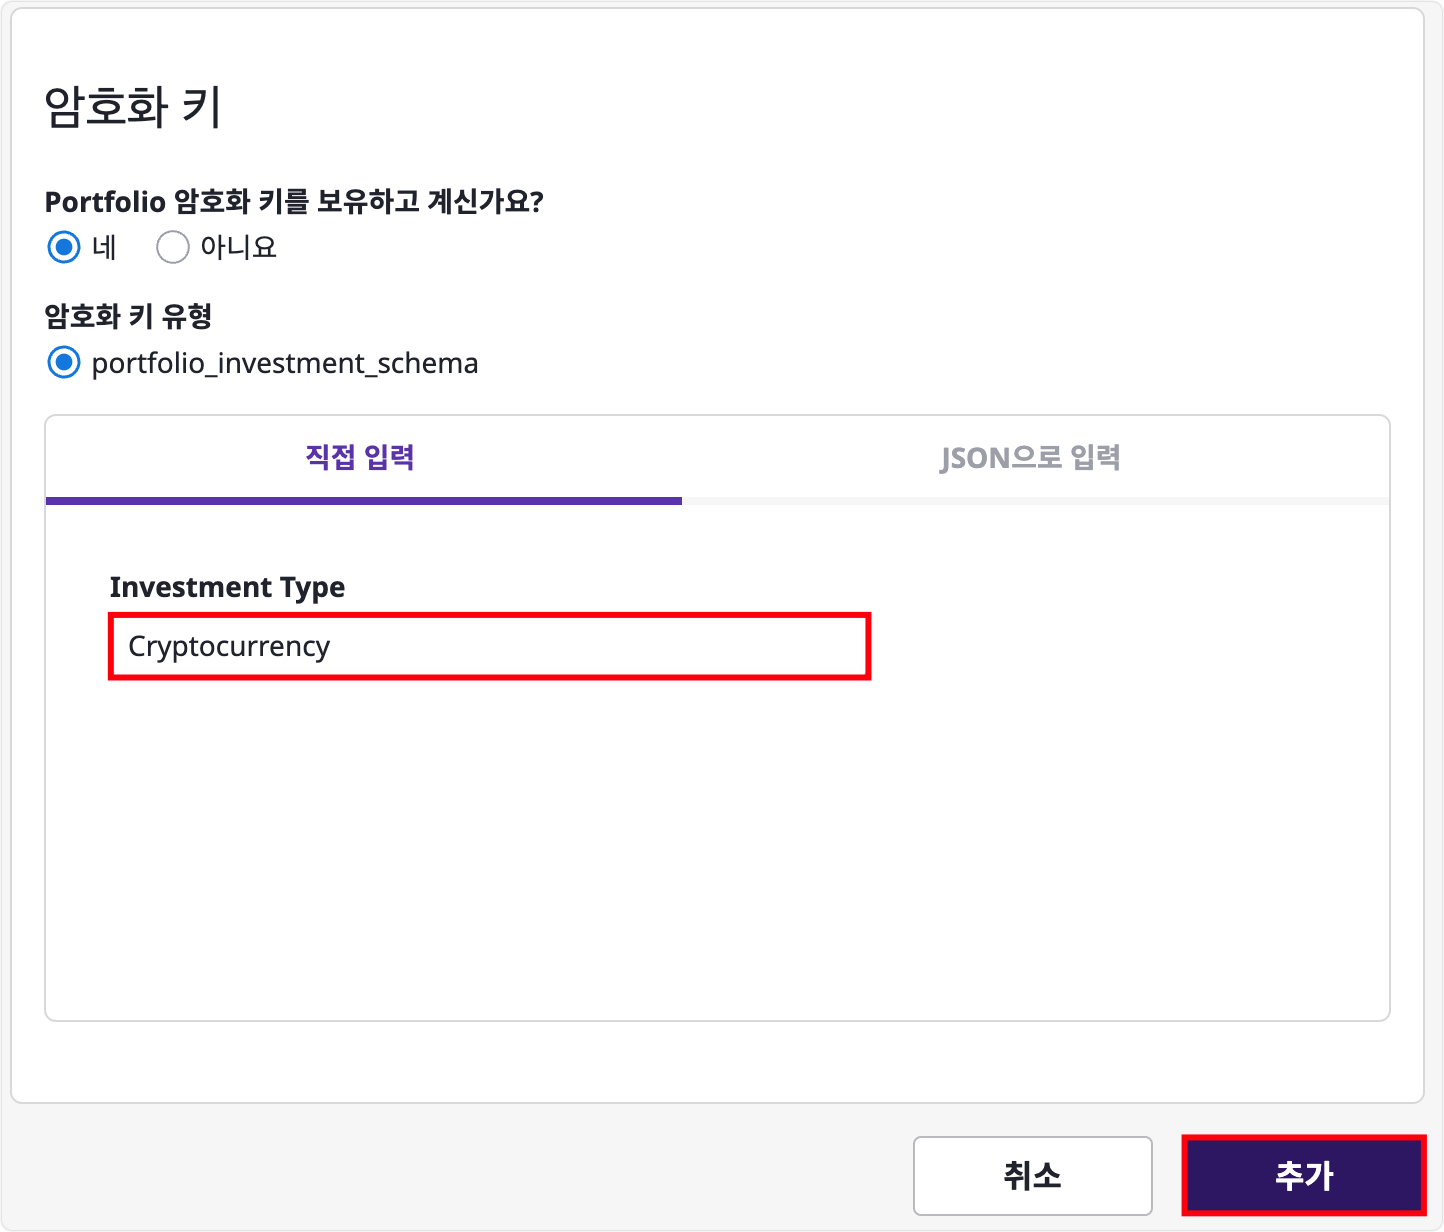
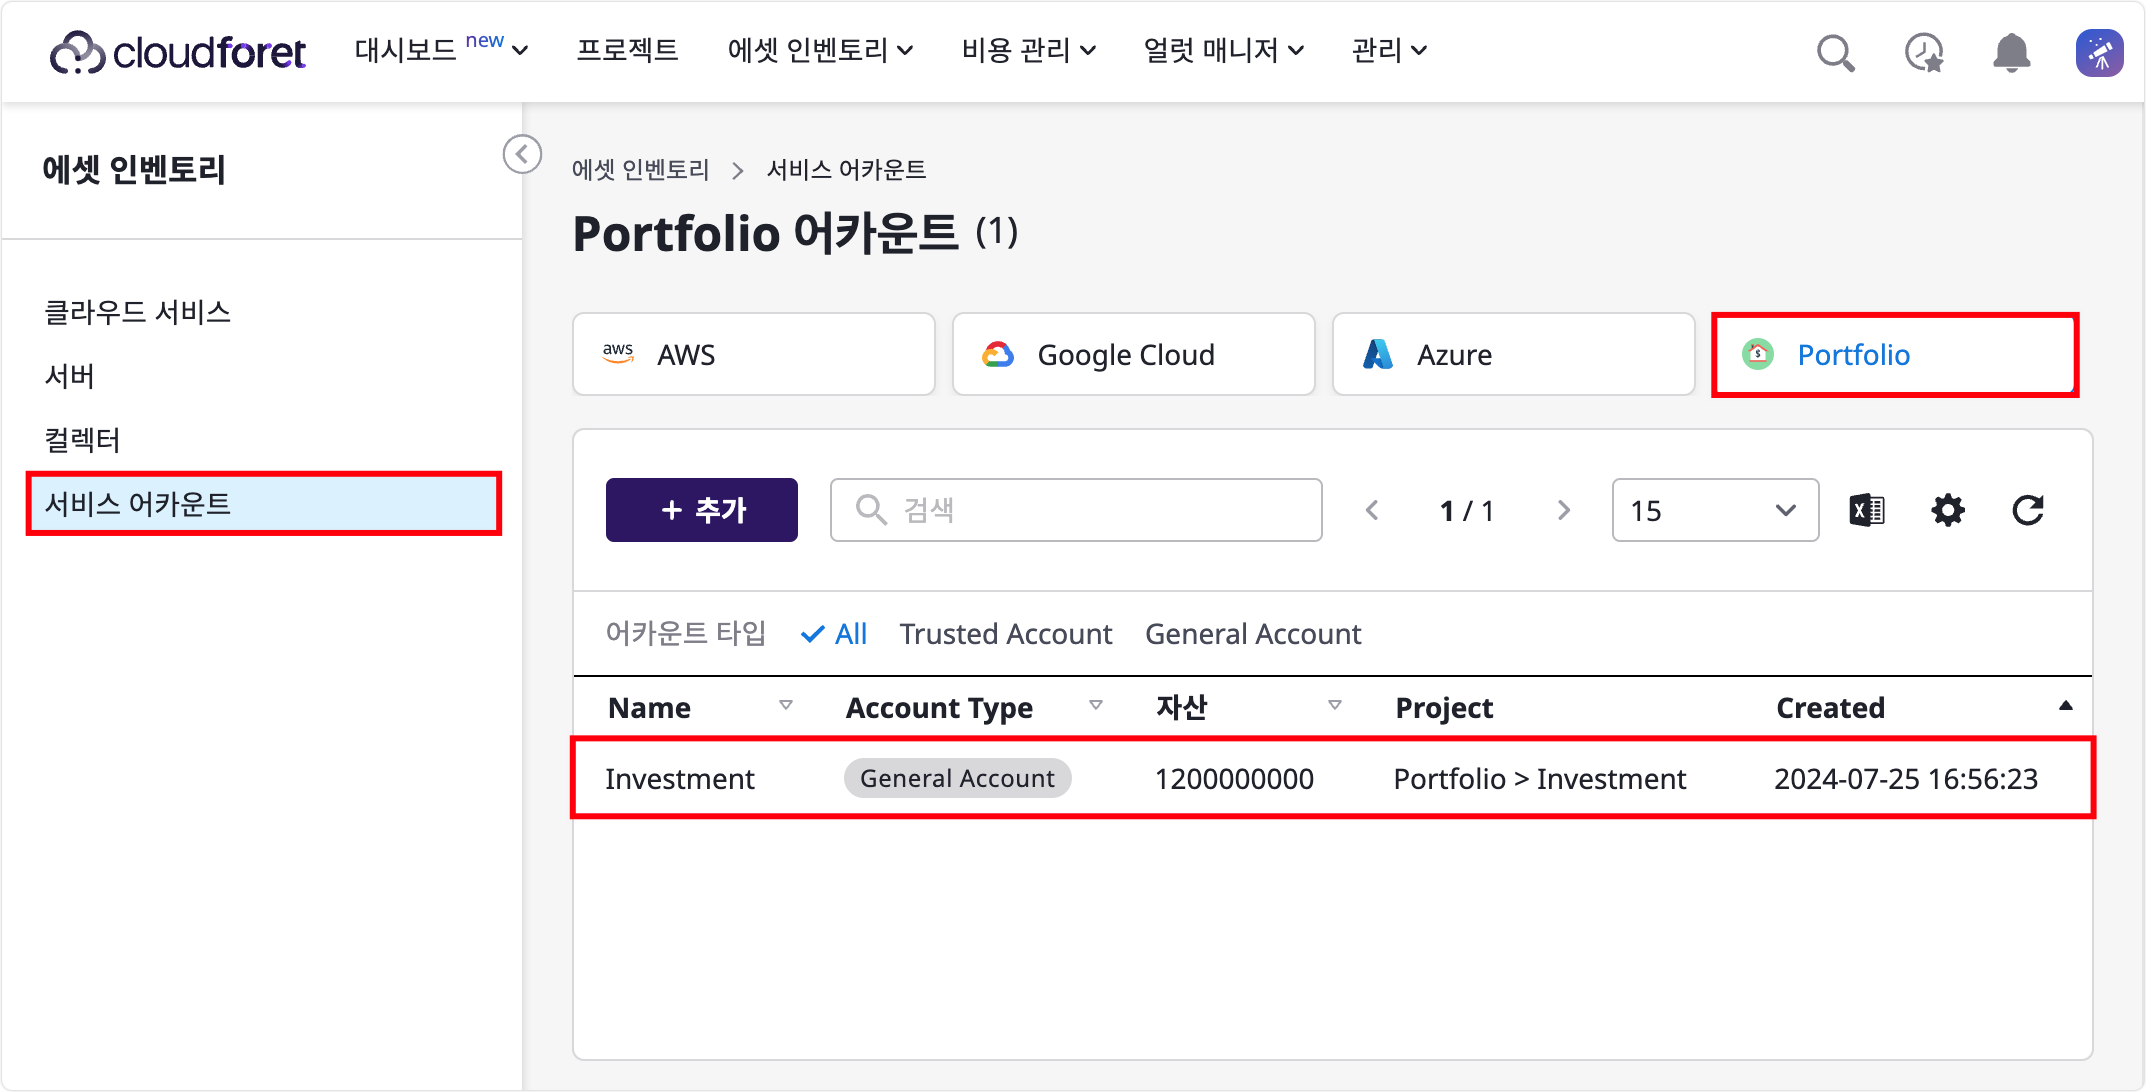
‘Investment’라는 서비스 어카운트가 제대로 생성되었습니다.
6. Plugin 등록
Inventory 플러그인을 등록하면 해당 플러그인을 이용하여 수집한 데이터를 SpaceONE에서 확인할 수 있습니다. 이때, Collector라는 리소스를 이용합니다.
1) Collector 리소스 조회
현재는 Local Repository의 Provider에 등록된 컬렉터(Collector)가 존재하지 않으므로 NO DATA인 것을 알 수 있습니다.
NO DATA1-1) 콘솔 UI로 확인해봐도 아래와 같이 어떤 컬렉터도 존재하지 않는 것을 확인할 수 있습니다.
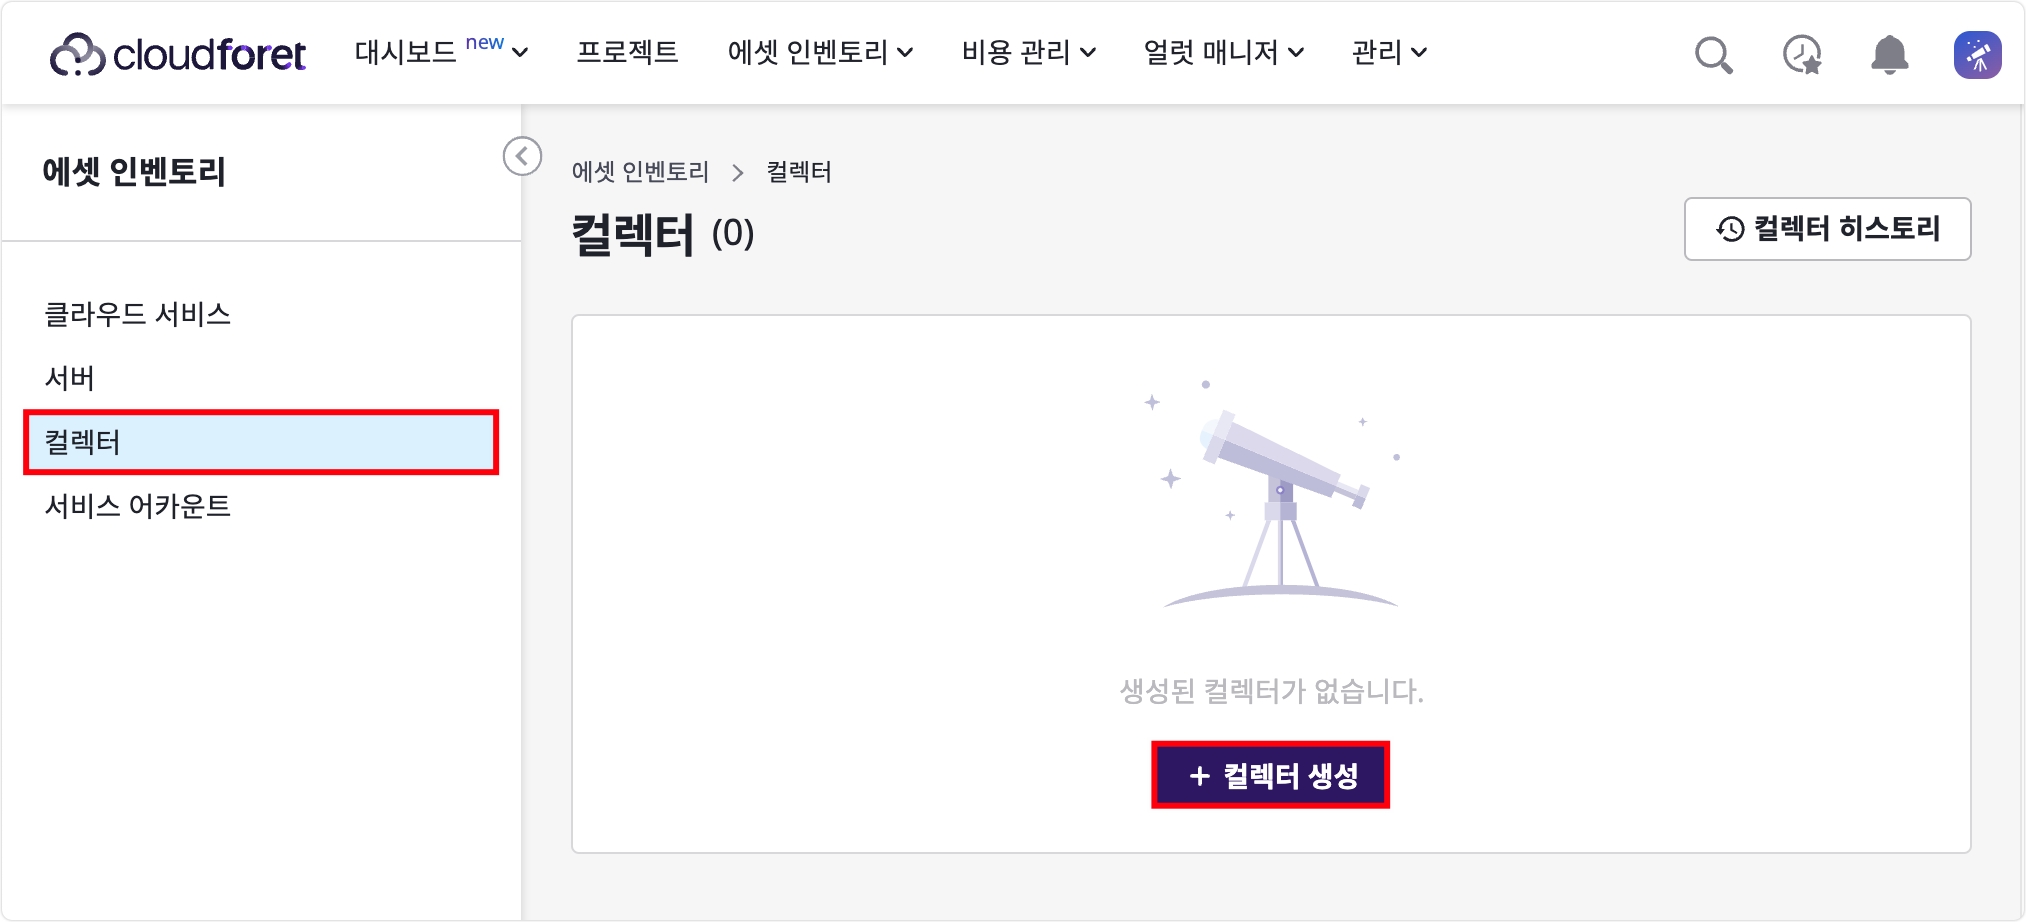
1-2) 컬렉터 생성을 클릭해보면, 기본적으로 Managed Repository에서 제공하는 컬렉터 말고는 Local Repository에 등록한 ‘Investment’ 라는 프로바이더에는 어떤 컬렉터도 존재하지 않는 것을 볼 수 있습니다.
2) setup.py 작성
2-1) VERSION 파일을 생성합니다.
2-2) 플러그인 실행을 위한 파이썬 패키지 목록을 작성합니다.
spaceone-api
pre-commit
pycoingecko
grpcio
2-3) setup.py 파일을 작성합니다.
#
#   Copyright 2020 The SpaceONE Authors.
#
#   Licensed under the Apache License, Version 2.0 (the "License");
#   you may not use this file except in compliance with the License.
#   You may obtain a copy of the License at
#
#       http://www.apache.org/licenses/LICENSE-2.0
#
#   Unless required by applicable law or agreed to in writing, software
#   distributed under the License is distributed on an "AS IS" BASIS,
#   WITHOUT WARRANTIES OR CONDITIONS OF ANY KIND, either express or implied.
#   See the License for the specific language governing permissions and
#   limitations under the License.


from setuptools import find_packages, setup

with open("VERSION", "r") as f:
    VERSION = f.read().strip()
    f.close()

setup(
    name="plugin-portfolio-inven-collector",
    version=VERSION,
    description="SpaceONE Portfolio Inventory Collector Plugin",
    long_description="",
    url="https://www.spaceone.dev/",
    author="MEGAZONE SpaceONE Team",
    author_email="admin@spaceone.dev",
    license="Apache License 2.0",
    packages=find_packages(),
    install_requires=[
        "spaceone-api",
        "pycoingecko",
    ],
    package_data={
        "plugin": ["metadata/**/*.yaml"],
    },
    zip_safe=False,
)
3) Dockerfile 작성 및 이미지 빌드
먼저 플러그인을 등록하려면 Dockerfile을 이용하여 이미지를 빌드해야 합니다.
3-1) Dockerfile을 작성합니다.
FROM cloudforet/python-core:2.0

ENV PYTHONUNBUFFERED 1
ENV SPACEONE_PORT 50051
ENV SERVER_TYPE grpc
ENV PKG_DIR /tmp/pkg
ENV SRC_DIR /tmp/src

RUN apt update && apt upgrade -y

COPY pkg/*.txt ${PKG_DIR}/

RUN pip install --upgrade pip && \
    pip install --upgrade -r ${PKG_DIR}/pip_requirements.txt && \
    pip install --upgrade --pre spaceone-inventory

COPY src ${SRC_DIR}
WORKDIR ${SRC_DIR}
RUN python3 setup.py install && rm -rf /tmp/*

EXPOSE ${SPACEONE_PORT}

ENTRYPOINT ["spaceone"]
CMD ["run", "plugin-server", "plugin"]
3-2) 이미지를 빌드합니다. quasarhub 에는 본인의 Docker Hub ID를 입력합니다.
3-3) 도커 이미지를 조회하여 제대로 빌드된 것을 볼 수 있습니다.
REPOSITORY                                                       TAG       IMAGE ID       CREATED         SIZE
quasarhub/plugin-portfolio-inven-collector                           0.0.1     4a0d97d31d80   1 minutes ago   956MB
3-4) docker run명령을 입력했을 때 아래와 같이 출력되면 정상적으로 동작하는 것입니다.
...

2024-07-25T17:31:01.154Z [DEBUG]       (server.py:69) Loaded Services:
	 - spaceone.api.inventory.plugin.Collector
	 - spaceone.api.inventory.plugin.Job
	 - grpc.health.v1.Health
	 - spaceone.api.core.v1.ServerInfo
2024-07-25T17:31:01.155Z [INFO]       (server.py:73) Start gRPC Server (plugin): port=50051, max_workers=100
3-5) 가이드대로 진행하였다면 최종적인 디렉터리 구조는 다음과 같습니다.
- pip_requirements.txt
- setup.py
- VERSION
- __init__.py
- cryptocurrency_connector.py
- __init__.py
- cryptocurrency_manager.py
- __init__.py
- main.py
- Dockerfile
4) Docker Hub Registry에 이미지 올리기
4-1) 도커 로그인을 위한 본인의 Username과 Password를 입력합니다.
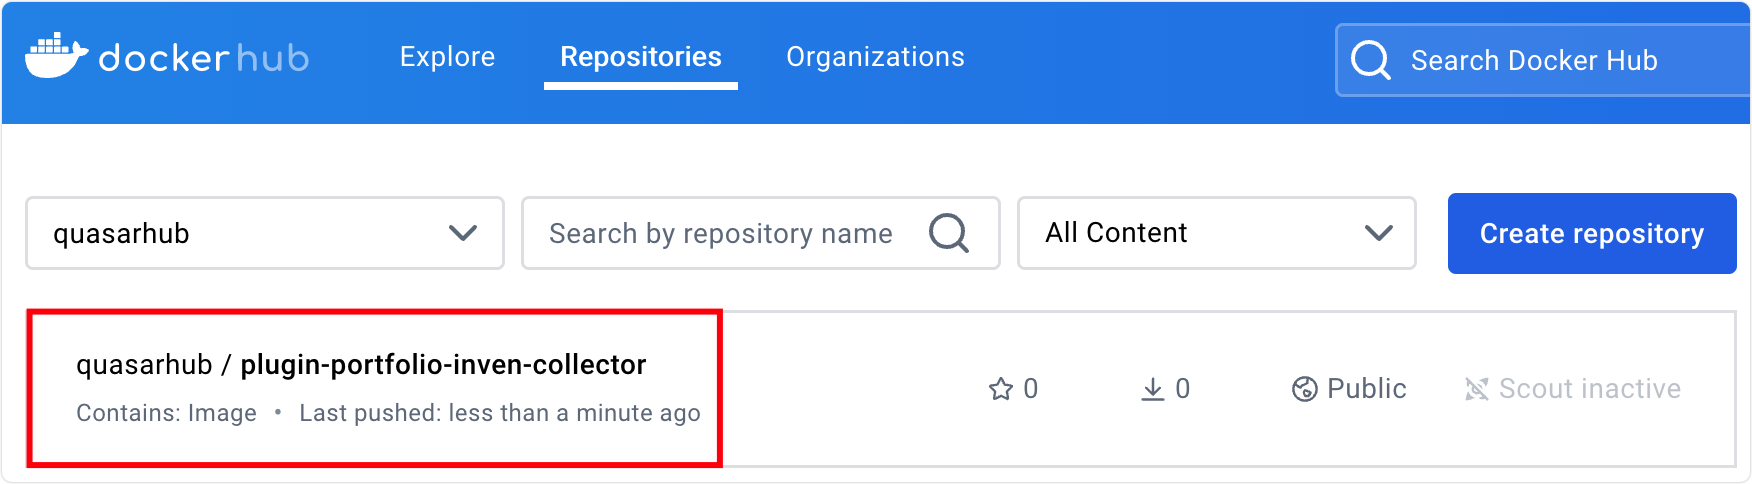
4-2) 이미지를 Push 하면, Docker Hub에 정상적으로 이미지가 업로드된 것을 확인할 수 있습니다.
5) 등록된 플러그인 조회
현재 기본적으로 등록된 플러그인 조회해보면 아래와 같이 나옵니다. 모두 SpaceONE에서 기본적으로 제공하는 플러그인들입니다. 이제 예제에서 만든 플러그인을 등록합니다.
 plugin_id                                | name                                      | image                                               | state   | service_type             | registry_type   | provider
------------------------------------------+-------------------------------------------+-----------------------------------------------------+---------+--------------------------+-----------------+--------------
 plugin-api-direct-mon-webhook            | API Direct                                | spaceone/plugin-api-direct-mon-webhook              | ENABLED | monitoring.Webhook       | DOCKER_HUB      |
 plugin-aws-cloud-service-inven-collector | AWS Cloud Service Collector               | spaceone/plugin-aws-cloud-service-inven-collector   | ENABLED | inventory.Collector      | DOCKER_HUB      | aws
 plugin-aws-cloudtrail-mon-datasource     | AWS CloudTail Log DataSource              | spaceone/plugin-aws-cloudtrail-mon-datasource       | ENABLED | monitoring.DataSource    | DOCKER_HUB      | aws
 plugin-aws-cloudwatch-mon-datasource     | AWS CloudWatch Metric DataSource          | spaceone/plugin-aws-cloudwatch-mon-datasource       | ENABLED | monitoring.DataSource    | DOCKER_HUB      | aws
 plugin-aws-cost-explorer-cost-datasource | AWS Cost Explorer Data Source             | spaceone/plugin-aws-cost-explorer-cost-datasource   | ENABLED | cost_analysis.DataSource | DOCKER_HUB      | aws
 plugin-aws-ec2-inven-collector           | AWS EC2 Collector                         | spaceone/plugin-aws-ec2-inven-collector             | ENABLED | inventory.Collector      | DOCKER_HUB      | aws
 plugin-aws-phd-inven-collector           | AWS Personal Health Dashboard Collector   | spaceone/plugin-aws-phd-inven-collector             | ENABLED | inventory.Collector      | DOCKER_HUB      | aws
 plugin-aws-sns-monitoring-webhook        | AWS SNS                                   | spaceone/plugin-aws-sns-mon-webhook                 | ENABLED | monitoring.Webhook       | DOCKER_HUB      | aws
 plugin-aws-ta-inven-collector            | AWS Trusted Advisor Collector             | spaceone/plugin-aws-trusted-advisor-inven-collector | ENABLED | inventory.Collector      | DOCKER_HUB      | aws
 plugin-azure-activity-log-mon-datasource | Azure Activity Log DataSource             | spaceone/plugin-azure-activity-log-mon-datasource   | ENABLED | monitoring.DataSource    | DOCKER_HUB      | azure
 plugin-azure-cost-mgmt-cost-datasource   | Azure Cost Management Data Source         | spaceone/plugin-azure-cost-mgmt-cost-datasource     | ENABLED | cost_analysis.DataSource | DOCKER_HUB      | azure
 plugin-azure-inven-collector             | Azure Collector                           | spaceone/plugin-azure-inven-collector               | ENABLED | inventory.Collector      | DOCKER_HUB      | azure
 plugin-azure-monitor-mon-datasource      | Azure Monitoring Metric DataSource        | spaceone/plugin-azure-monitor-mon-datasource        | ENABLED | monitoring.DataSource    | DOCKER_HUB      | azure
 plugin-email-noti-protocol               | Email Notification Protocol               | spaceone/plugin-email-noti-protocol                 | ENABLED | notification.Protocol    | DOCKER_HUB      | email
 plugin-google-cloud-inven-collector      | Google Cloud Collector                    | spaceone/plugin-google-cloud-inven-collector        | ENABLED | inventory.Collector      | DOCKER_HUB      | google_cloud
 plugin-google-cloud-log-mon-datasource   | Google Cloud Log DataSource               | spaceone/plugin-google-cloud-log-mon-datasource     | ENABLED | monitoring.DataSource    | DOCKER_HUB      | google_cloud
 plugin-google-monitoring-mon-webhook     | Google Cloud Monitoring                   | spaceone/plugin-google-monitoring-mon-webhook       | ENABLED | monitoring.Webhook       | DOCKER_HUB      | google_cloud
 plugin-google-stackdriver-mon-datasource | Google Cloud Monitoring Metric DataSource | spaceone/plugin-google-stackdriver-mon-datasource   | ENABLED | monitoring.DataSource    | DOCKER_HUB      | google_cloud
 plugin-grafana-mon-webhook               | Grafana                                   | spaceone/plugin-grafana-mon-webhook                 | ENABLED | monitoring.Webhook       | DOCKER_HUB      |
 plugin-keycloak-identity-auth            | Keycloak OIDC                             | spaceone/plugin-keycloak-identity-auth              | ENABLED | identity.Domain          | DOCKER_HUB      |
 plugin-ms-teams-noti-protocol            | MS Teams Notification Protocol            | spaceone/plugin-ms-teams-noti-protocol              | ENABLED | notification.Protocol    | DOCKER_HUB      | microsoft
 plugin-prometheus-mon-webhook            | Prometheus                                | spaceone/plugin-prometheus-mon-webhook              | ENABLED | monitoring.Webhook       | DOCKER_HUB      |
 plugin-slack-noti-protocol               | Slack Notification Protocol               | spaceone/plugin-slack-noti-protocol                 | ENABLED | notification.Protocol    | DOCKER_HUB      | slack
 plugin-telegram-noti-protocol            | Telegram Notification Protocol            | spaceone/plugin-telegram-noti-protocol              | ENABLED | notification.Protocol    | DOCKER_HUB      | telegram

 Count: 24 / 24
6) 플러그인 등록
5-1) 플러그인 등록을 위한 YAML 파일을 작성합니다.
---
name: Portfolio Collector
provider: portfolio
service_type: inventory.Collector
registry_config: { }
registry_type: DOCKER_HUB
image: quasarhub/plugin-portfolio-inven-collector
capability:
  supported_schema:
    - portfolio_investment_schema
tags:
  description: Diversify and optimize your financial future with our comprehensive asset portfolio management.
  icon: https://visualpharm.com/assets/401/Rebalance%20Portfolio-595b40b75ba036ed117d88fd.svg
  long_description: This powerful plugin allows you to track and analyze various types of assets, including stocks, bonds, real estate, cryptocurrencies, and more.
labels:
  - Portfolio
  - Investment
template: { }플러그인 등록 결과는 다음과 같습니다.
---
capability:
  supported_schema:
    - portfolio_investment_schema
created_at: '2024-07-25T17:35:41.612Z'
domain_id: domain-9998b2bc254d
image: quasarhub/plugin-portfolio-inven-collector
labels:
  - Portfolio
  - Investment
name: Portfolio Collector
plugin_id: plugin-portfolio-inven-collector
provider: portfolio
registry_config: { }
registry_type: DOCKER_HUB
registry_url: registry.hub.docker.com
repository_info:
  name: Local Repository
  repository_id: repo-16a1409f9992
  repository_type: local
service_type: inventory.Collector
state: ENABLED
tags:
  description: Diversify and optimize your financial future with our comprehensive
    asset portfolio management.
  icon: https://visualpharm.com/assets/401/Rebalance%20Portfolio-595b40b75ba036ed117d88fd.svg
  long_description: This powerful plugin allows you to track and analyze various types
    of assets, including stocks, bonds, real estate, cryptocurrencies, and more.
template: { }
updated_at: '2024-07-25T17:35:41.612Z'
5-3) 플러그인 등록 여부를 확인하기 위해서 아래 명령어를 사용합니다. plugin-portfolio-inven-collector 플러그인이 등록된 것을 확인할 수 있습니다.
plugin_id | name | image | state | service_type | registry_type | provider
------------------------------------------+-------------------------------------------+-----------------------------------------------------+---------+--------------------------+-----------------+--------------
plugin-api-direct-mon-webhook | API Direct | spaceone/plugin-api-direct-mon-webhook | ENABLED | monitoring.Webhook | DOCKER_HUB |
plugin-aws-cloud-service-inven-collector | AWS Cloud Service Collector | spaceone/plugin-aws-cloud-service-inven-collector | ENABLED | inventory.Collector | DOCKER_HUB | aws
plugin-aws-cloudtrail-mon-datasource | AWS CloudTail Log DataSource | spaceone/plugin-aws-cloudtrail-mon-datasource | ENABLED | monitoring.DataSource | DOCKER_HUB | aws
plugin-aws-cloudwatch-mon-datasource | AWS CloudWatch Metric DataSource | spaceone/plugin-aws-cloudwatch-mon-datasource | ENABLED | monitoring.DataSource | DOCKER_HUB | aws
plugin-aws-cost-explorer-cost-datasource | AWS Cost Explorer Data Source | spaceone/plugin-aws-cost-explorer-cost-datasource | ENABLED | cost_analysis.DataSource | DOCKER_HUB | aws
plugin-aws-ec2-inven-collector | AWS EC2 Collector | spaceone/plugin-aws-ec2-inven-collector | ENABLED | inventory.Collector | DOCKER_HUB | aws
plugin-aws-phd-inven-collector | AWS Personal Health Dashboard Collector | spaceone/plugin-aws-phd-inven-collector | ENABLED | inventory.Collector | DOCKER_HUB | aws
plugin-aws-sns-monitoring-webhook | AWS SNS | spaceone/plugin-aws-sns-mon-webhook | ENABLED | monitoring.Webhook | DOCKER_HUB | aws
plugin-aws-ta-inven-collector | AWS Trusted Advisor Collector | spaceone/plugin-aws-trusted-advisor-inven-collector | ENABLED | inventory.Collector | DOCKER_HUB | aws
plugin-azure-activity-log-mon-datasource | Azure Activity Log DataSource | spaceone/plugin-azure-activity-log-mon-datasource | ENABLED | monitoring.DataSource | DOCKER_HUB | azure
plugin-azure-cost-mgmt-cost-datasource | Azure Cost Management Data Source | spaceone/plugin-azure-cost-mgmt-cost-datasource | ENABLED | cost_analysis.DataSource | DOCKER_HUB | azure
plugin-azure-inven-collector | Azure Collector | spaceone/plugin-azure-inven-collector | ENABLED | inventory.Collector | DOCKER_HUB | azure
plugin-azure-monitor-mon-datasource | Azure Monitoring Metric DataSource | spaceone/plugin-azure-monitor-mon-datasource | ENABLED | monitoring.DataSource | DOCKER_HUB | azure
plugin-email-noti-protocol | Email Notification Protocol | spaceone/plugin-email-noti-protocol | ENABLED | notification.Protocol | DOCKER_HUB | email
plugin-google-cloud-inven-collector | Google Cloud Collector | spaceone/plugin-google-cloud-inven-collector | ENABLED | inventory.Collector | DOCKER_HUB | google_cloud
plugin-google-cloud-log-mon-datasource | Google Cloud Log DataSource | spaceone/plugin-google-cloud-log-mon-datasource | ENABLED | monitoring.DataSource | DOCKER_HUB | google_cloud
plugin-google-monitoring-mon-webhook | Google Cloud Monitoring | spaceone/plugin-google-monitoring-mon-webhook | ENABLED | monitoring.Webhook | DOCKER_HUB | google_cloud
plugin-google-stackdriver-mon-datasource | Google Cloud Monitoring Metric DataSource | spaceone/plugin-google-stackdriver-mon-datasource | ENABLED | monitoring.DataSource | DOCKER_HUB | google_cloud
plugin-grafana-mon-webhook | Grafana | spaceone/plugin-grafana-mon-webhook | ENABLED | monitoring.Webhook | DOCKER_HUB |
plugin-keycloak-identity-auth | Keycloak OIDC | spaceone/plugin-keycloak-identity-auth | ENABLED | identity.Domain | DOCKER_HUB |
plugin-ms-teams-noti-protocol | MS Teams Notification Protocol | spaceone/plugin-ms-teams-noti-protocol | ENABLED | notification.Protocol | DOCKER_HUB | microsoft
plugin-prometheus-mon-webhook | Prometheus | spaceone/plugin-prometheus-mon-webhook | ENABLED | monitoring.Webhook | DOCKER_HUB |
plugin-slack-noti-protocol | Slack Notification Protocol | spaceone/plugin-slack-noti-protocol | ENABLED | notification.Protocol | DOCKER_HUB | slack
plugin-telegram-noti-protocol | Telegram Notification Protocol | spaceone/plugin-telegram-noti-protocol | ENABLED | notification.Protocol | DOCKER_HUB | telegram
plugin-portfolio-inven-collector | Portfolio Collector | quasarhub/plugin-portfolio-inven-collector | ENABLED | inventory.Collector | DOCKER_HUB | investment
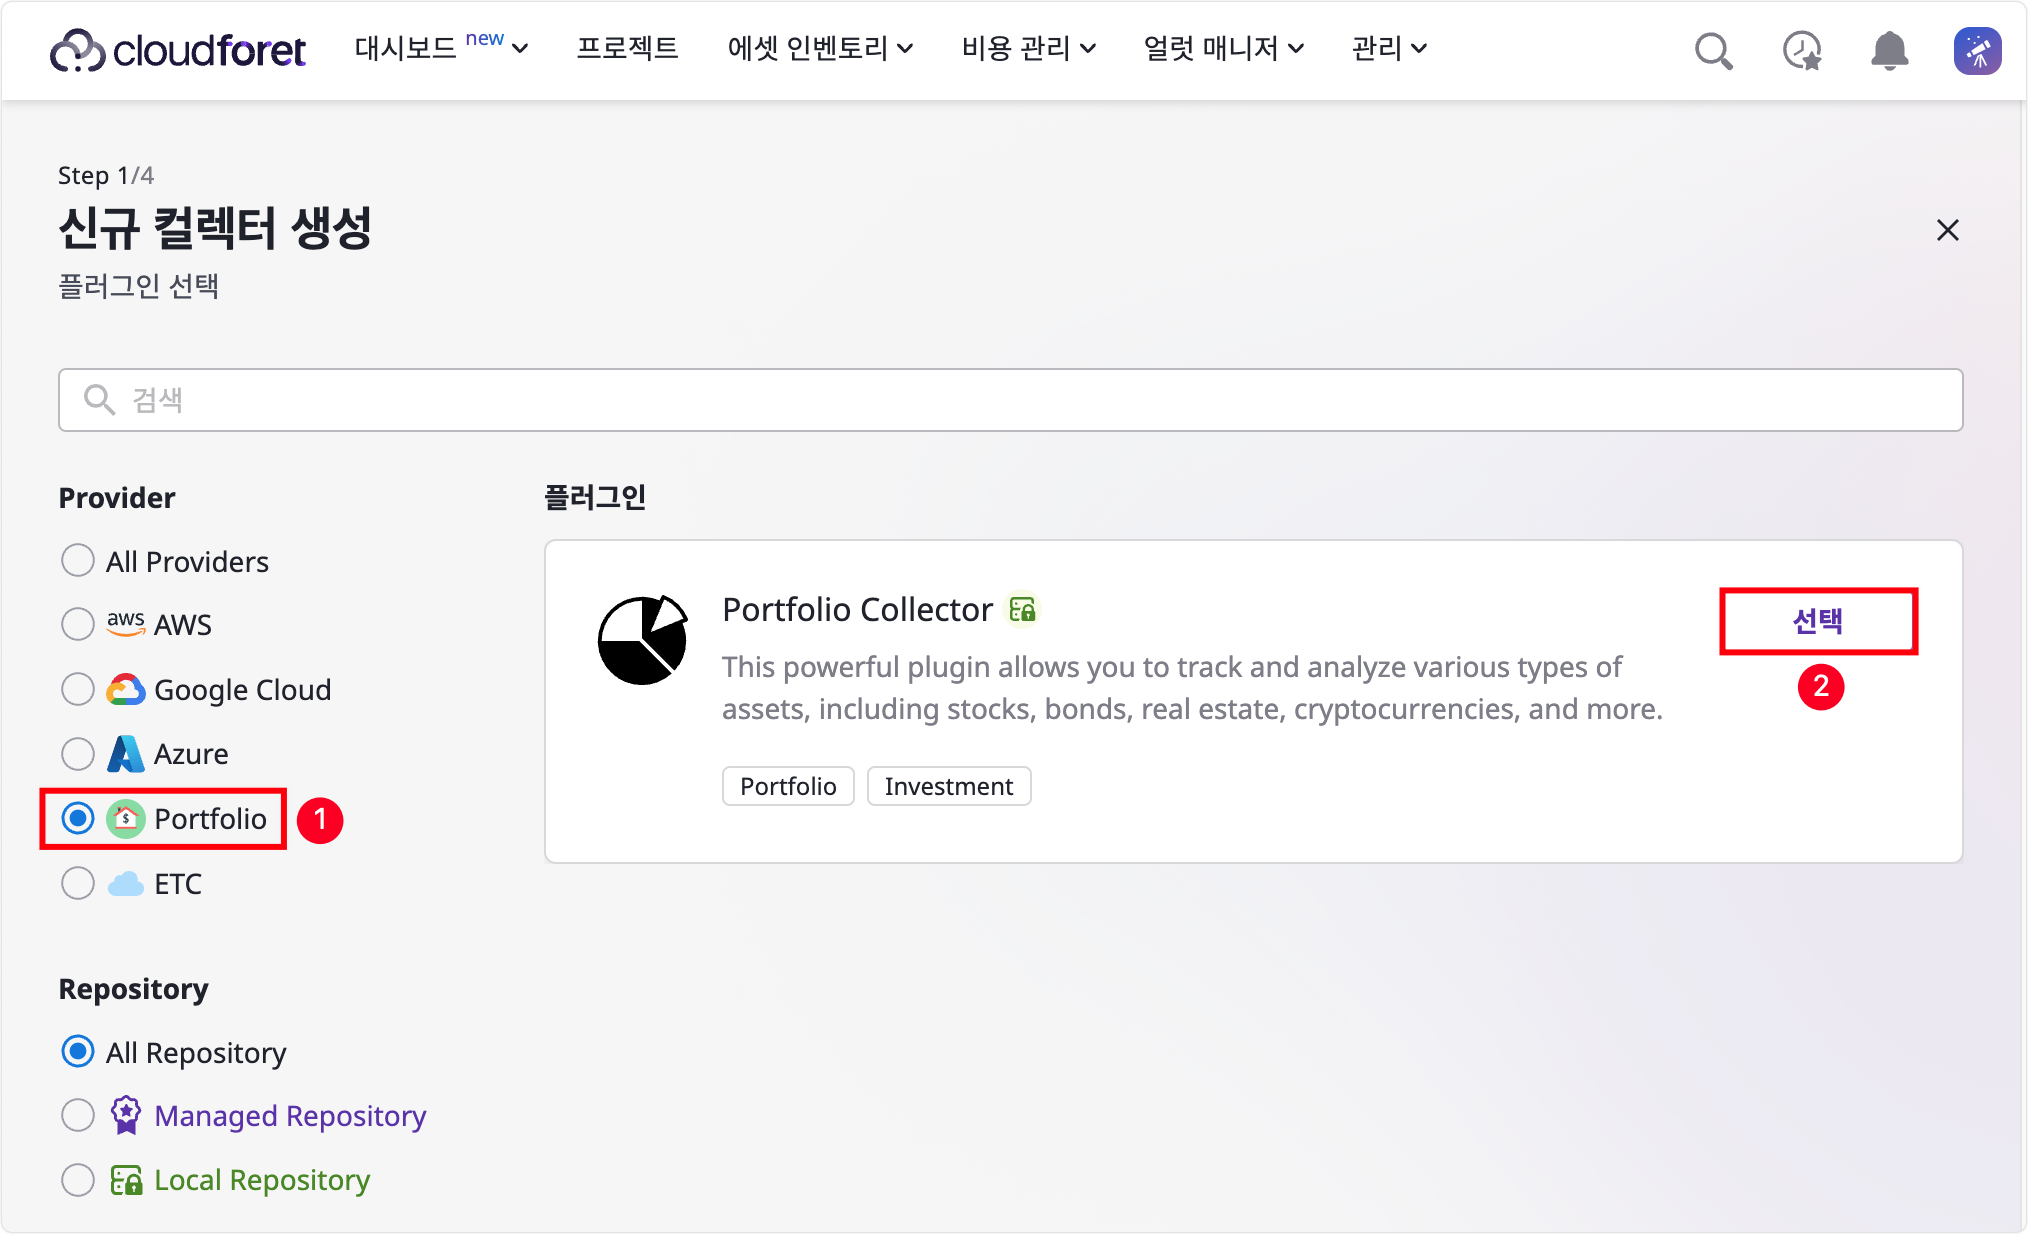
Count: 25 / 255-4) 콘솔 UI로 확인해보려면, 컬렉터 > 컬렉터 생성을 클릭합니다.
5-5) 플러그인 등록시 입력하였던 Portfolio Collector가 정상적으로 등록되었습니다. [선택] 버튼을 클릭합니다.
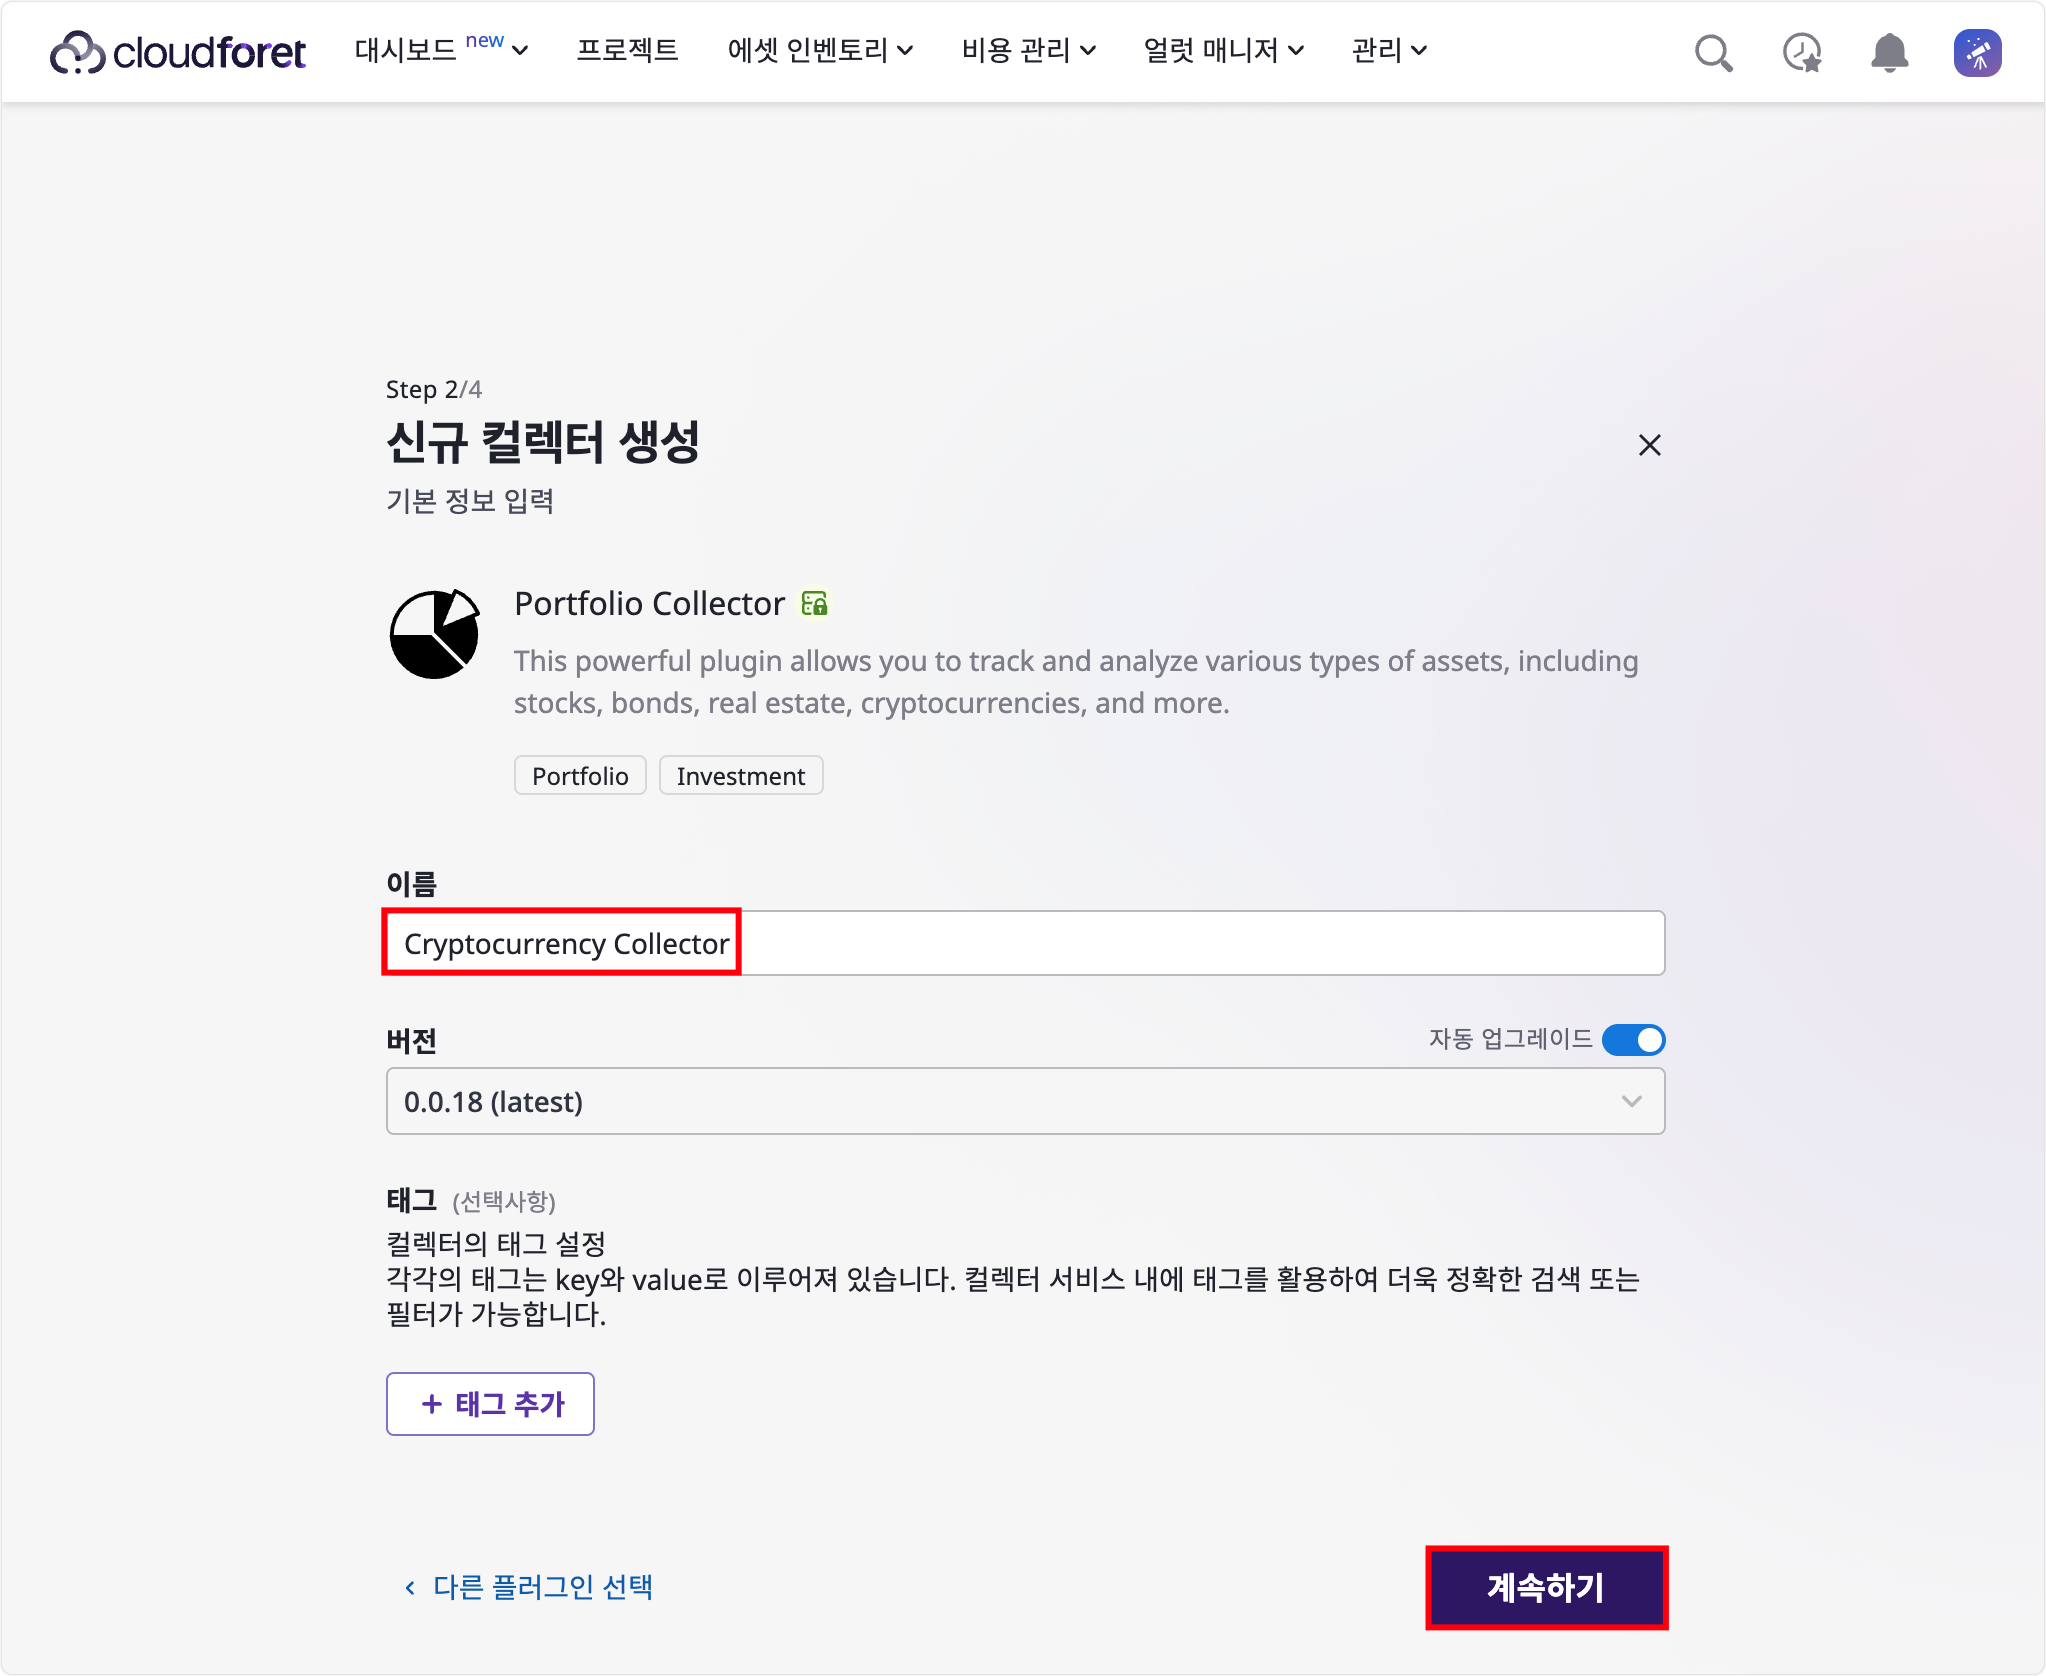
5-6) 이름 입력 후, [계속하기] 버튼을 클릭합니다.
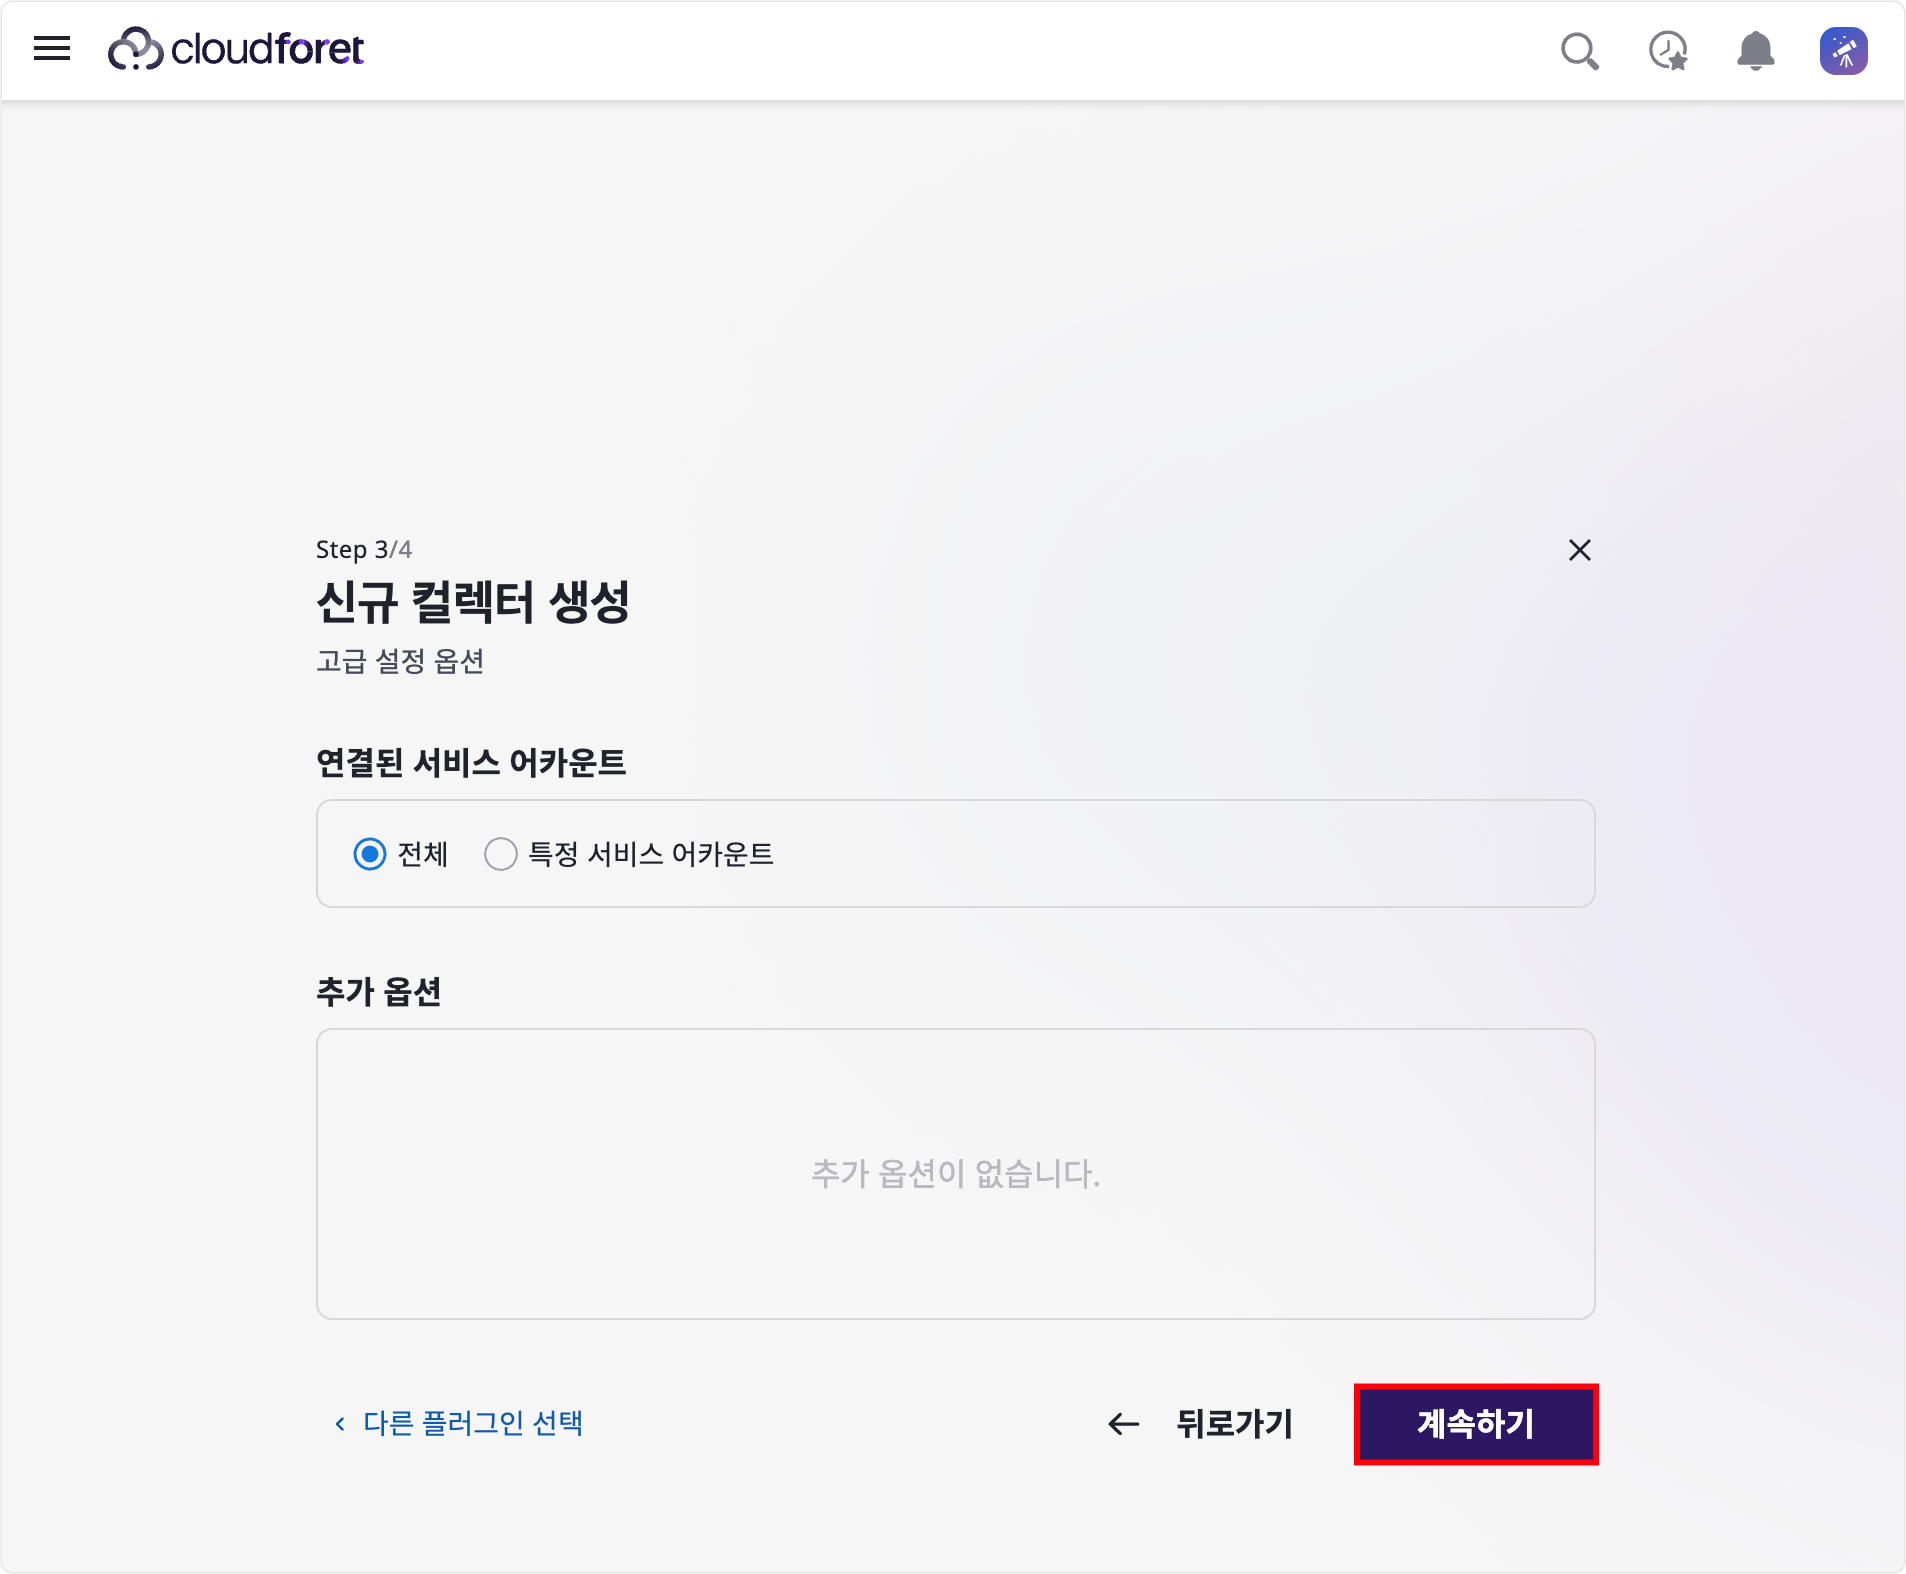
5-7) 전체 서비스 어카운트를 선택할 수 있고, 또는 특정 서비스 어카운트만을 선택할 수도 있습니다.
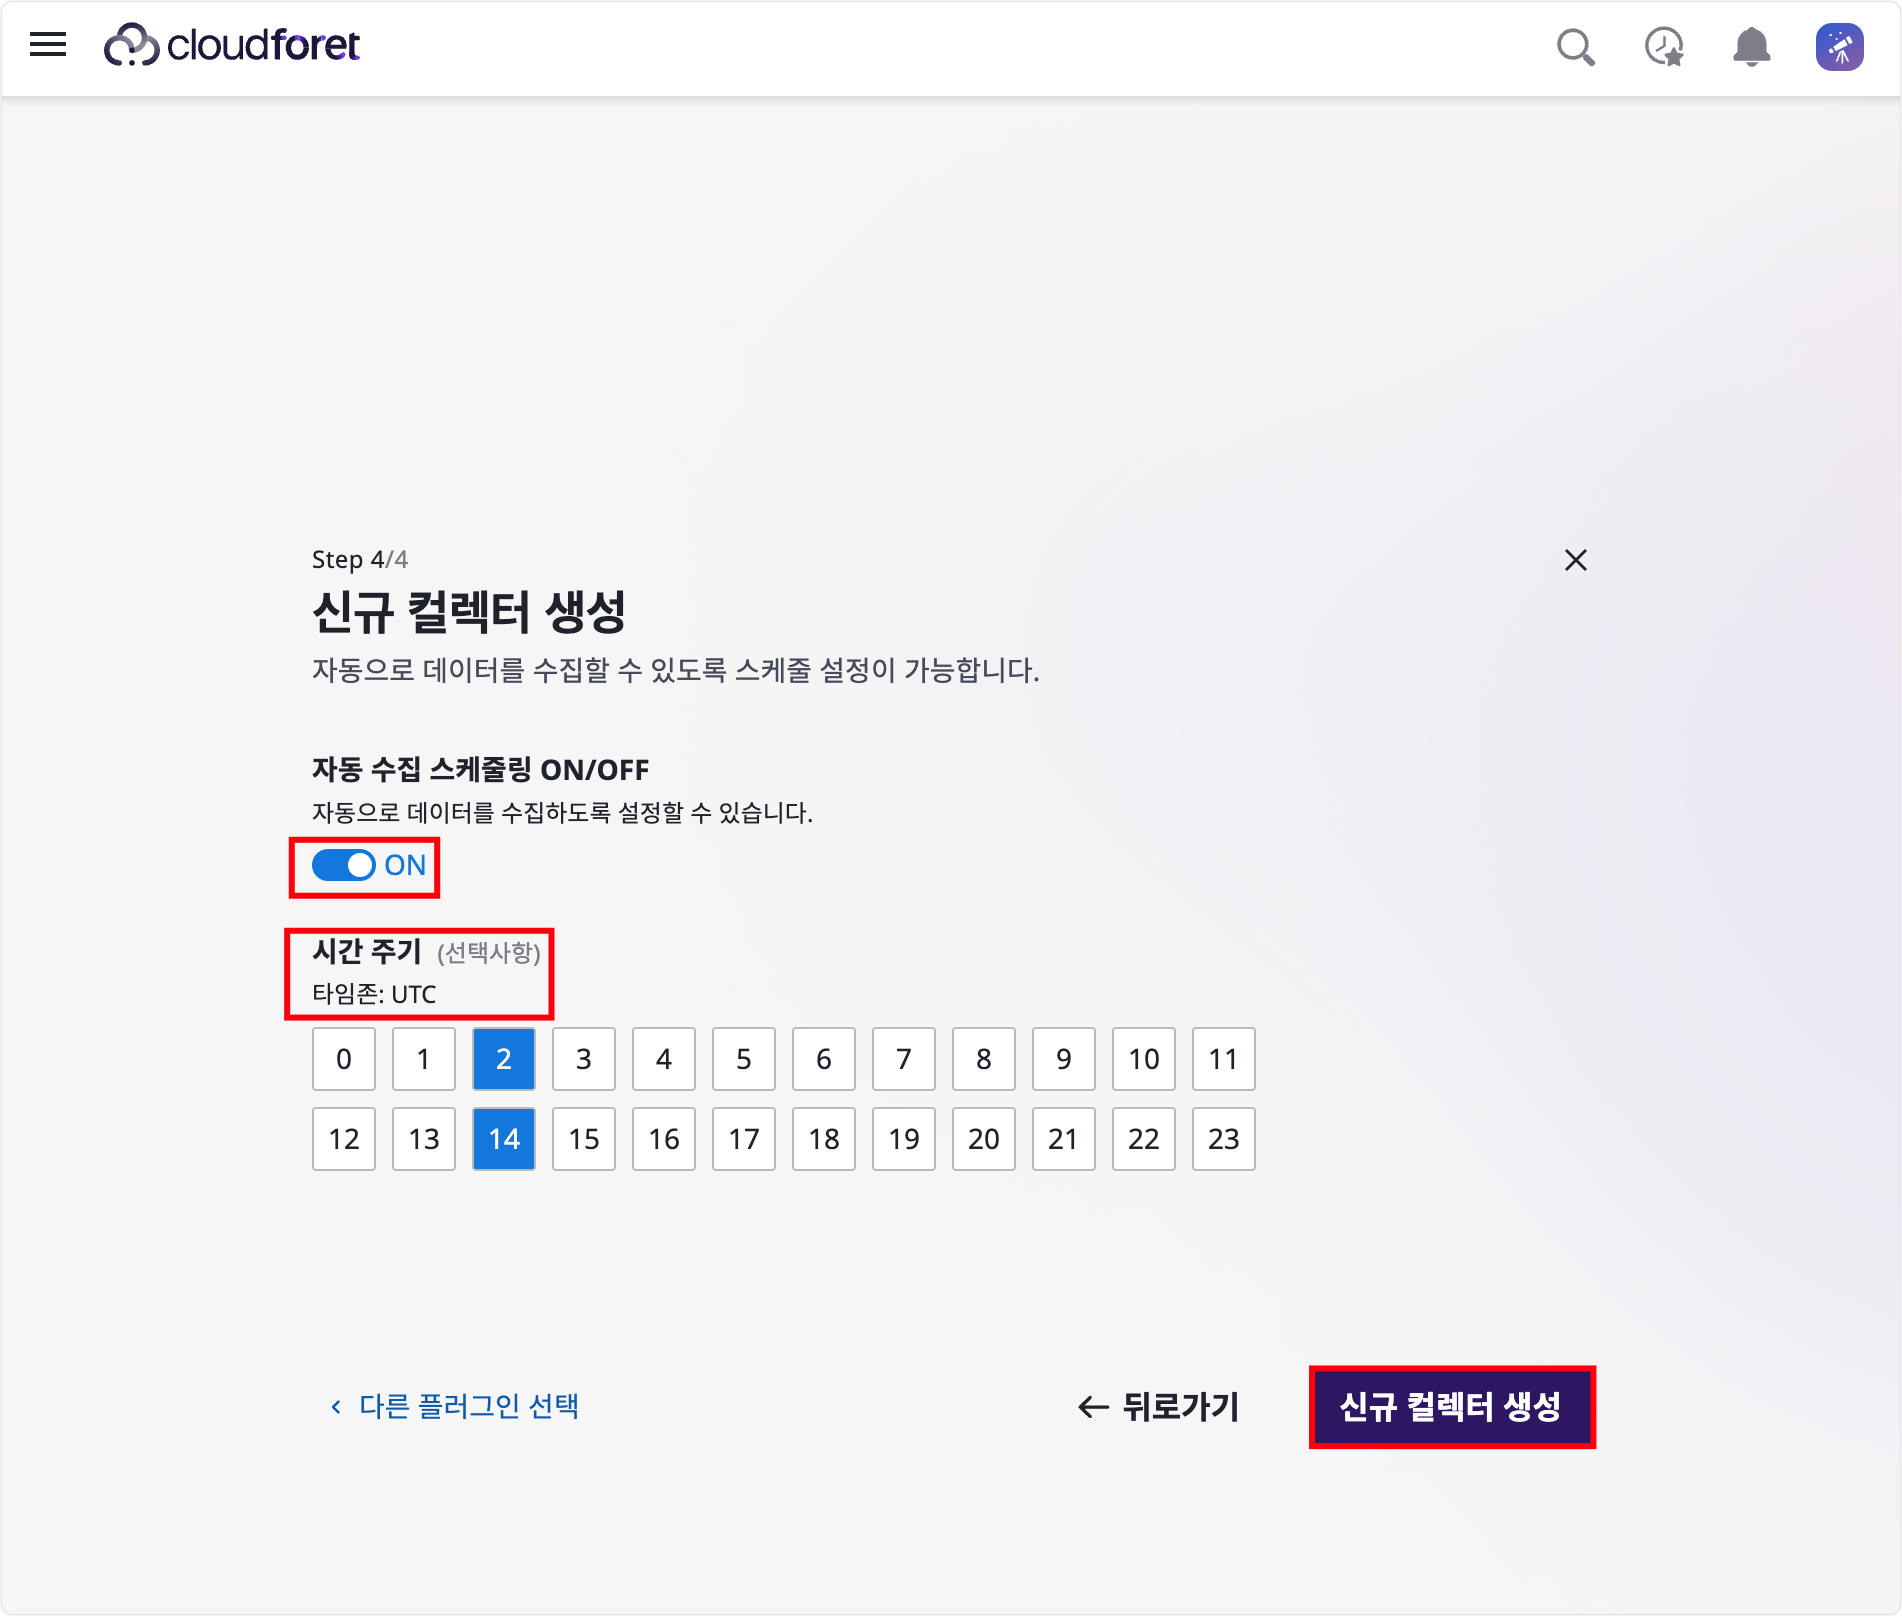
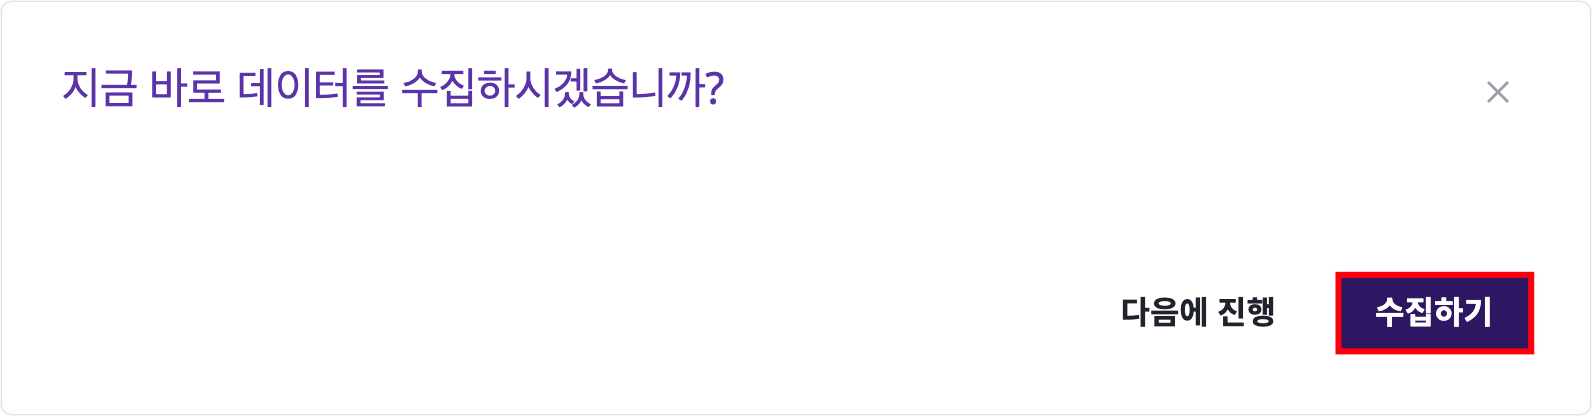
5-8) 자동 수집 스케줄링 기능을 ON 하게 되면 사용자가 원하는 시간대에 컬렉터가 자동 수집합니다. [신규 컬렉터 생성] 버튼을 클릭하여 데이터를 수집합니다.
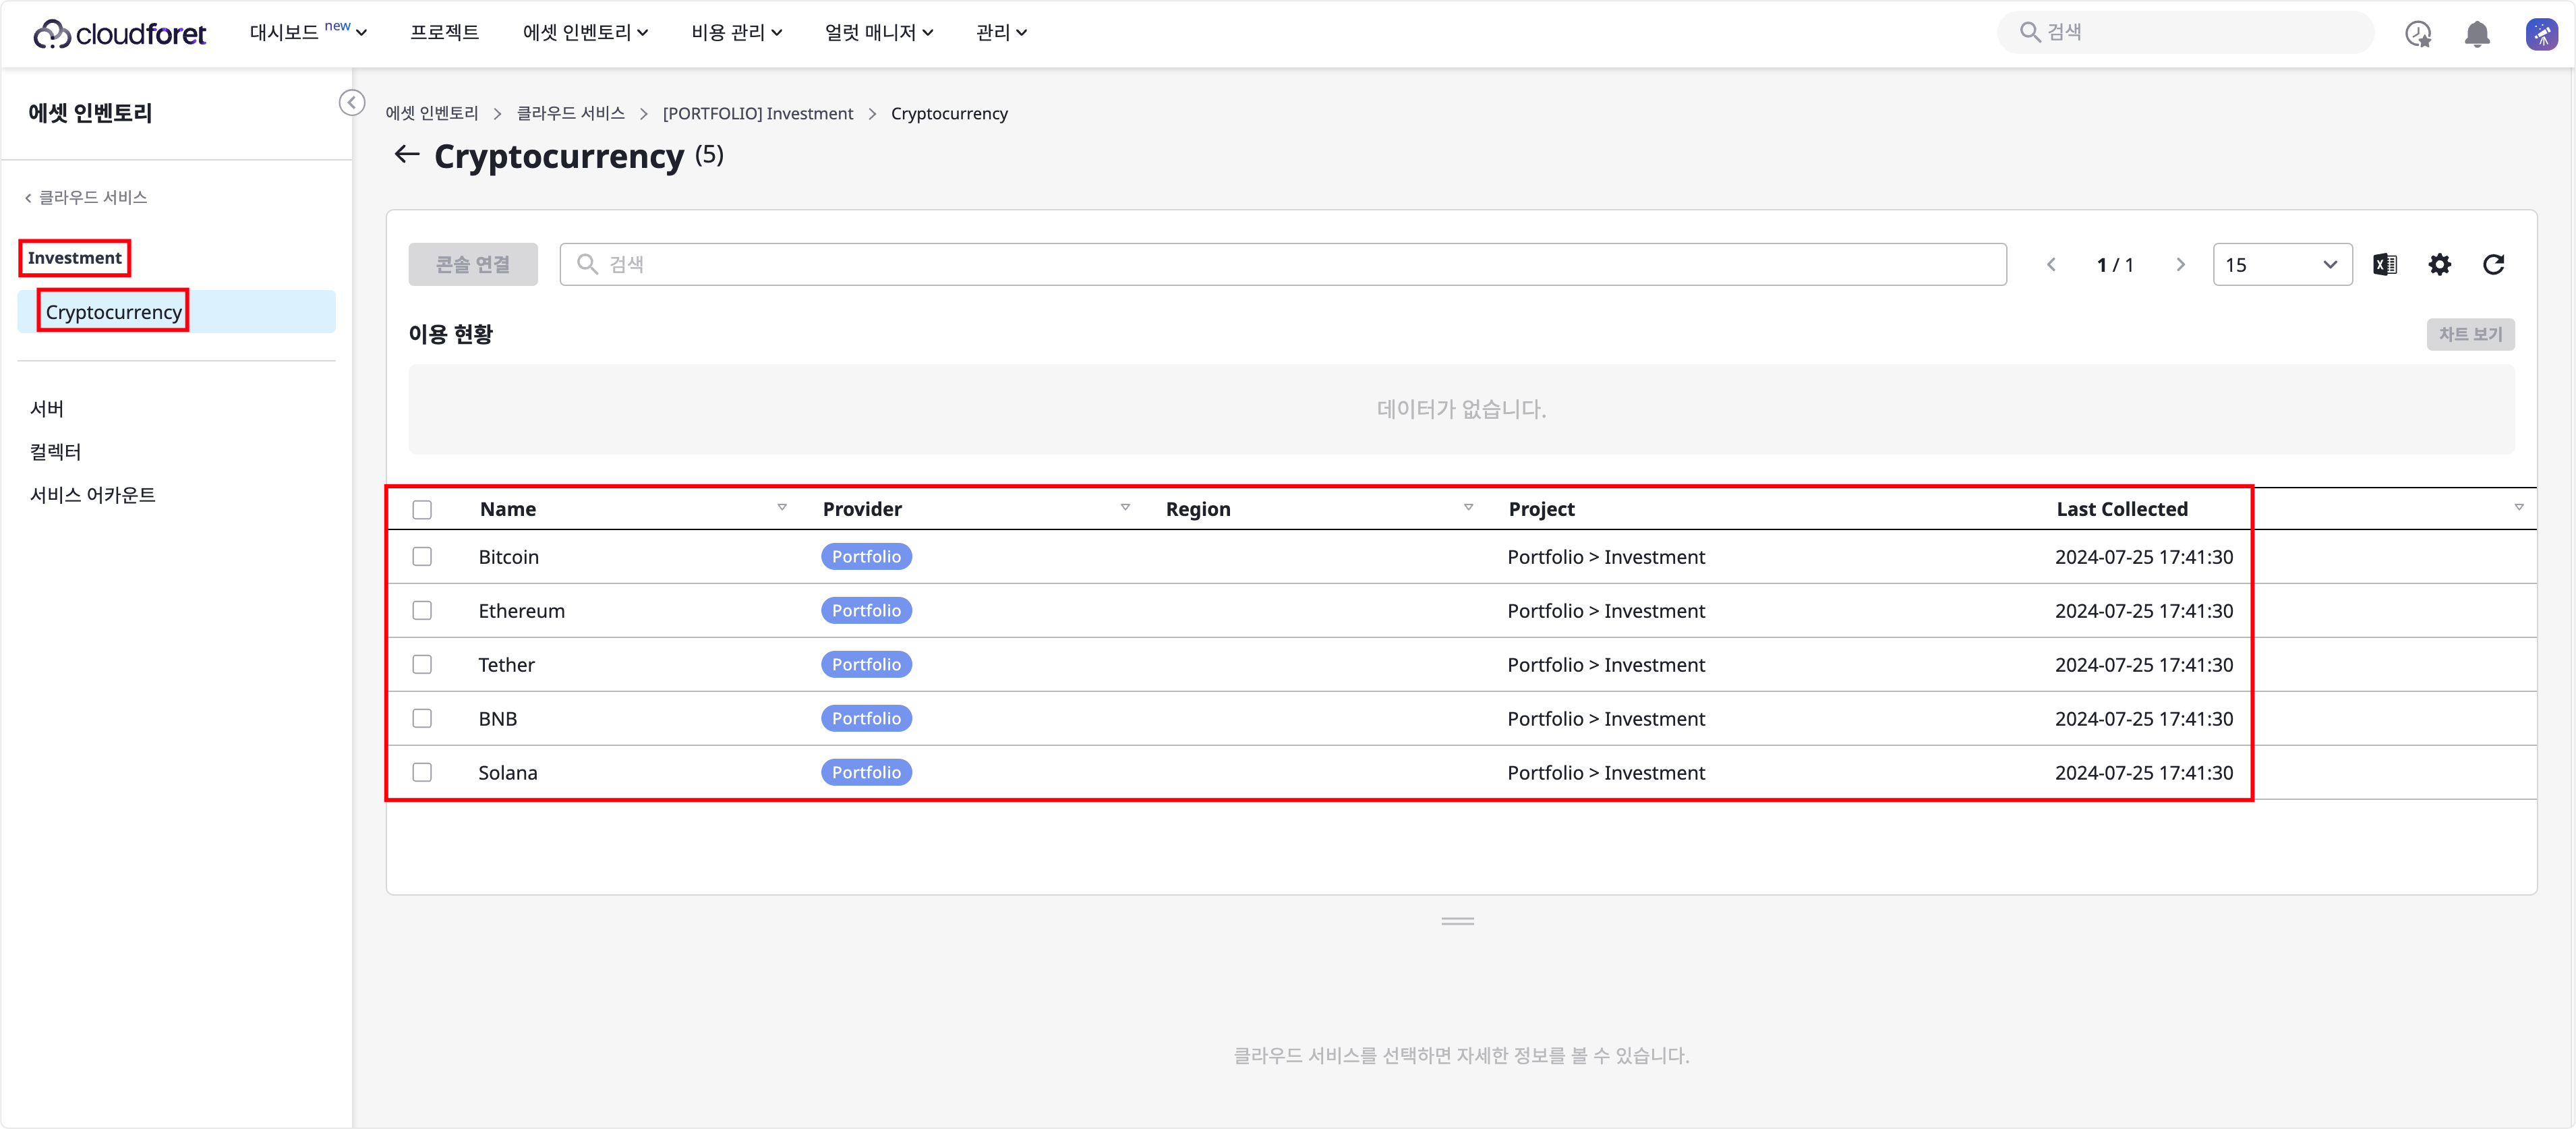
5-9) 플러그인에서 provider, cloud_service_group, cloud_service_type에 명시한대로 클라우드 서비스에 추가된 것을 확인할 수 있습니다.

5-10) 상위 5개의 암호 화폐를 수집하였으므로 개수도 총 5개 입니다. ‘Portfolio’를 클릭해보면, 어떤 암호 화폐들이 있는지 확인할 수 있습니다.
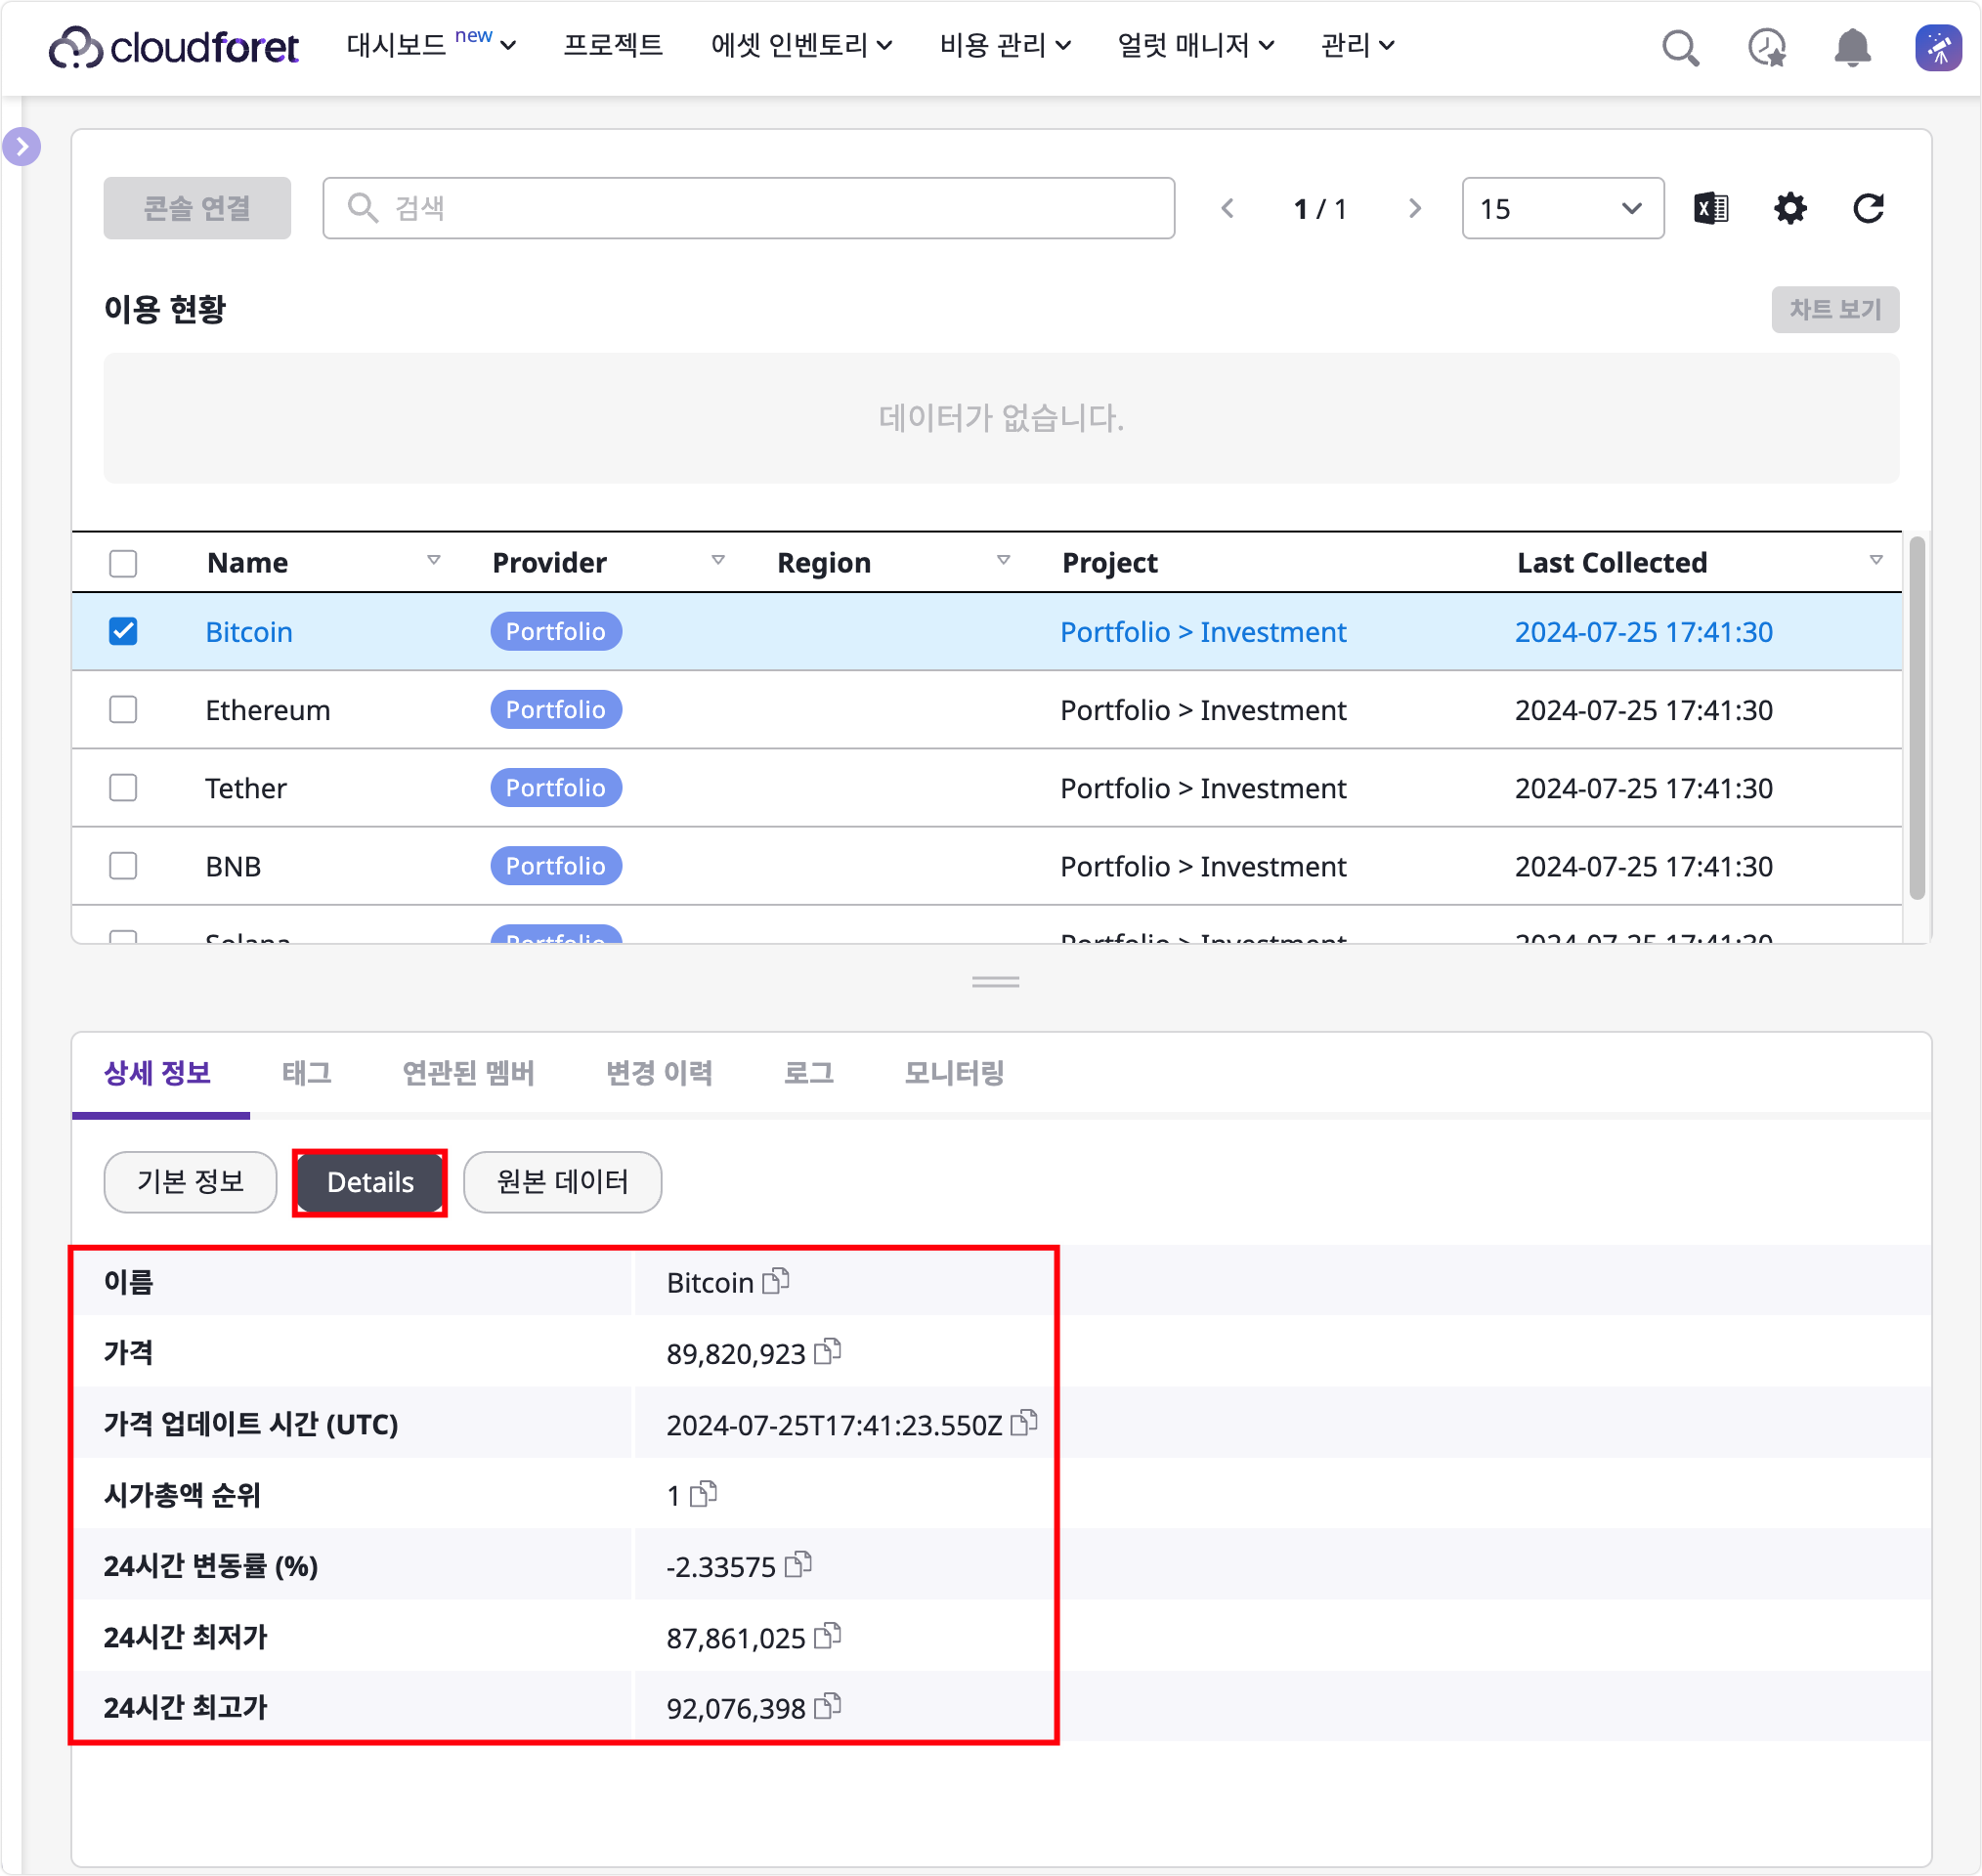
5-11) 특정 암호 화폐를 클릭시, 상세 정보, 태그 등을 볼 수 있습니다.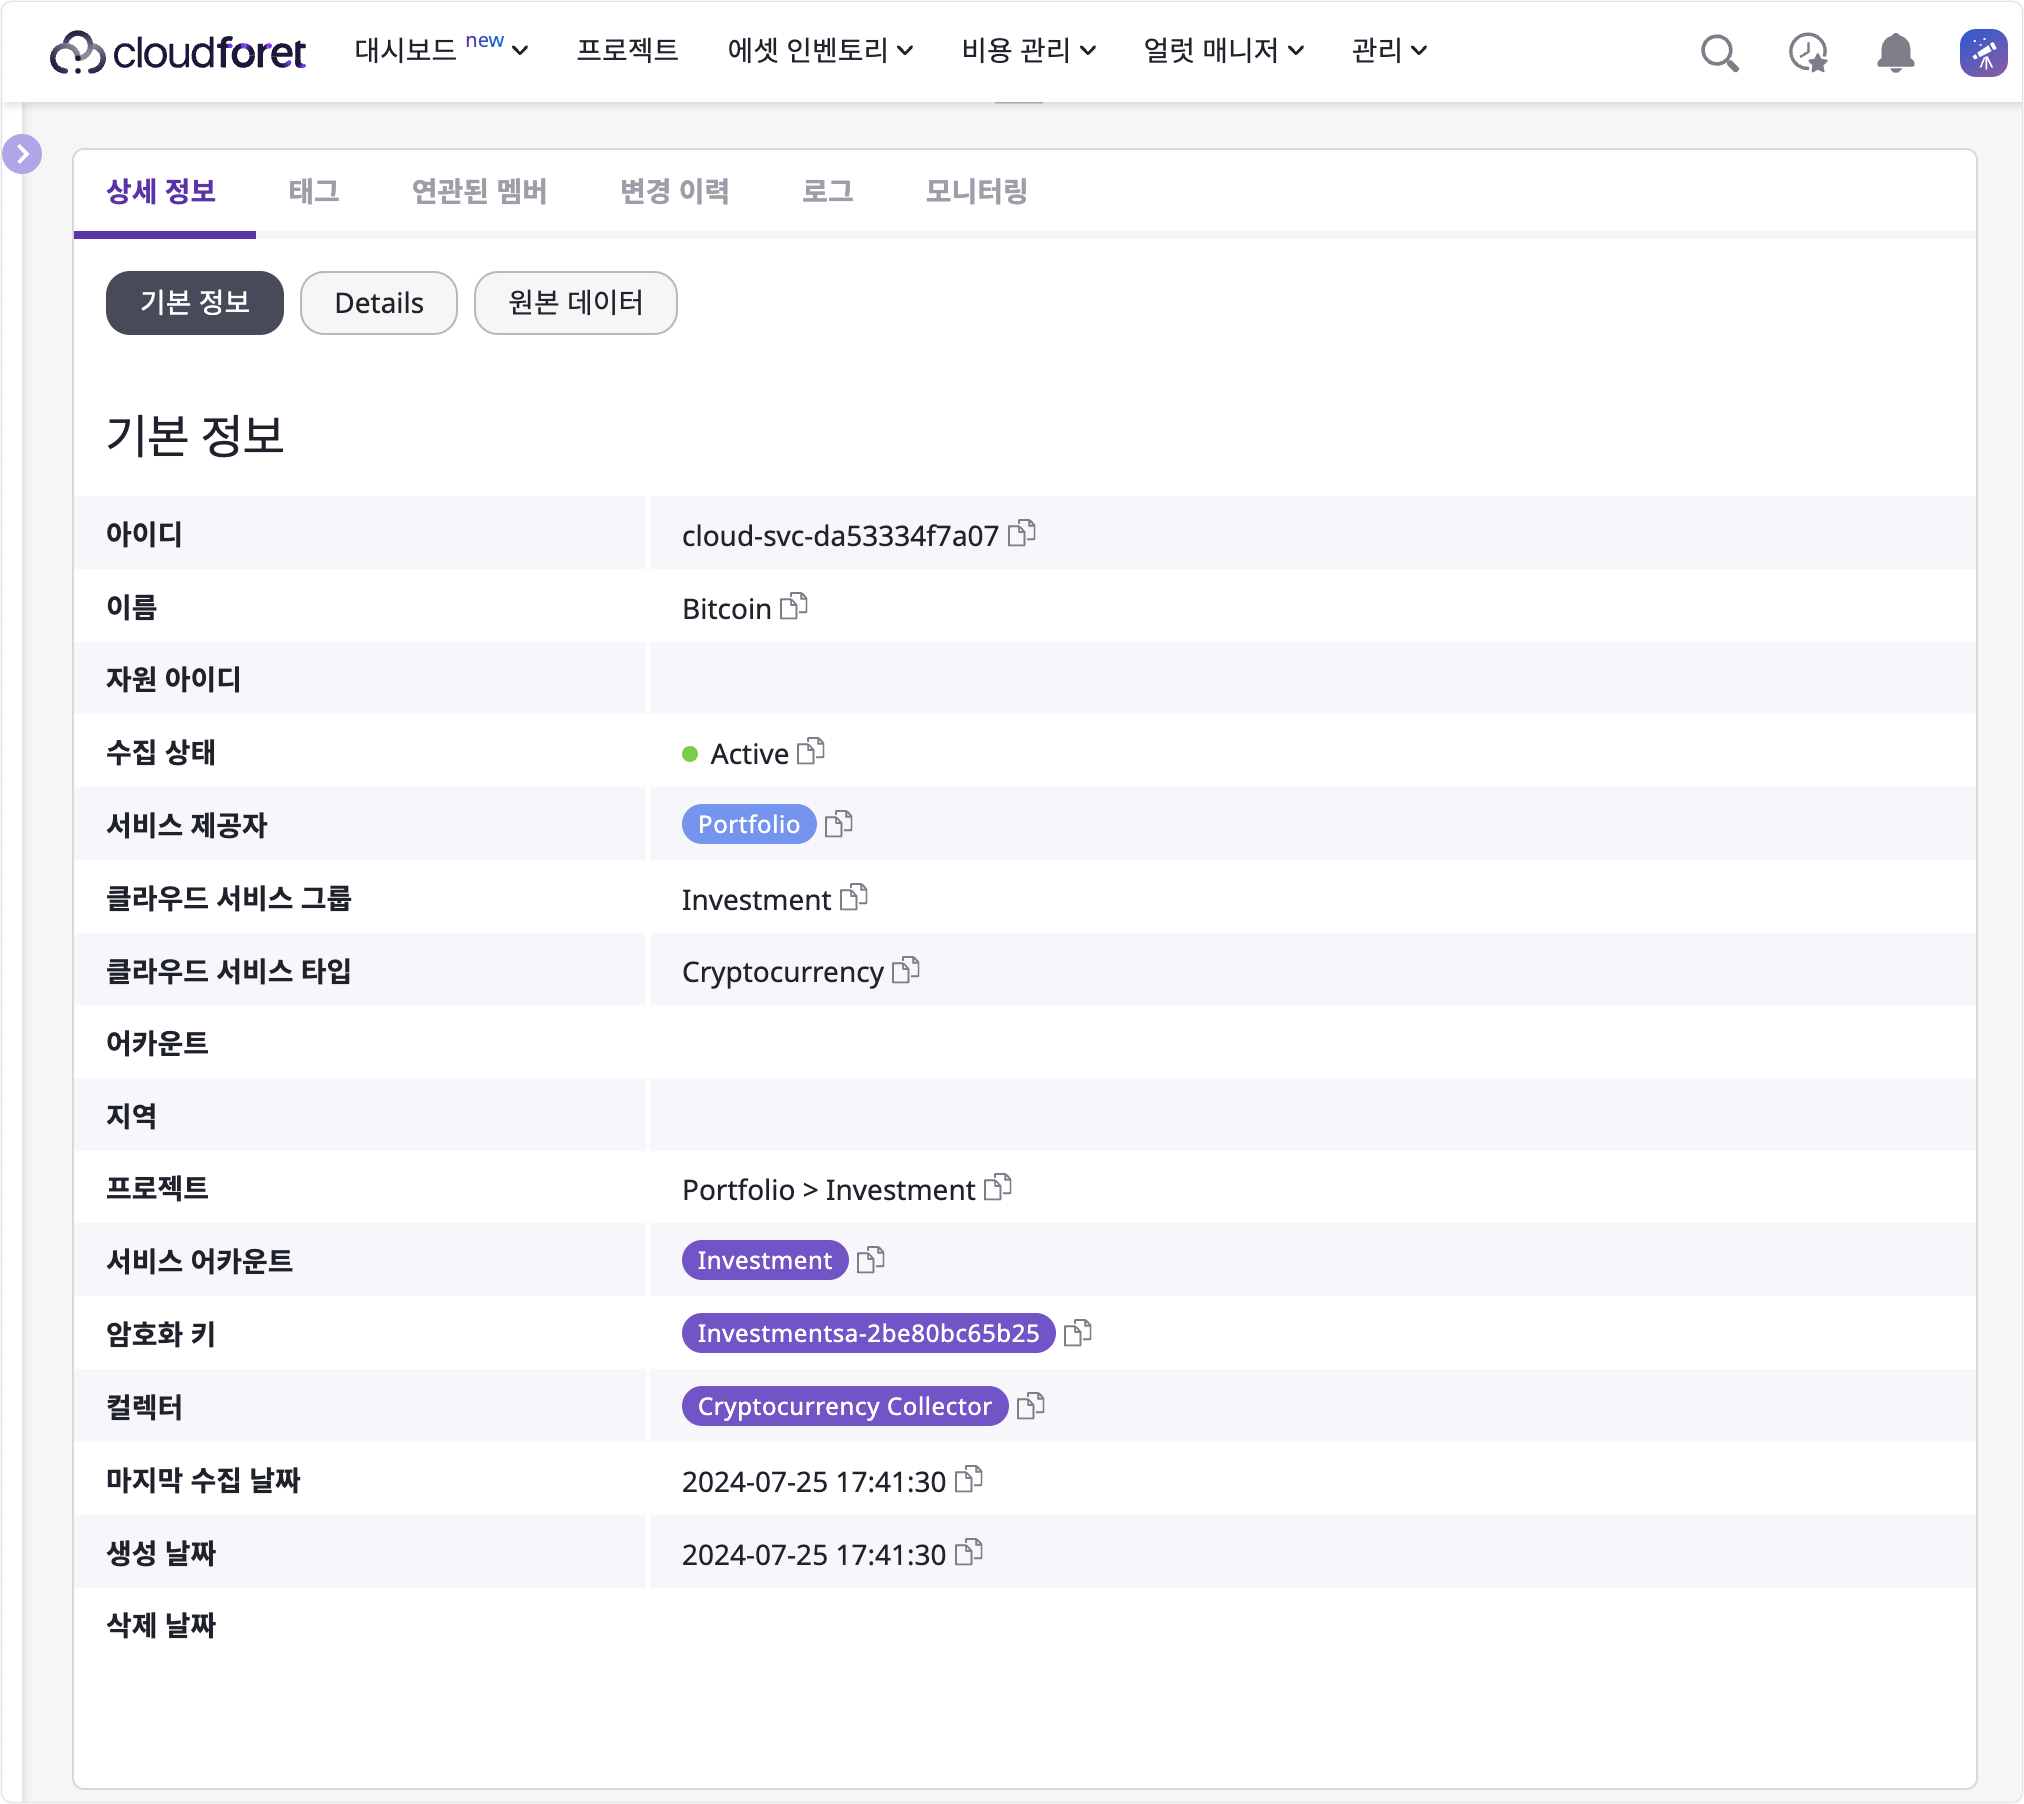
5-12) SpaceONE Dynamic UI를 위한 Metadata 표현 결과는 아래와 같이 Details에서 확인할 수 있습니다.