Installing CloudOps
This document guides you through installing CloudOps directly on your local machine or AWS EC2 instance and setting up the CloudOps API environment.
Environment Setup and Configuration
Environment Setup
Before installing CloudOps, basic environment setup is required. Please refer to the table below for supported versions by license.
| Name | Status Value |
|---|---|
| OrbStack or Docker Desktop | Kubernetes Enabled |
| Helm | Version 3.14+ |
Environment Configuration
1) Create Namespace
Create namespaces to deploy CloudOps in Kubernetes.
2) Apply Role and RoleBinding
The rbac.yaml file is used to regulate access to computer or network resources based on individual user roles.
Execute the following command through CLI to download the file.
3. Helm Chart Installation
1) Download YAML File
Download the values.yaml file for installing Helm Chart.
2) Download Helm Chart
3) Helm Installation
4) Pod Check
After installation is complete, check if Pods are created and in Running state.
NAME                                       READY   STATUS             RESTARTS        AGE
board-6785c9fb6d-rxcch                     1/1     Running            0               14m
config-5956655ccc-rnz9n                    1/1     Running            0               14m
console-7d4595758b-md8f6                   1/1     Running            0               14m
console-api-56f4496f7d-tvgq7               2/2     Running            0               14m
console-api-v2-rest-644b847b57-cqjm7       2/2     Running            0               14m
cost-analysis-659ff5d88f-ckds7             1/1     Running            0               14m
cost-analysis-scheduler-8474c56c95-57qpj   1/1     Running            0               14m
cost-analysis-worker-7bc667f5b4-qwjn9      1/1     Running            0               14m
dashboard-759ccd74b7-dh4rf                 1/1     Running            0               14m
file-manager-85dbb6c46b-sz5g6              1/1     Running            0               14m
identity-644b45c8df-6dzwx                  1/1     Running            0               14m
inventory-6bd9df778b-kwfl4                 1/1     Running            0               14m
inventory-scheduler-5455f95c99-vkrrm       0/1     CrashLoopBackOff   7 (2m57s ago)   14m
inventory-worker-67d7599f5b-9m52m          1/1     Running            0               14m
mongodb-7fd58fcf75-lkhp6                   1/1     Running            0               14m
monitoring-7b94cc8db8-zg2km                1/1     Running            0               14m
monitoring-rest-86d785f565-z6ztm           2/2     Running            0               14m
notification-6f96487ddb-rcm6h              1/1     Running            0               14m
notification-scheduler-77789bb9fd-gpjvx    1/1     Running            0               14m
notification-worker-f567c5c77-2kwfp        1/1     Running            0               14m
plugin-598865d6dc-s5mb9                    1/1     Running            0               14m
plugin-scheduler-c9bdbd94f-94lwl           0/1     CrashLoopBackOff   7 (2m55s ago)   14m
plugin-worker-584d7b6b59-q6cn6             1/1     Running            0               14m
redis-646677656f-gc5sg                     1/1     Running            0               14m
repository-54dc68fb4f-rmjgb                1/1     Running            0               14m
secret-5d7c9b86bf-nk4js                    1/1     Running            0               14m
spacectl-54b4d5d5cb-p5k7d                  1/1     Running            0               14m
statistics-5fd4bcb4cc-6z5jh                1/1     Running            0               14m
statistics-scheduler-687fd4ccb-blxqx       0/1     CrashLoopBackOff   7 (3m22s ago)   14m
statistics-worker-7d97f6cf4d-k9l4p         1/1     Running            0               14m
supervisor-scheduler-7b5cd9c9f9-zszj7 2/2 Running 0 14mschedulerPod’s status is notRunning(CrashLoopBackkOff or Error) is normal.- It takes about 2~3 minutes for the first installation to become
Running. - spaceone-initializer installation
after,
inventory-scheduler,plugin-scheduler,statistics-schedulerPods becomeRunning.
4. spaceone-initializer Installation
Execute the following command through CLI to download the file.
1) Download YAML File
initializer.yaml file to perform initialization required for CloudOps installation. Please refer to spaceone-initializer for details.
2) Helm Installation
3) Helm Value Setting
After completion, you can get system token from Pod logs.
To find the Pod name of initializer, first execute the following command to display all Pod names in the cloudforet namespace.
3-1) Copy the entire name of the Pod with the format initializer-cloudops-xxxxx-xxxxx.
NAME                                       READY   STATUS             RESTARTS        AGE
spacectl-54b4d5d5cb-l8mlq                  1/1     Running            0               8m21s
board-6785c9fb6d-bhvw6                     1/1     Running            0               8m21s
redis-646677656f-6ctpz                     1/1     Running            0               8m21s
notification-6f96487ddb-gmr9h              1/1     Running            0               8m21s
mongodb-7fd58fcf75-bwf8w                   1/1     Running            0               8m21s
statistics-worker-7d97f6cf4d-ds4wn         1/1     Running            0               8m21s
monitoring-7b94cc8db8-hsmfs                1/1     Running            0               8m21s
statistics-5fd4bcb4cc-z8mmv                1/1     Running            0               8m20s
repository-54dc68fb4f-tzmrl                1/1     Running            0               8m21s
notification-scheduler-77789bb9fd-9gbv6    1/1     Running            0               8m20s
file-manager-85dbb6c46b-k9t5h              1/1     Running            0               8m20s
plugin-598865d6dc-slpf4                    1/1     Running            0               8m18s
monitoring-rest-86d785f565-5djpd           2/2     Running            0               8m20s
plugin-worker-584d7b6b59-zs2pd             1/1     Running            0               8m21s
notification-worker-f567c5c77-fjpxg        1/1     Running            0               8m19s
supervisor-scheduler-7b5cd9c9f9-p2cbb      2/2     Running            0               8m21s
config-5956655ccc-9f7xf                    1/1     Running            0               8m19s
console-7d4595758b-s5r4x                   1/1     Running            0               8m19s
console-api-56f4496f7d-zpgrj               2/2     Running            0               8m19s
cost-analysis-659ff5d88f-slftb             1/1     Running            0               8m17s
inventory-worker-67d7599f5b-pjz2b          1/1     Running            0               8m17s
identity-644b45c8df-cnjht                  1/1     Running            0               8m17s
cost-analysis-scheduler-8474c56c95-7q55x   1/1     Running            0               8m17s
cost-analysis-worker-7bc667f5b4-fz468      1/1     Running            0               8m17s
console-api-v2-rest-644b847b57-v97fw       2/2     Running            0               8m18s
inventory-6bd9df778b-sg998                 1/1     Running            0               8m17s
dashboard-759ccd74b7-xw7v2                 1/1     Running            0               8m17s
secret-5d7c9b86bf-njvkg                    1/1     Running            0               8m16s
statistics-scheduler-687fd4ccb-sg9xl       0/1     CrashLoopBackOff   6 (2m29s ago)   8m20s
inventory-scheduler-5455f95c99-fft6h       0/1     CrashLoopBackOff   6 (2m29s ago)   8m17s
plugin-scheduler-c9bdbd94f-v6742           0/1     CrashLoopBackOff   6 (2m26s ago)   8m19s
initialize-cloudops-kle4o-c96ws 0/1 Completed 0 95skubectl logs command can be executed only if the Pod is in Completed state. If the Pod is not in Completed state but in INITIALIZING state, the following operations cannot be performed.3-2) Copy the entire name of the Pod with the format initializer-cloudops-xxxxx-xxxxx and paste it after the kubectl logs command. Then, copy the API
KEY starting with eyJ…. at the bottom.
3-3) Edit the values in release-1-12.yaml. Replace the TOKEN value of 'CHANGE_ME' with the copied API KEY eyJ....
...

global:
  namespace: cloudforet
  supervisor_namespace: cloudforet
  shared_conf:
    TOKEN: 'CHANGE_ME'
3-4) Upgrade helm chart
3-5) After upgrading, delete Pods with label app.kubernetes.io/instance and value cloudforet in cloudforet namespace.
5. Pod Check
Except for initialize-cloudops Pod, all Pods should be in Running state.
6. Port Forwarding
If you install Cloudforet on your local machine, you won’t have Ingress objects such as Amazon ALB or NGINX receiver. Instead, you can use kubectl port-forward.
(Port forwarding to ports 8080, 8081, 8082 and run in the background.)
If an issue occurs, you can terminate the process running on the corresponding port using the following command.
kill $(ps aux | grep 'kubectl port-forward' | awk '{print $2}')7. Start Cloudforet
After installation is complete, you can start Cloudforet. Access http://127.0.0.1:8080. (For EC2 user, access http://[your_ec2_server_ip]:8080.)
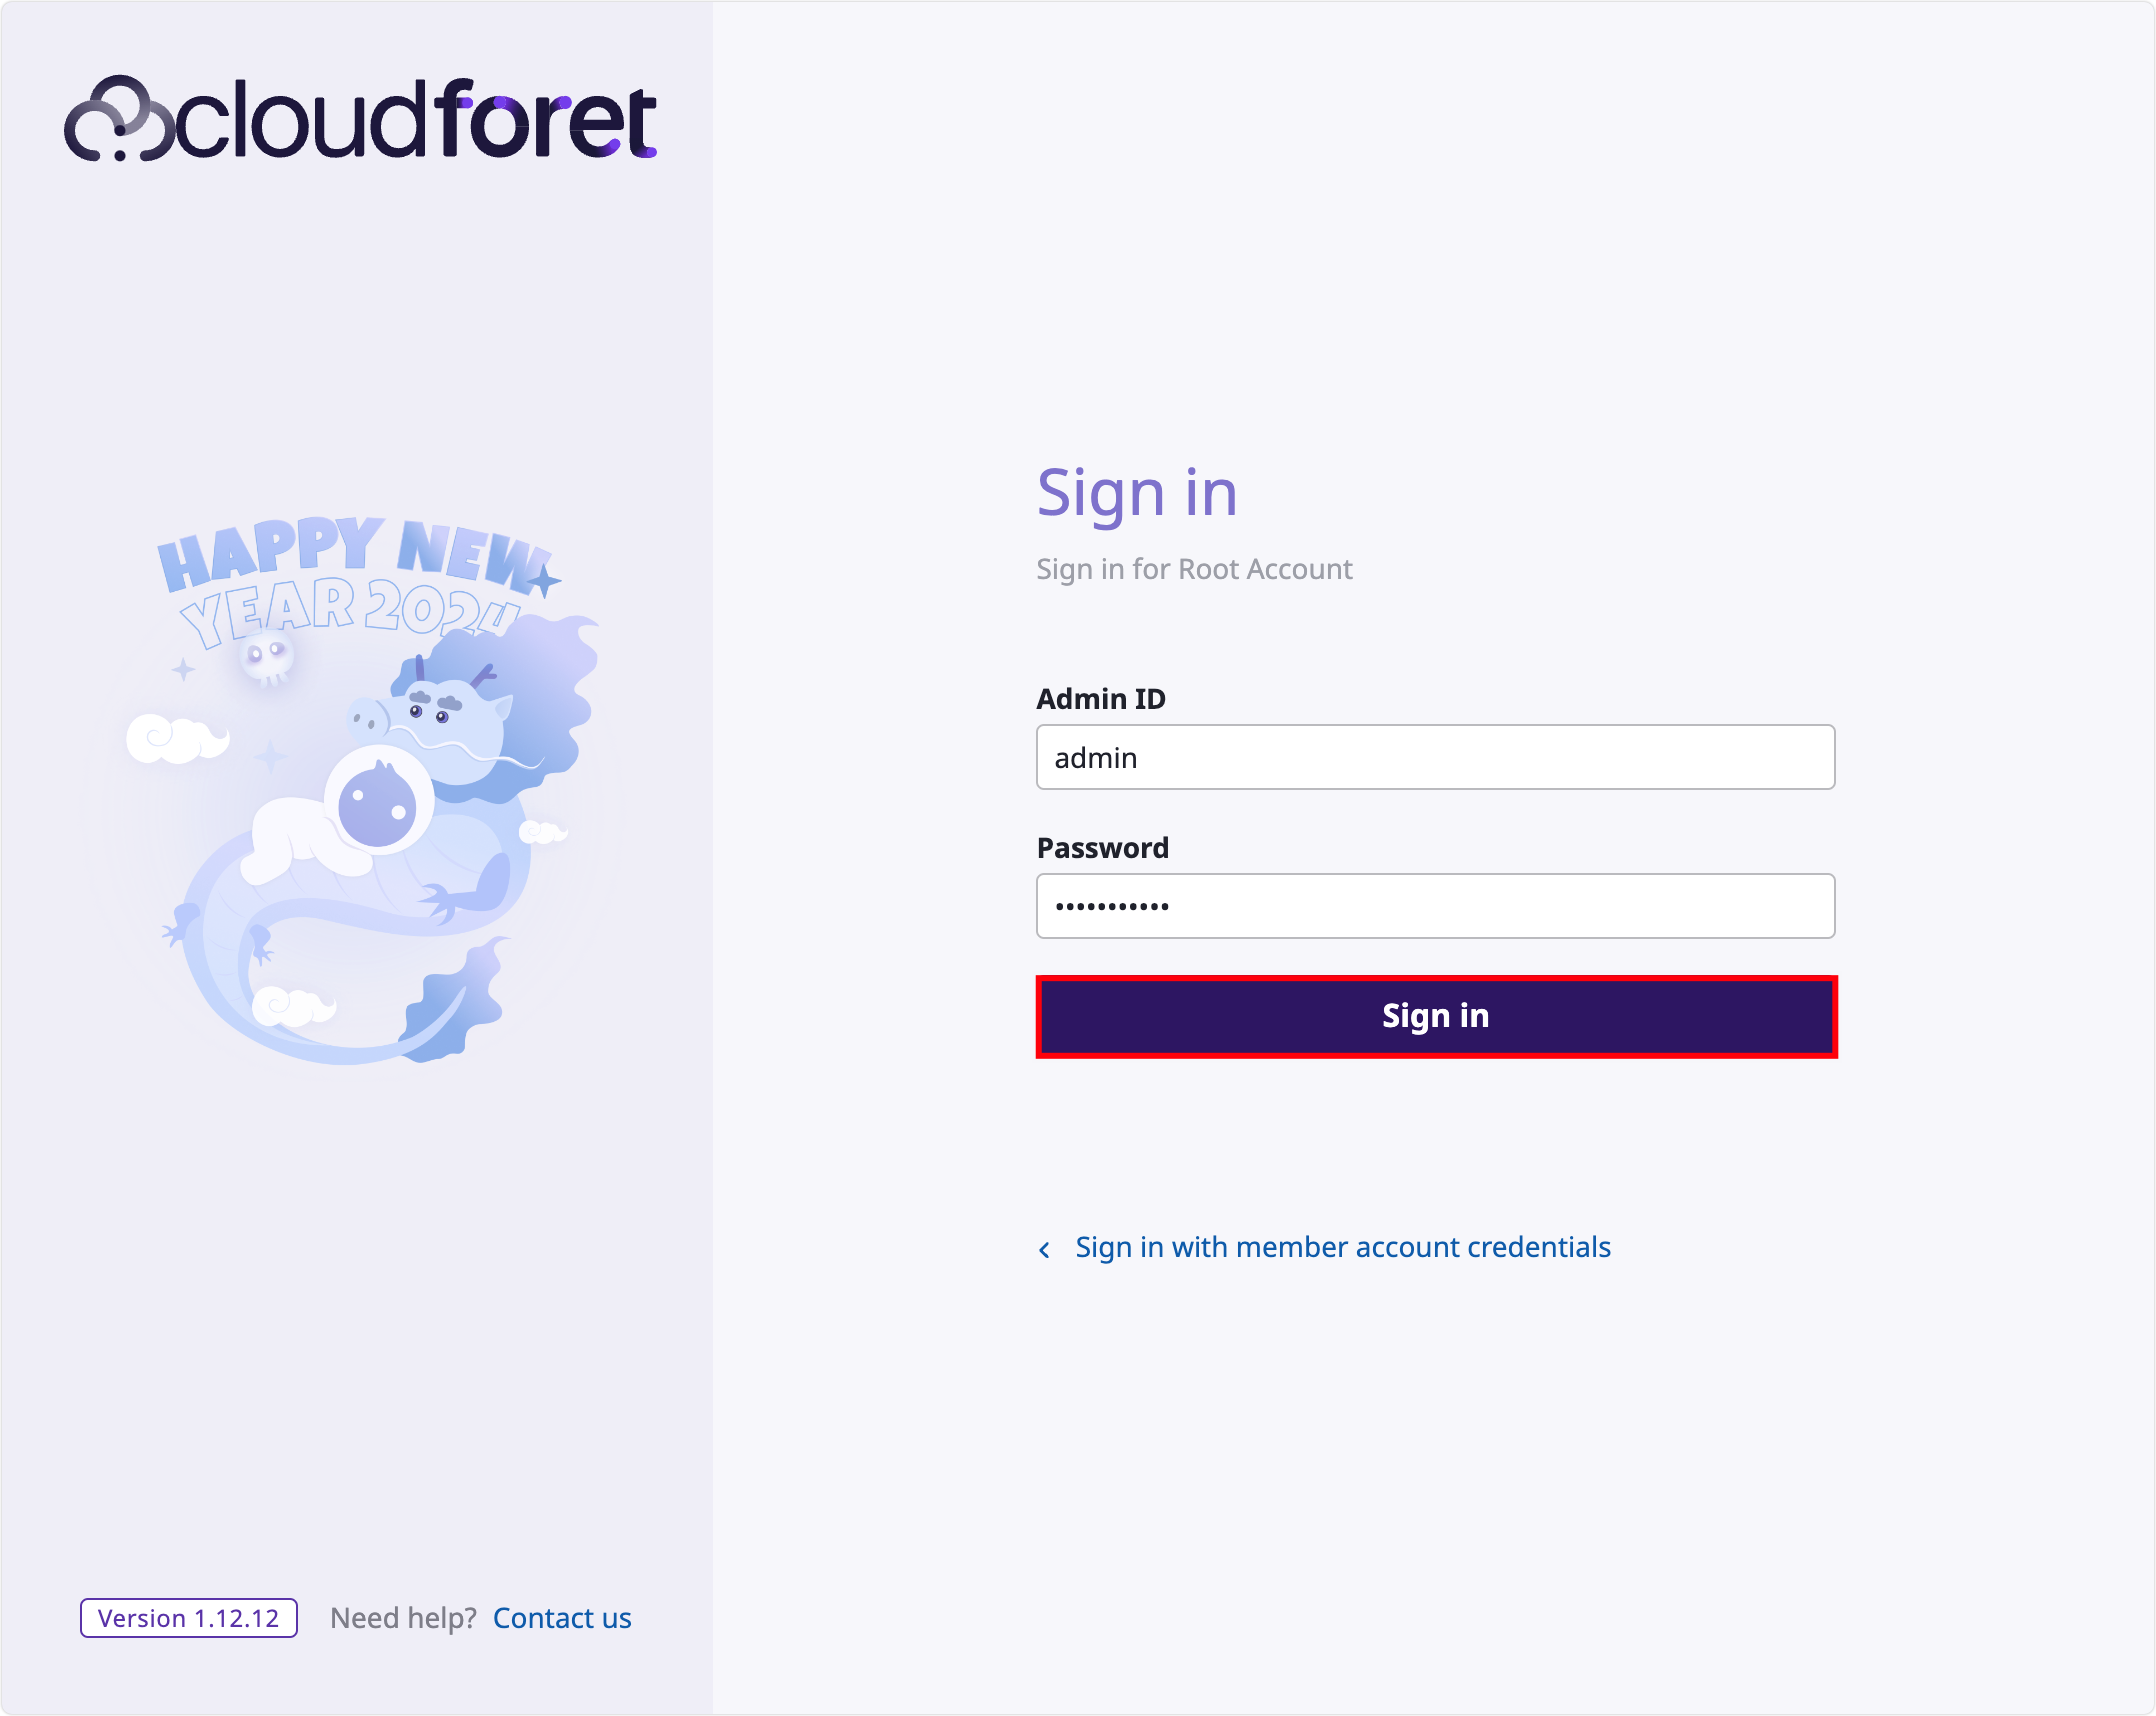
1) Account Login
Click “Sign in for Root Account”.
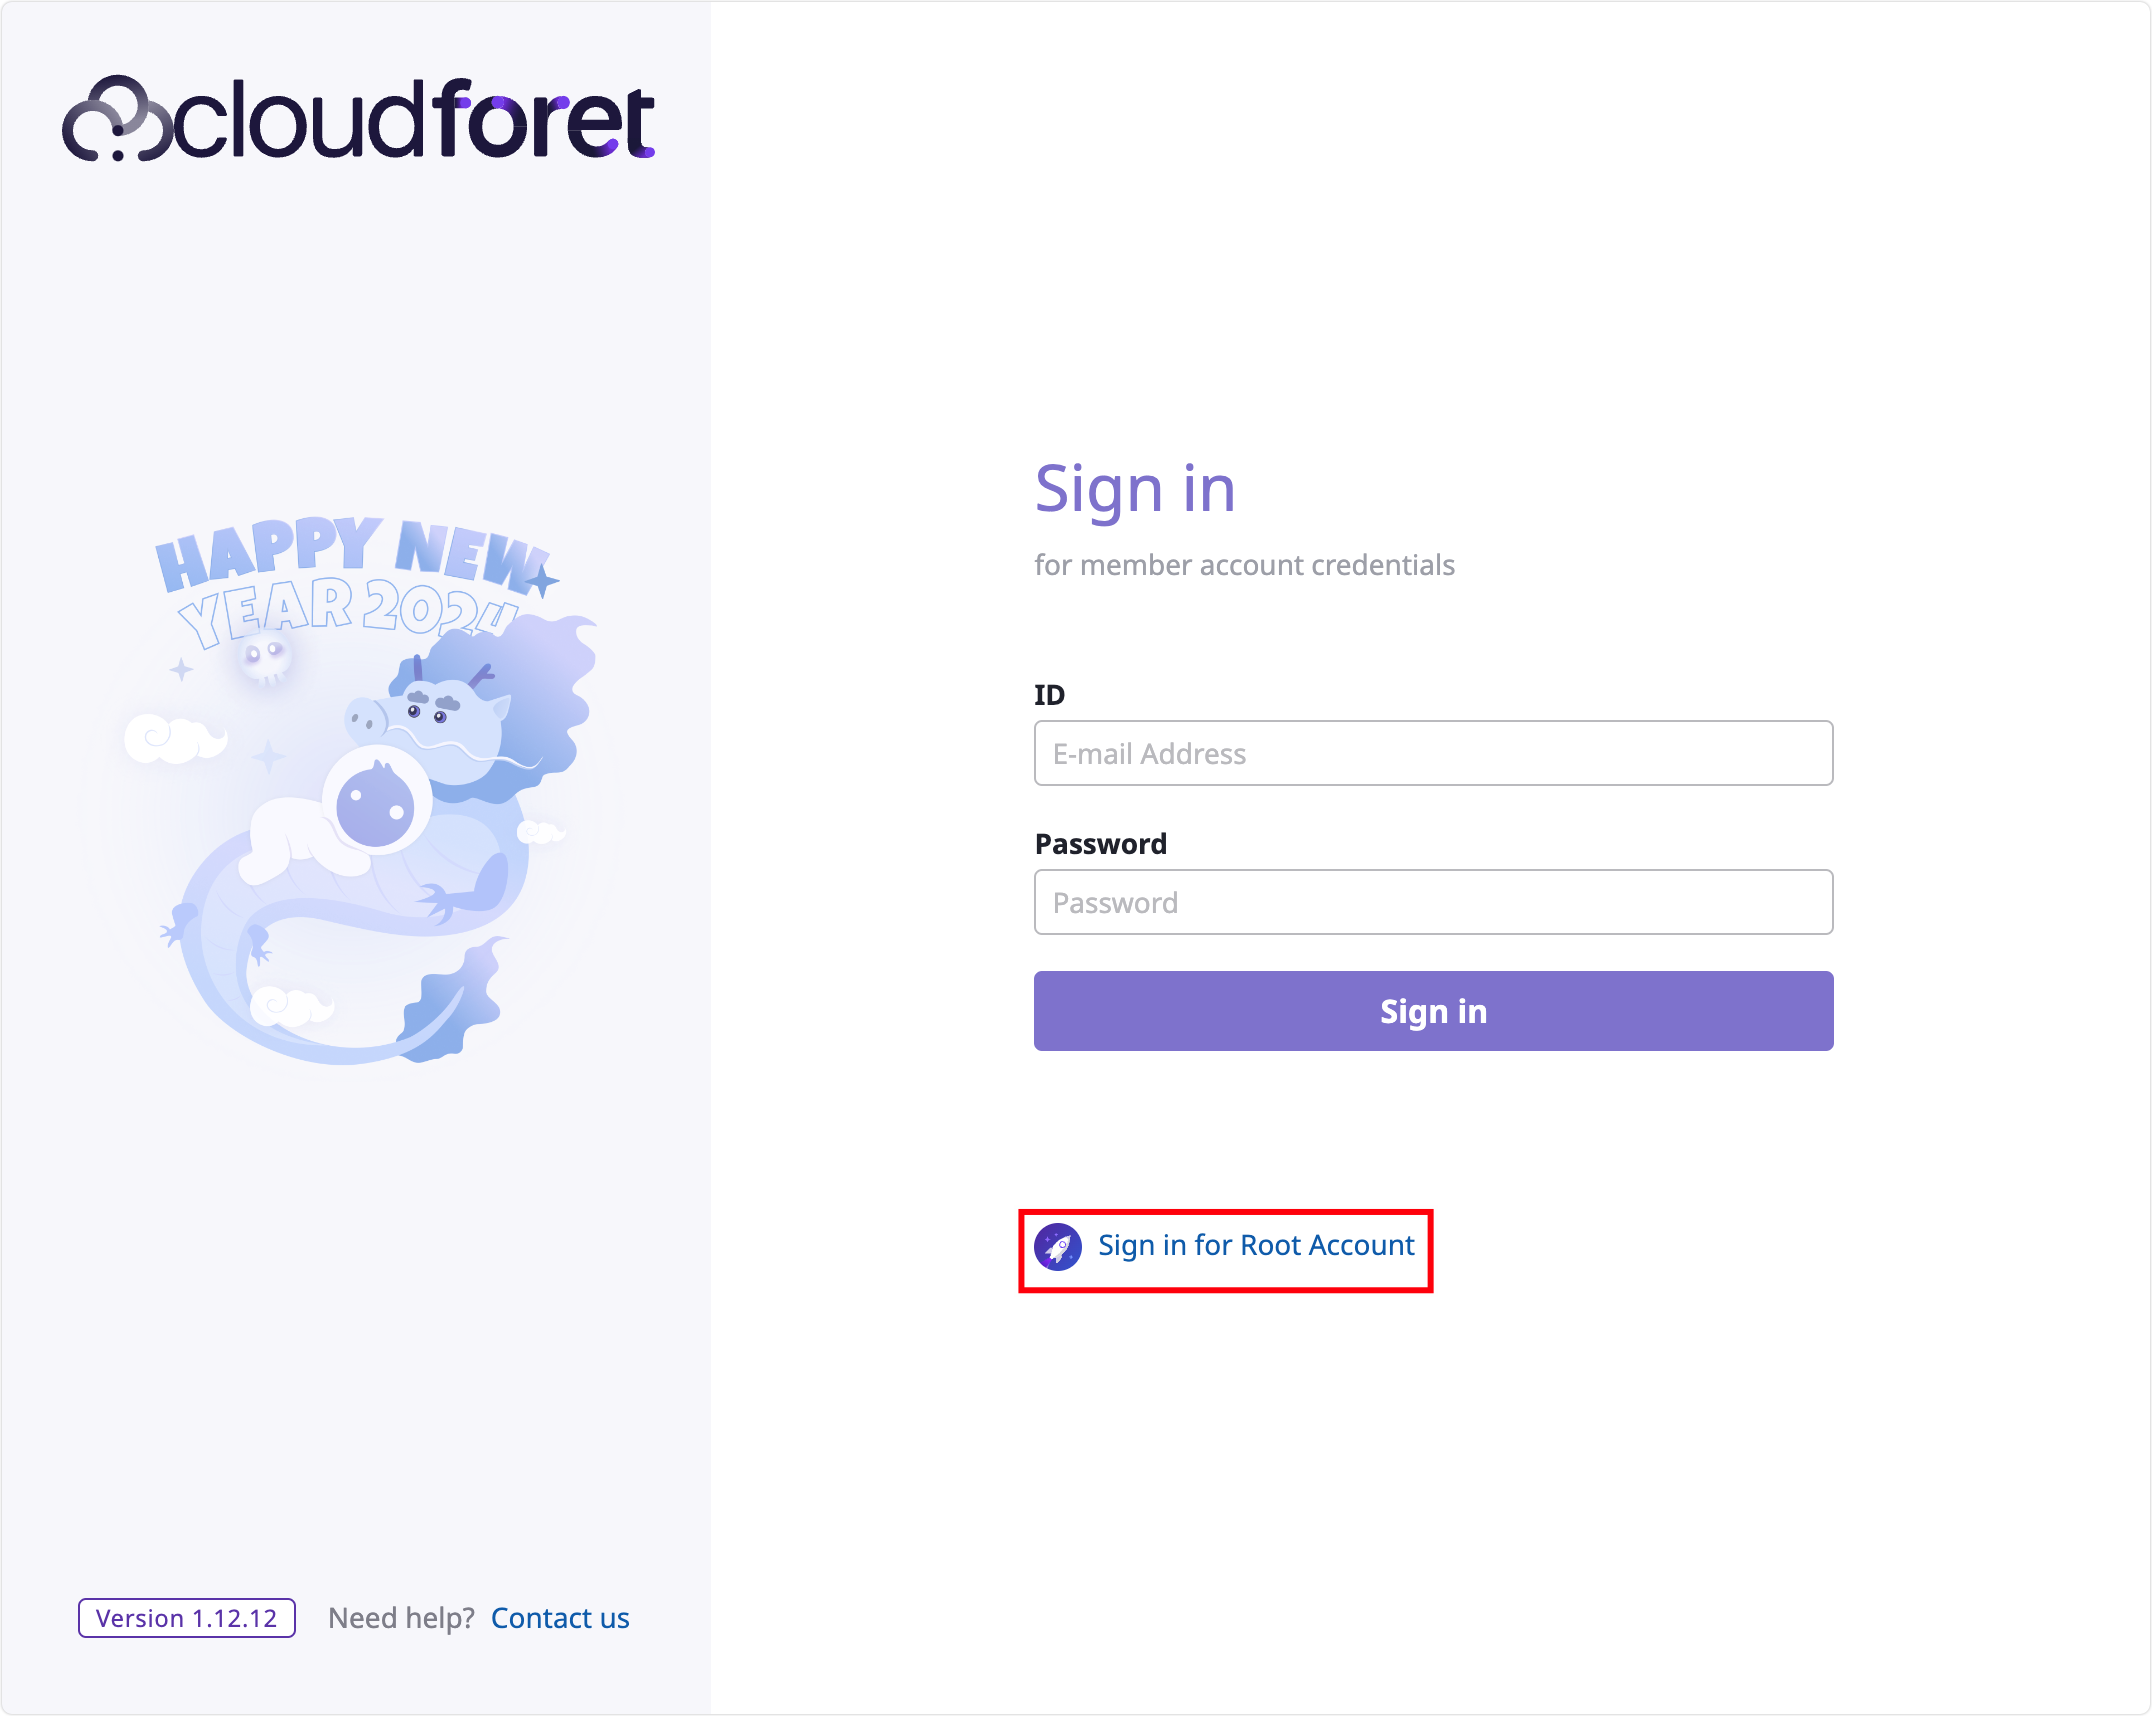
Log in with the following account.
| ID | Password |
|---|---|
| admin | Admin123!@# |
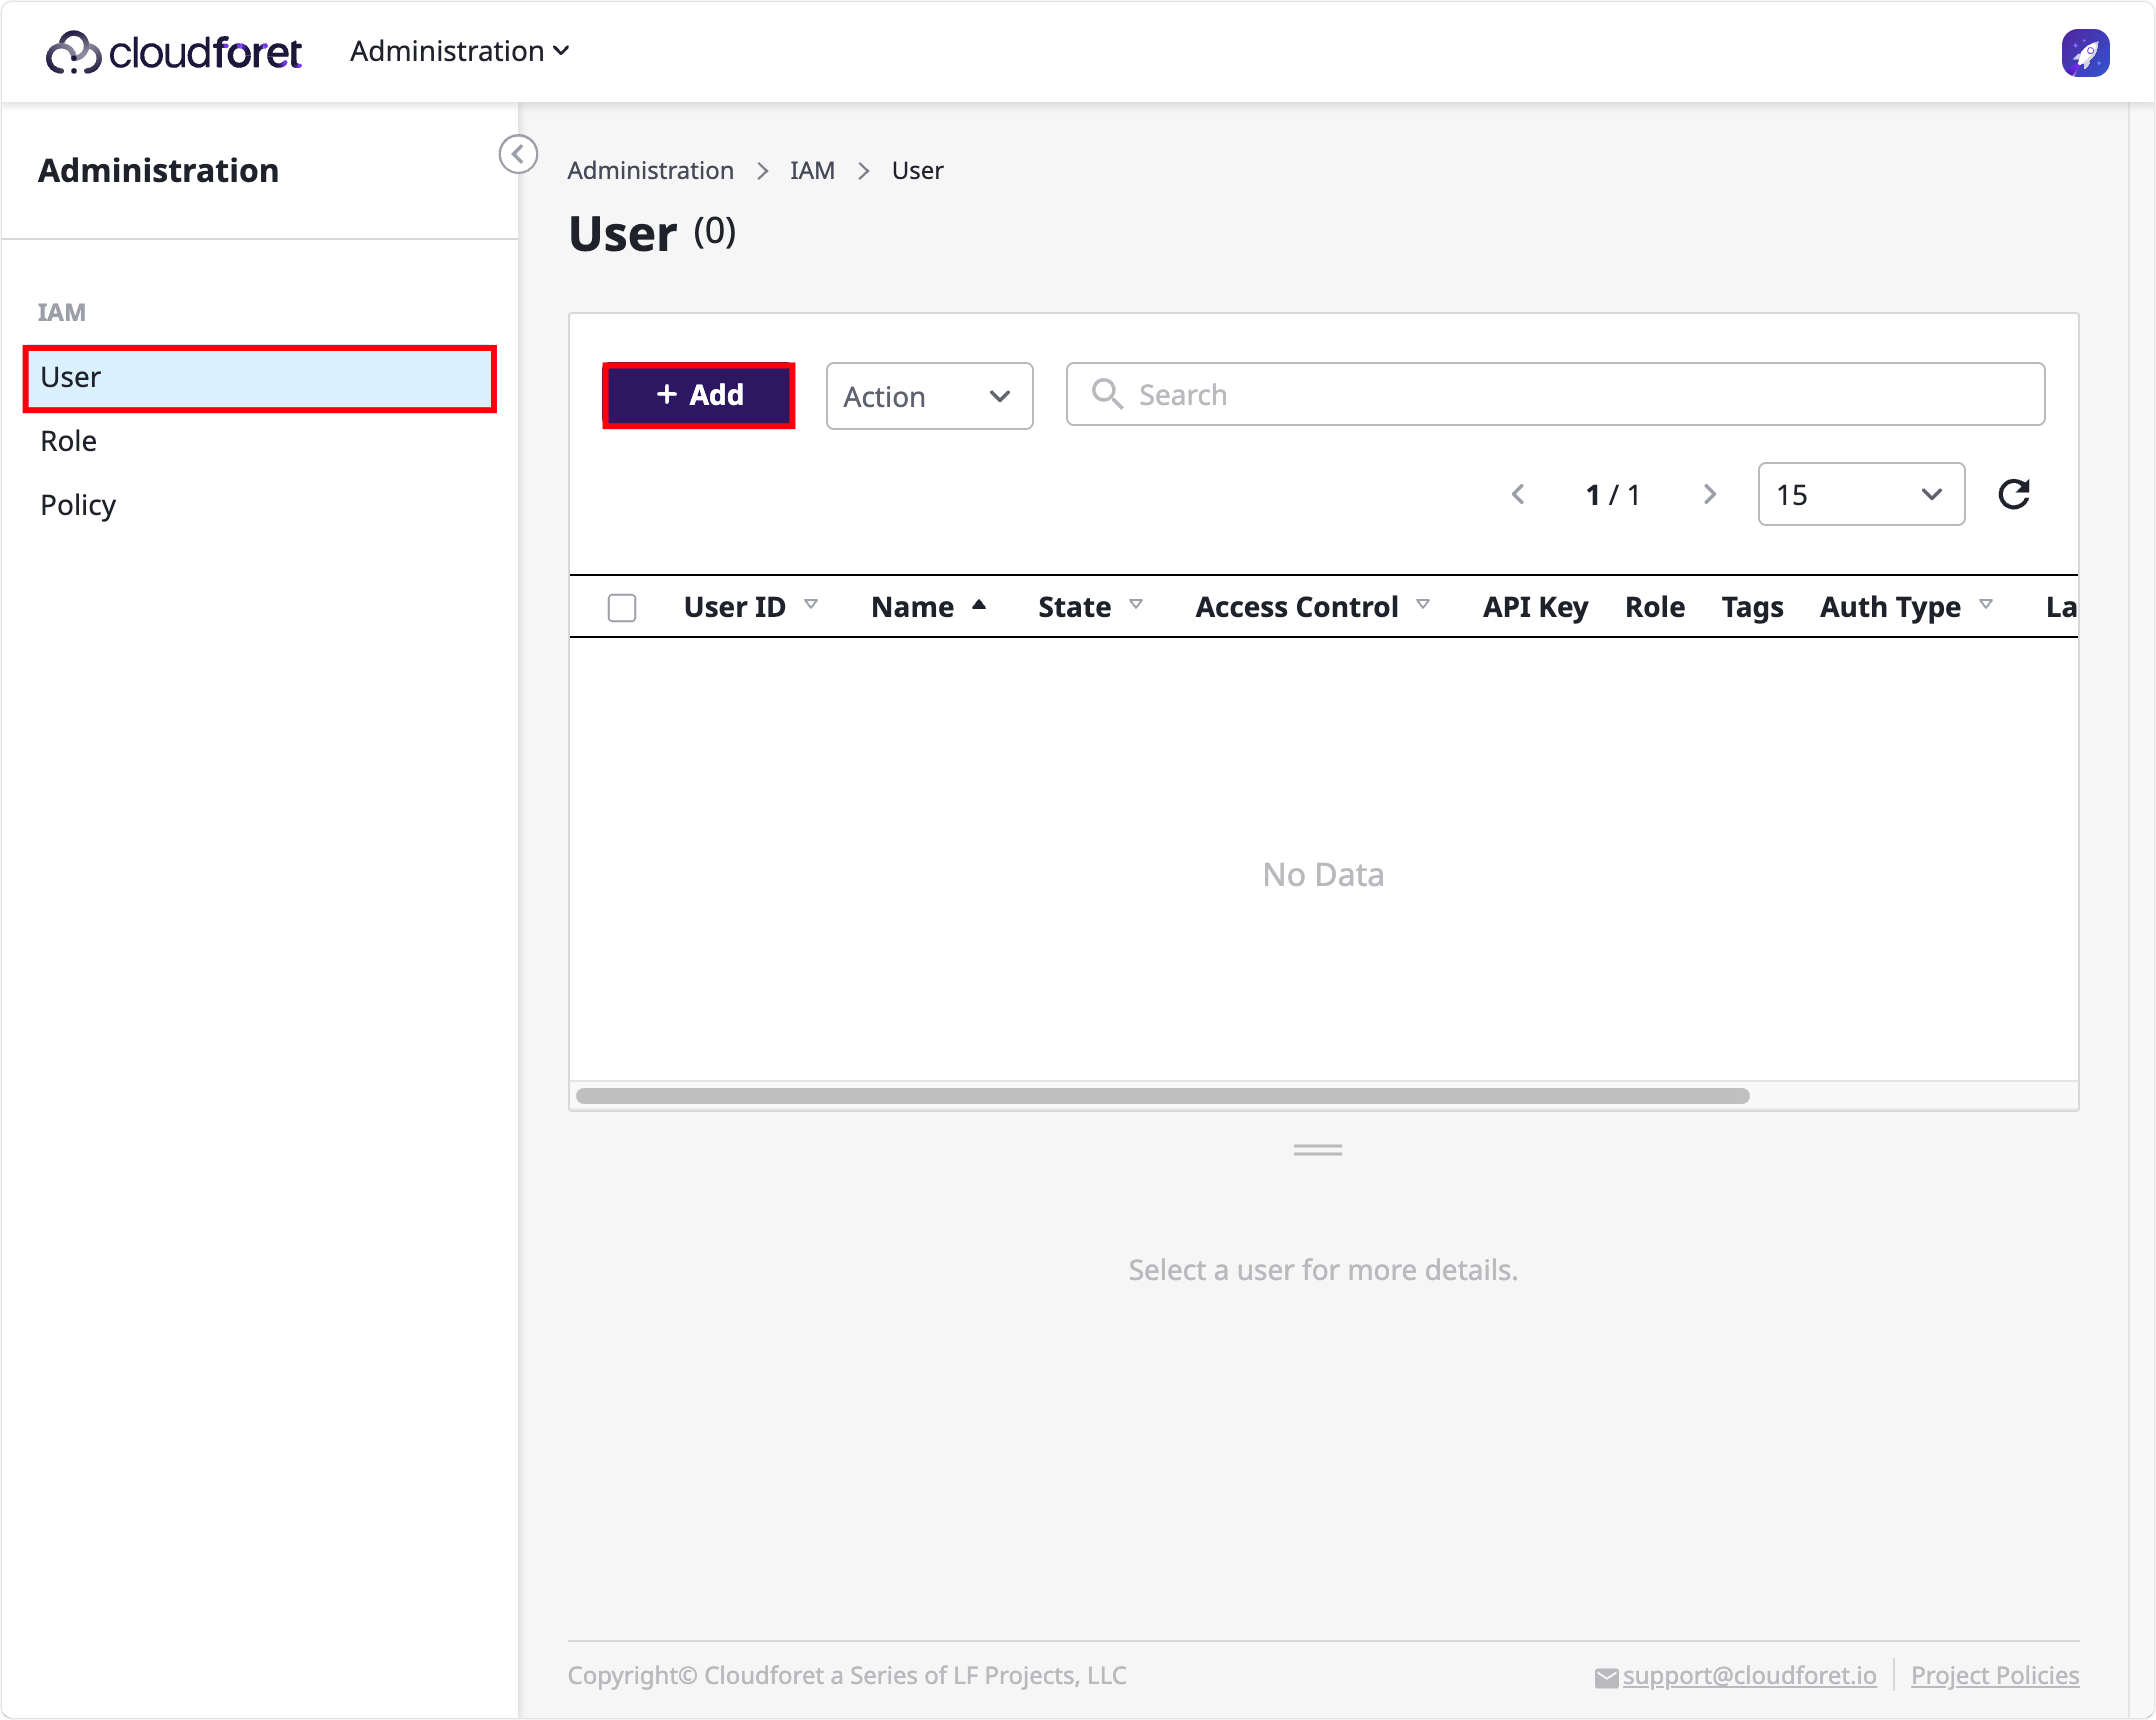
2) Go to User Page
After logging in, go to Administration > IAM > User and click [+ Add].
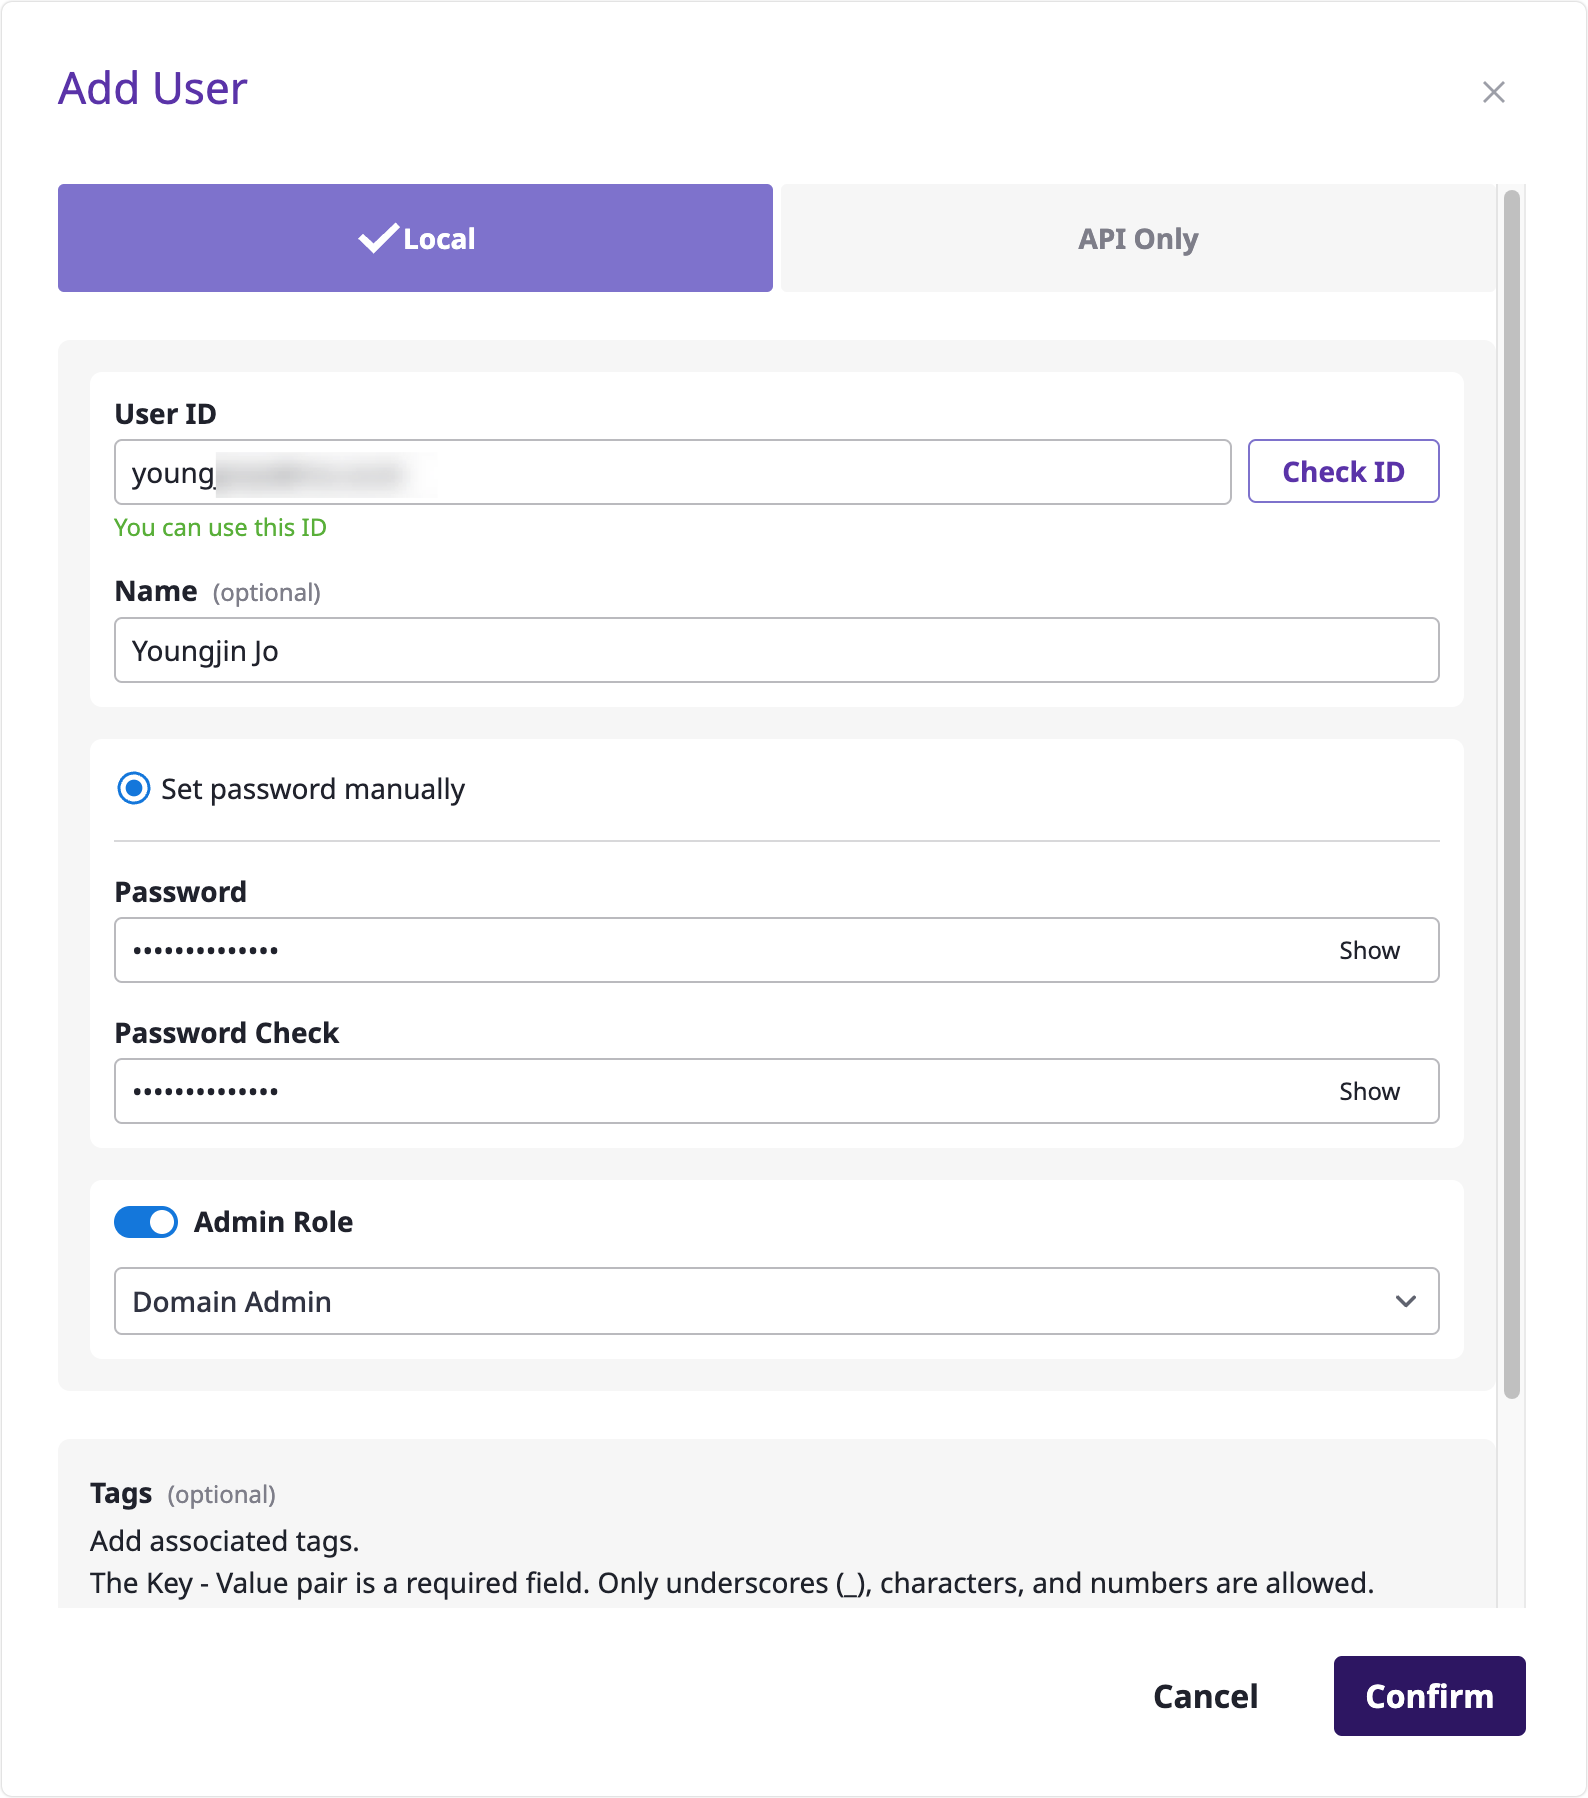
3) Add User
Enter basic information such as User ID, Name, Password, etc., and click [Confirm or OK] button to add user.
4) Log in with Added User
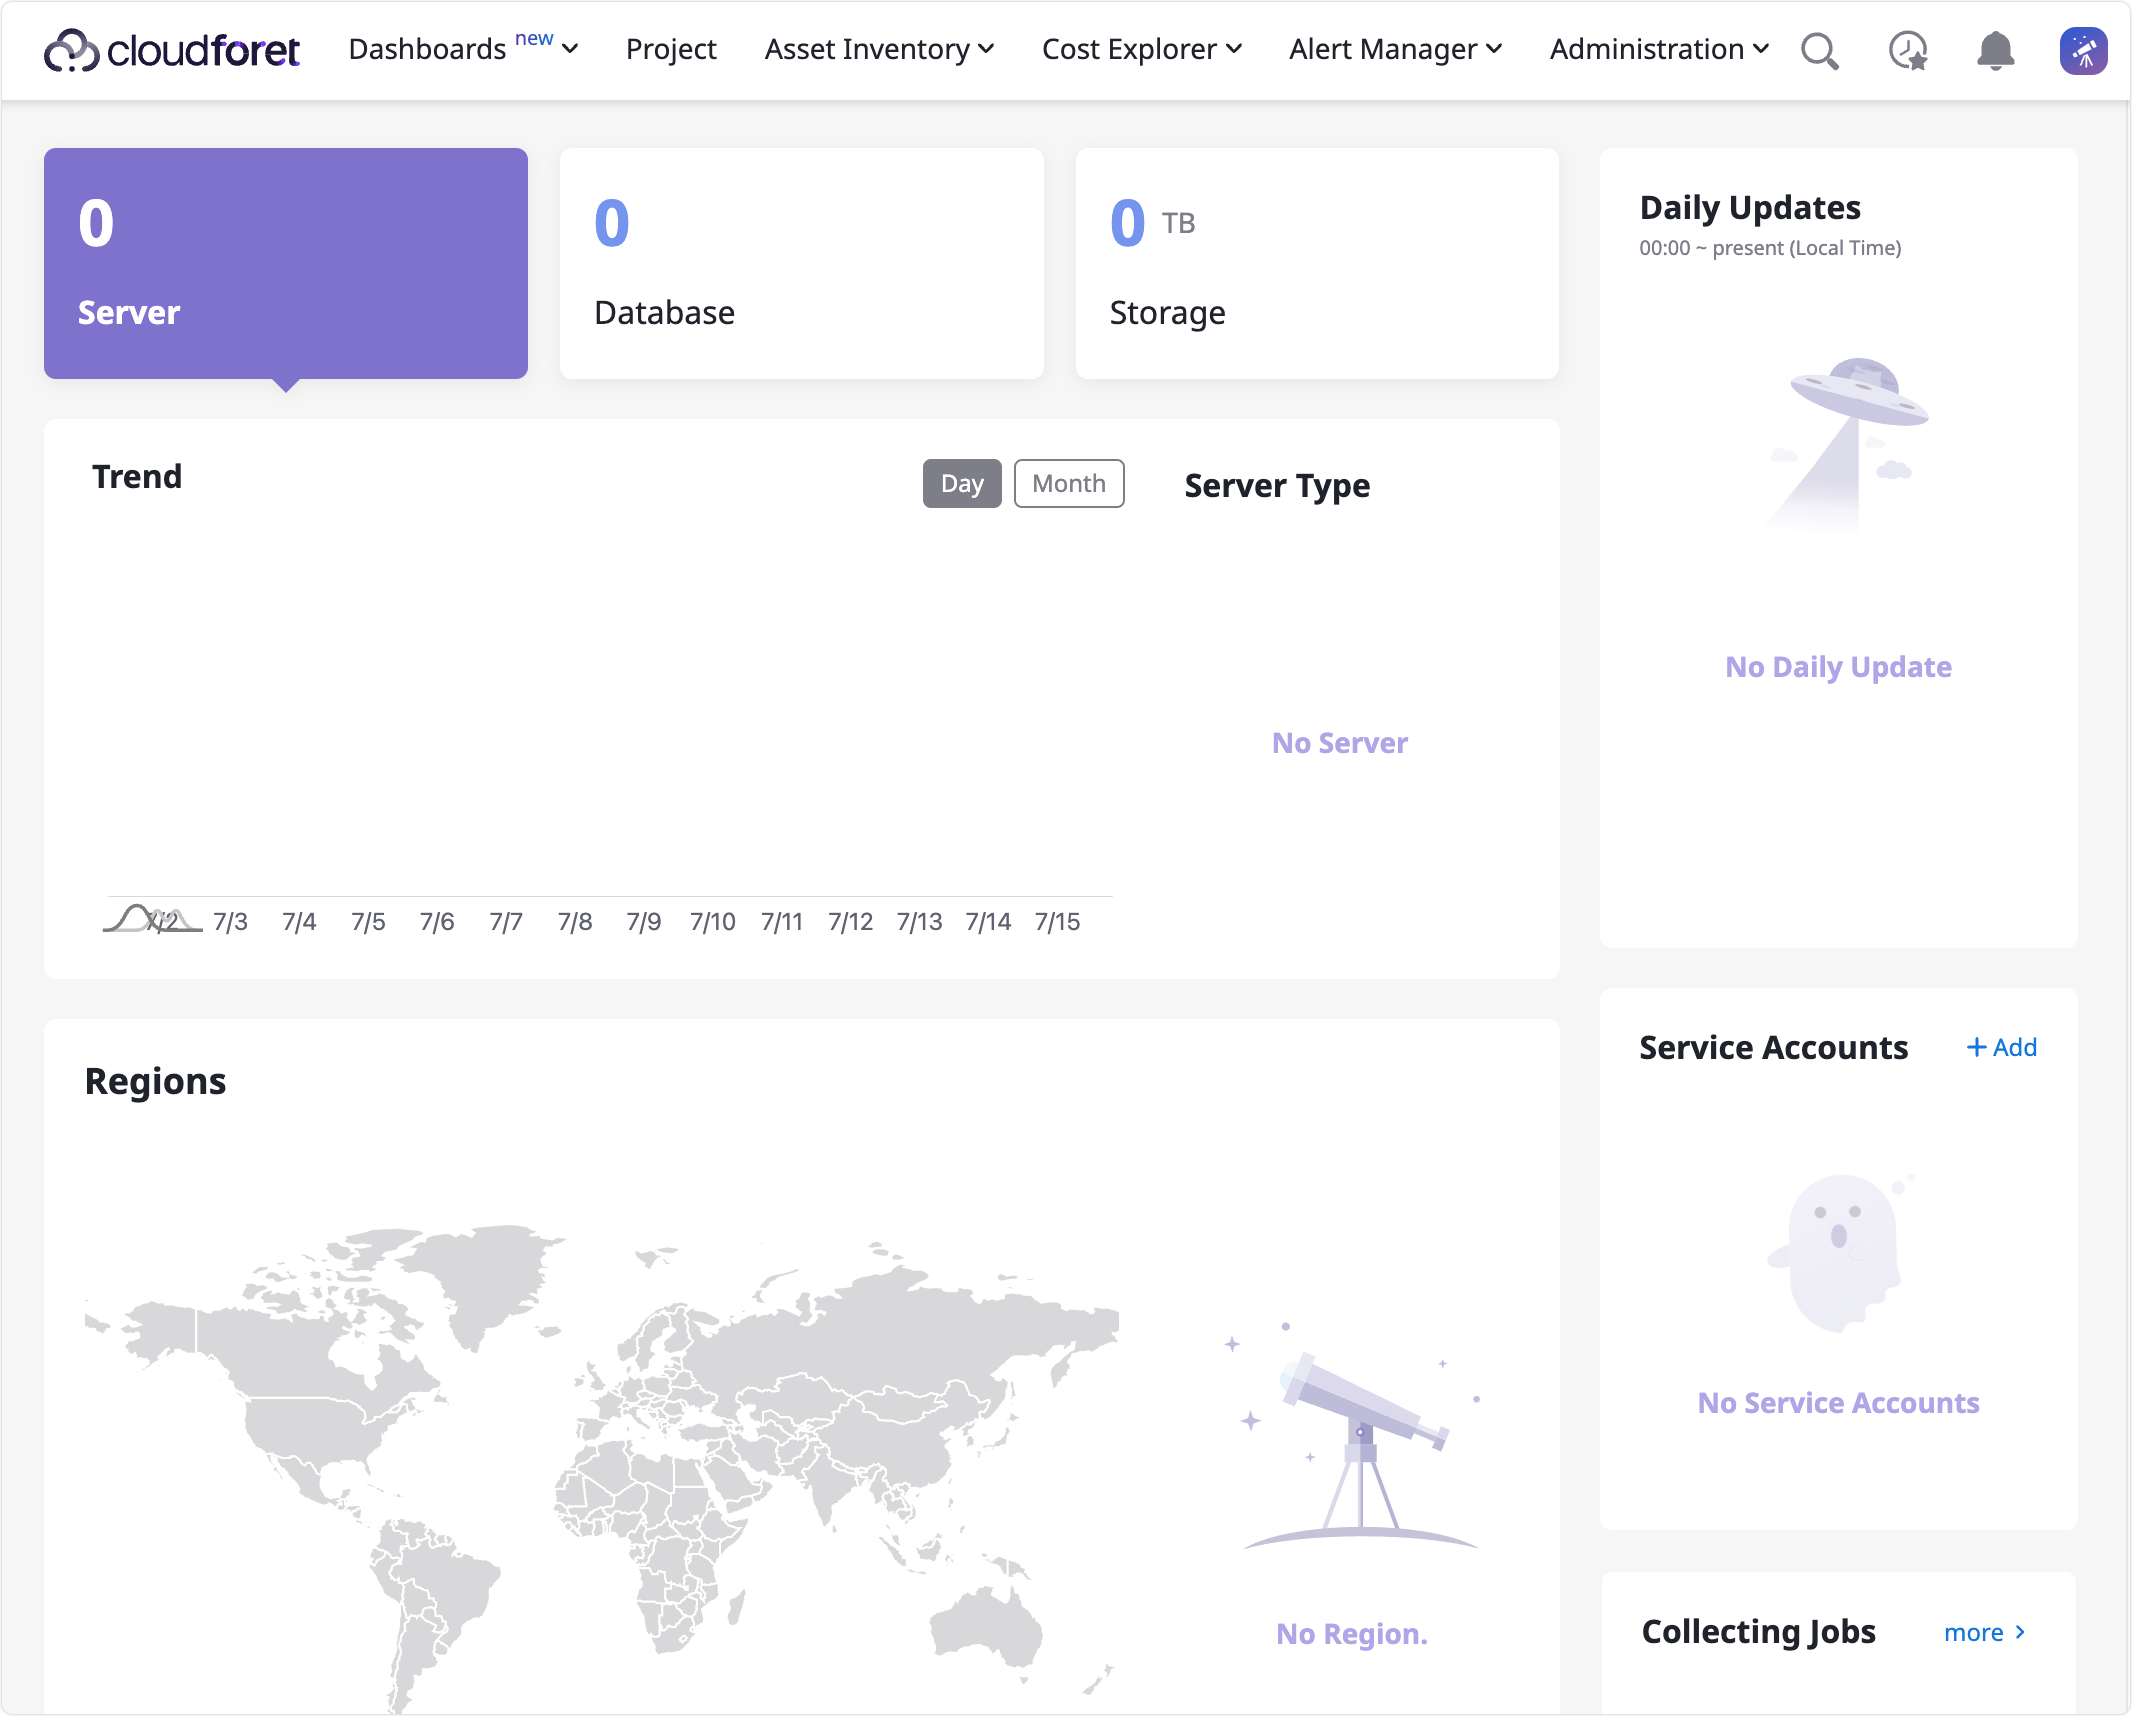
If you proceed with user addition, log in with the existing account (admin account) and log out. When you log in with the newly created user again, if you see the home screen as below, you are now ready to use CloudOps API.
8. My Page
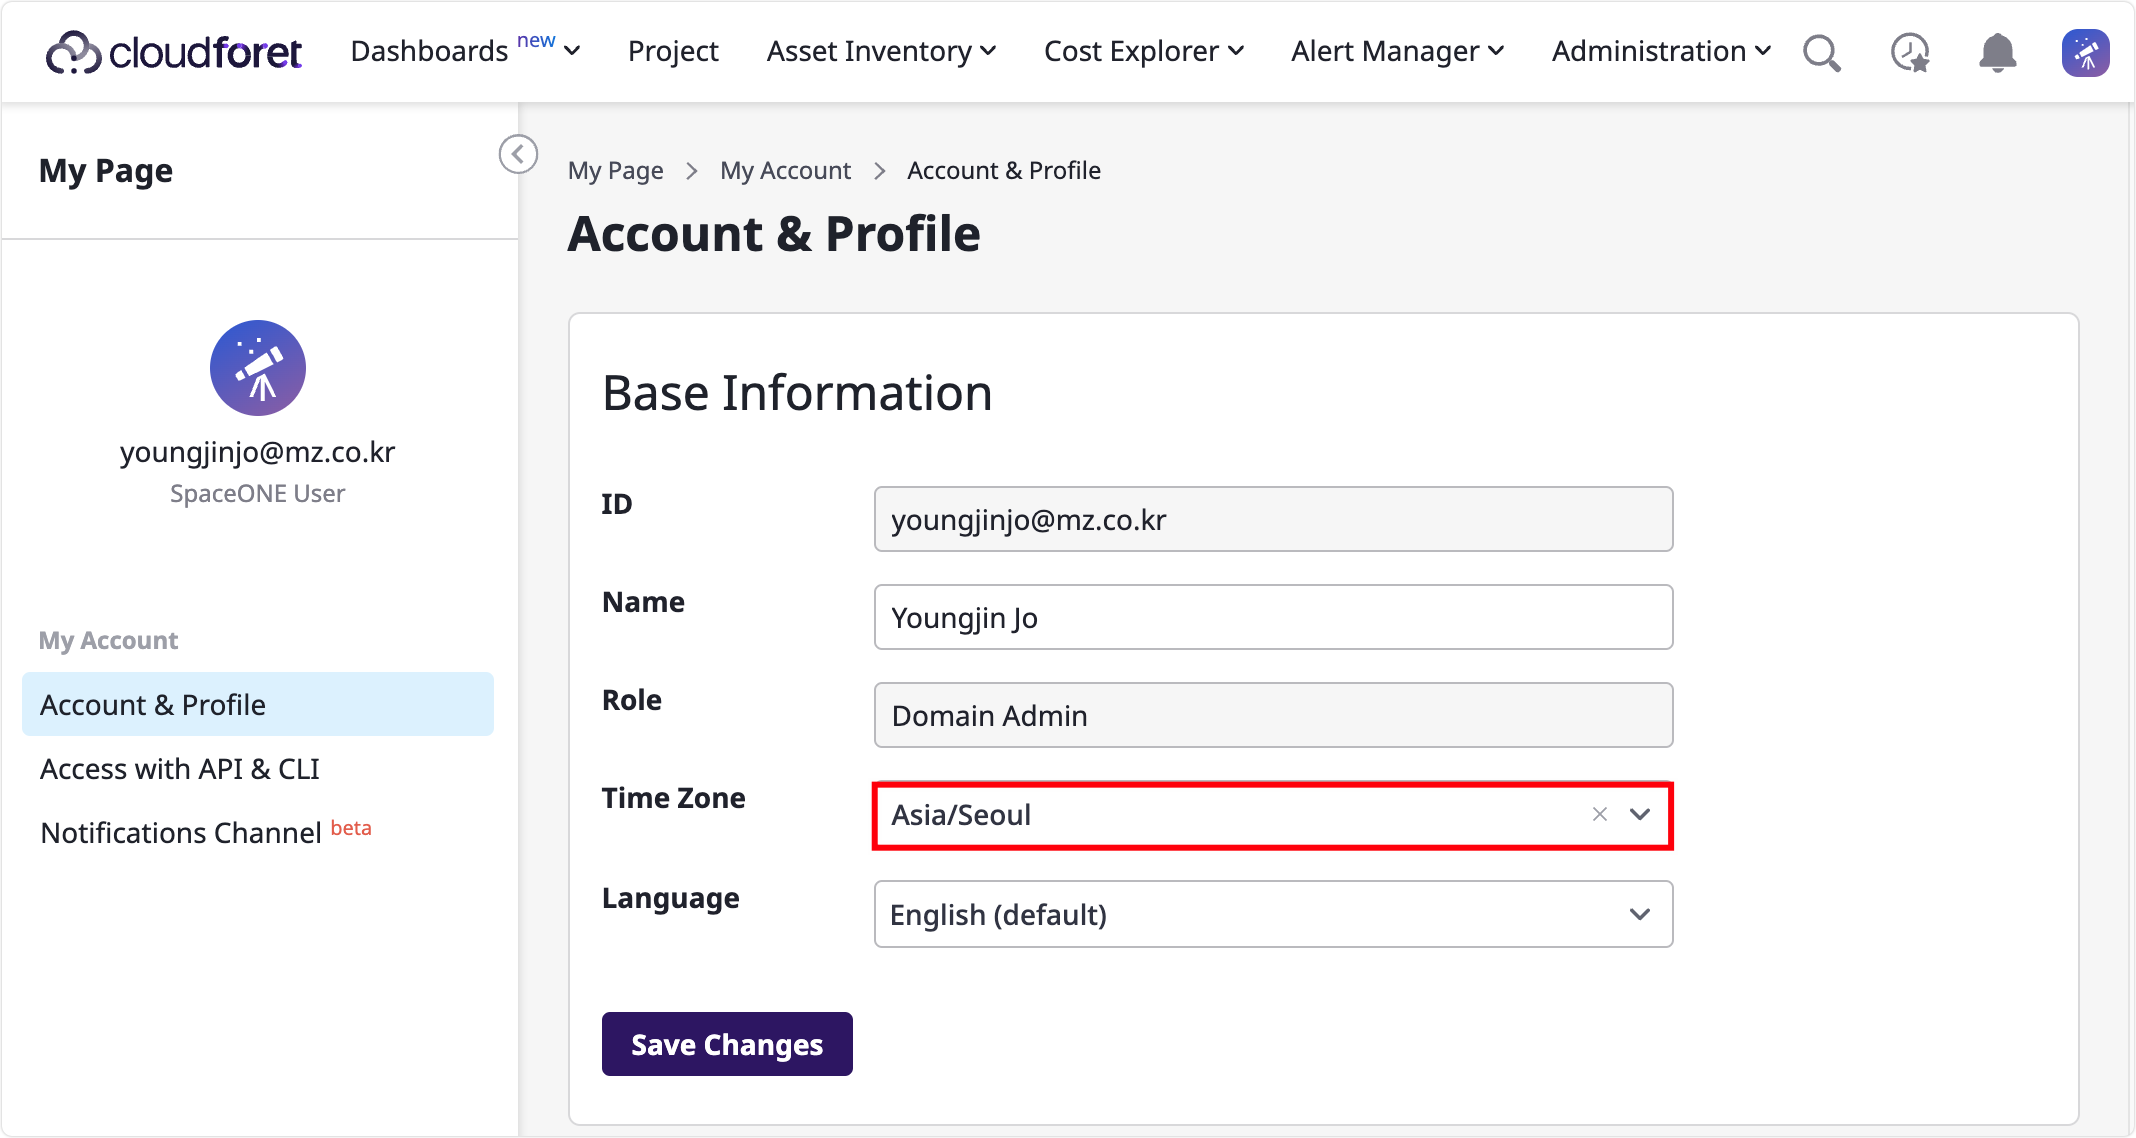
1) Account & Profile
Profile > Go to My Page > Account & Profile > Time Zone to change user’s time zone.
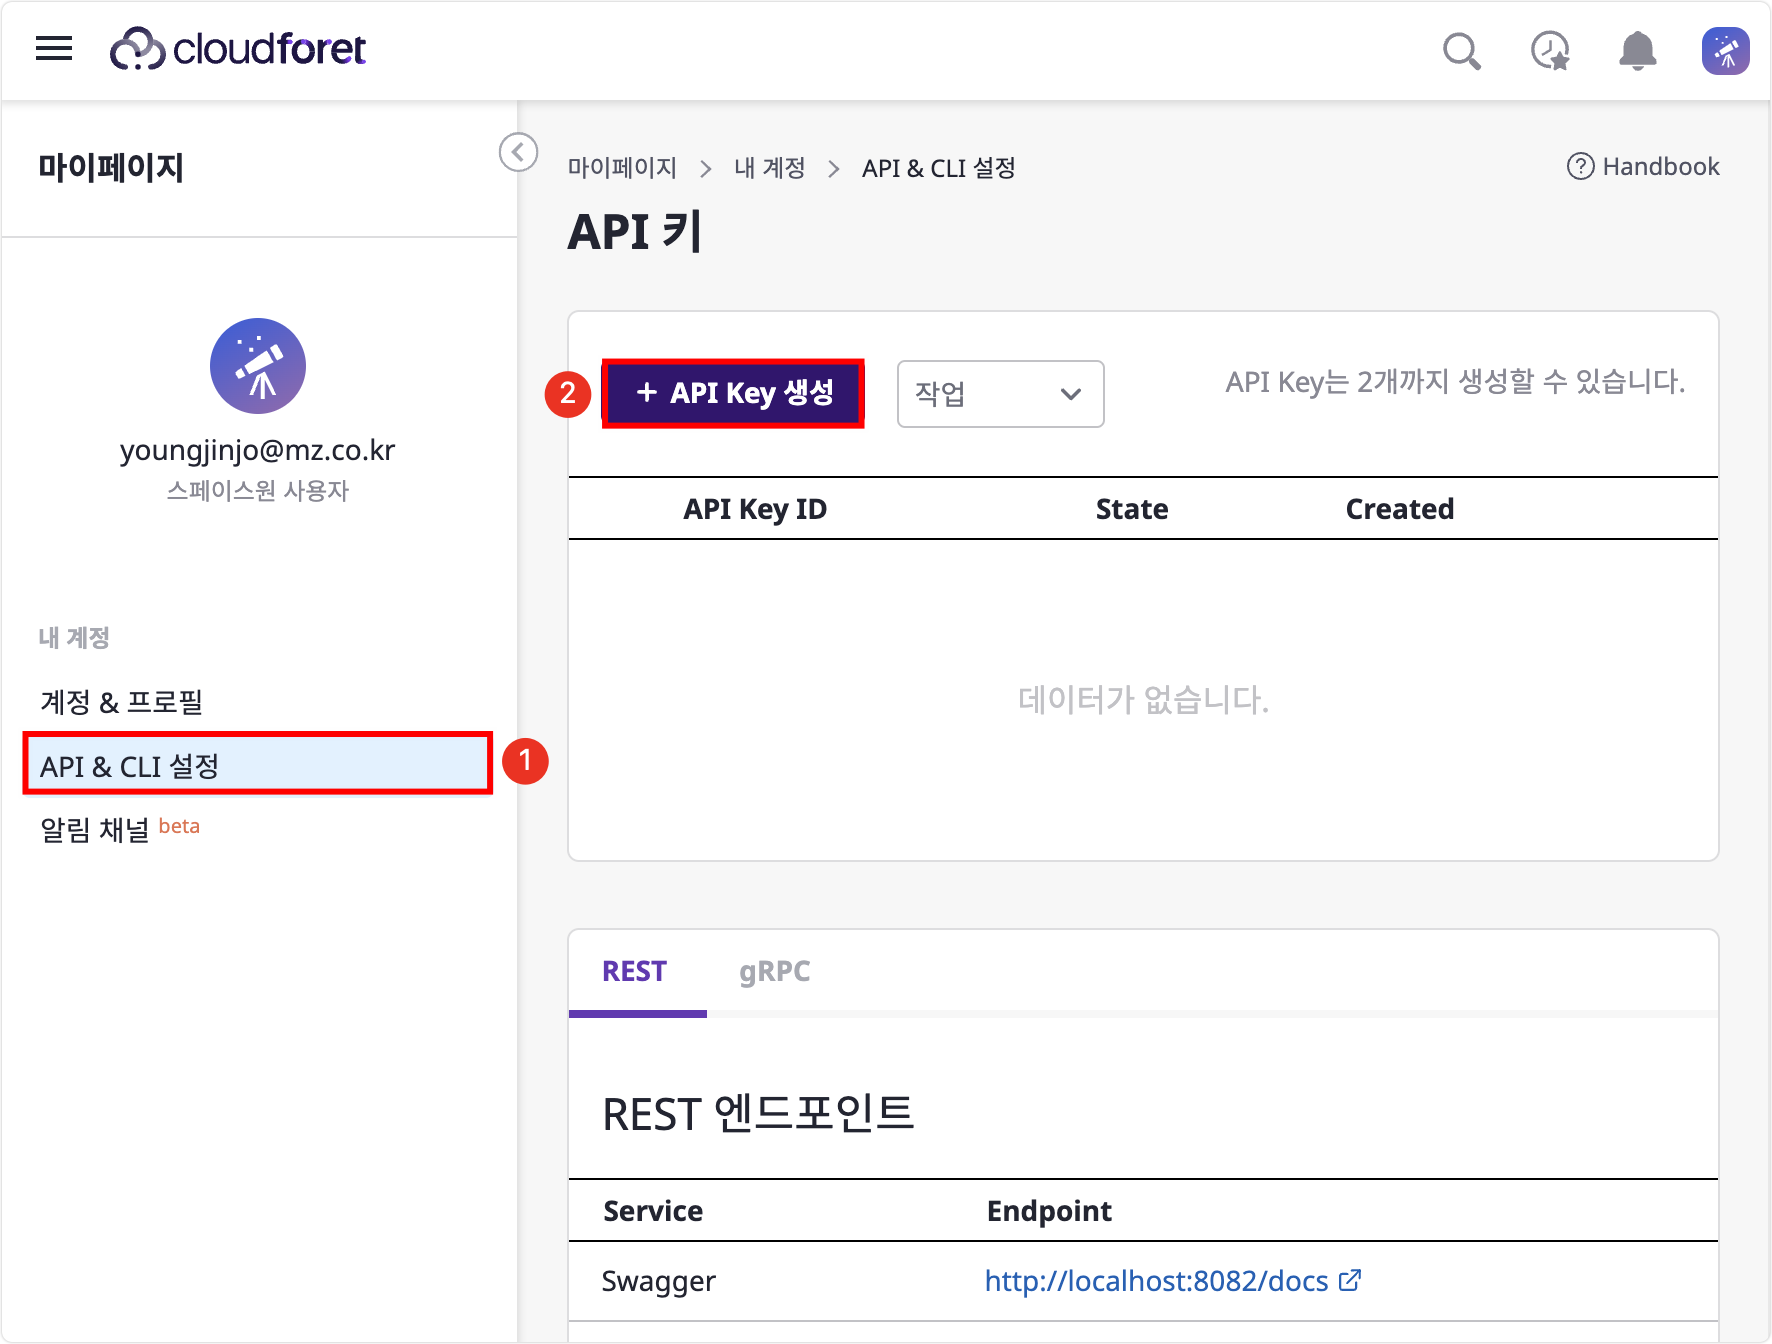
2) API & CLI Configuration
My Page > API & CLI Configuration menu and click [API Key Generation] button.
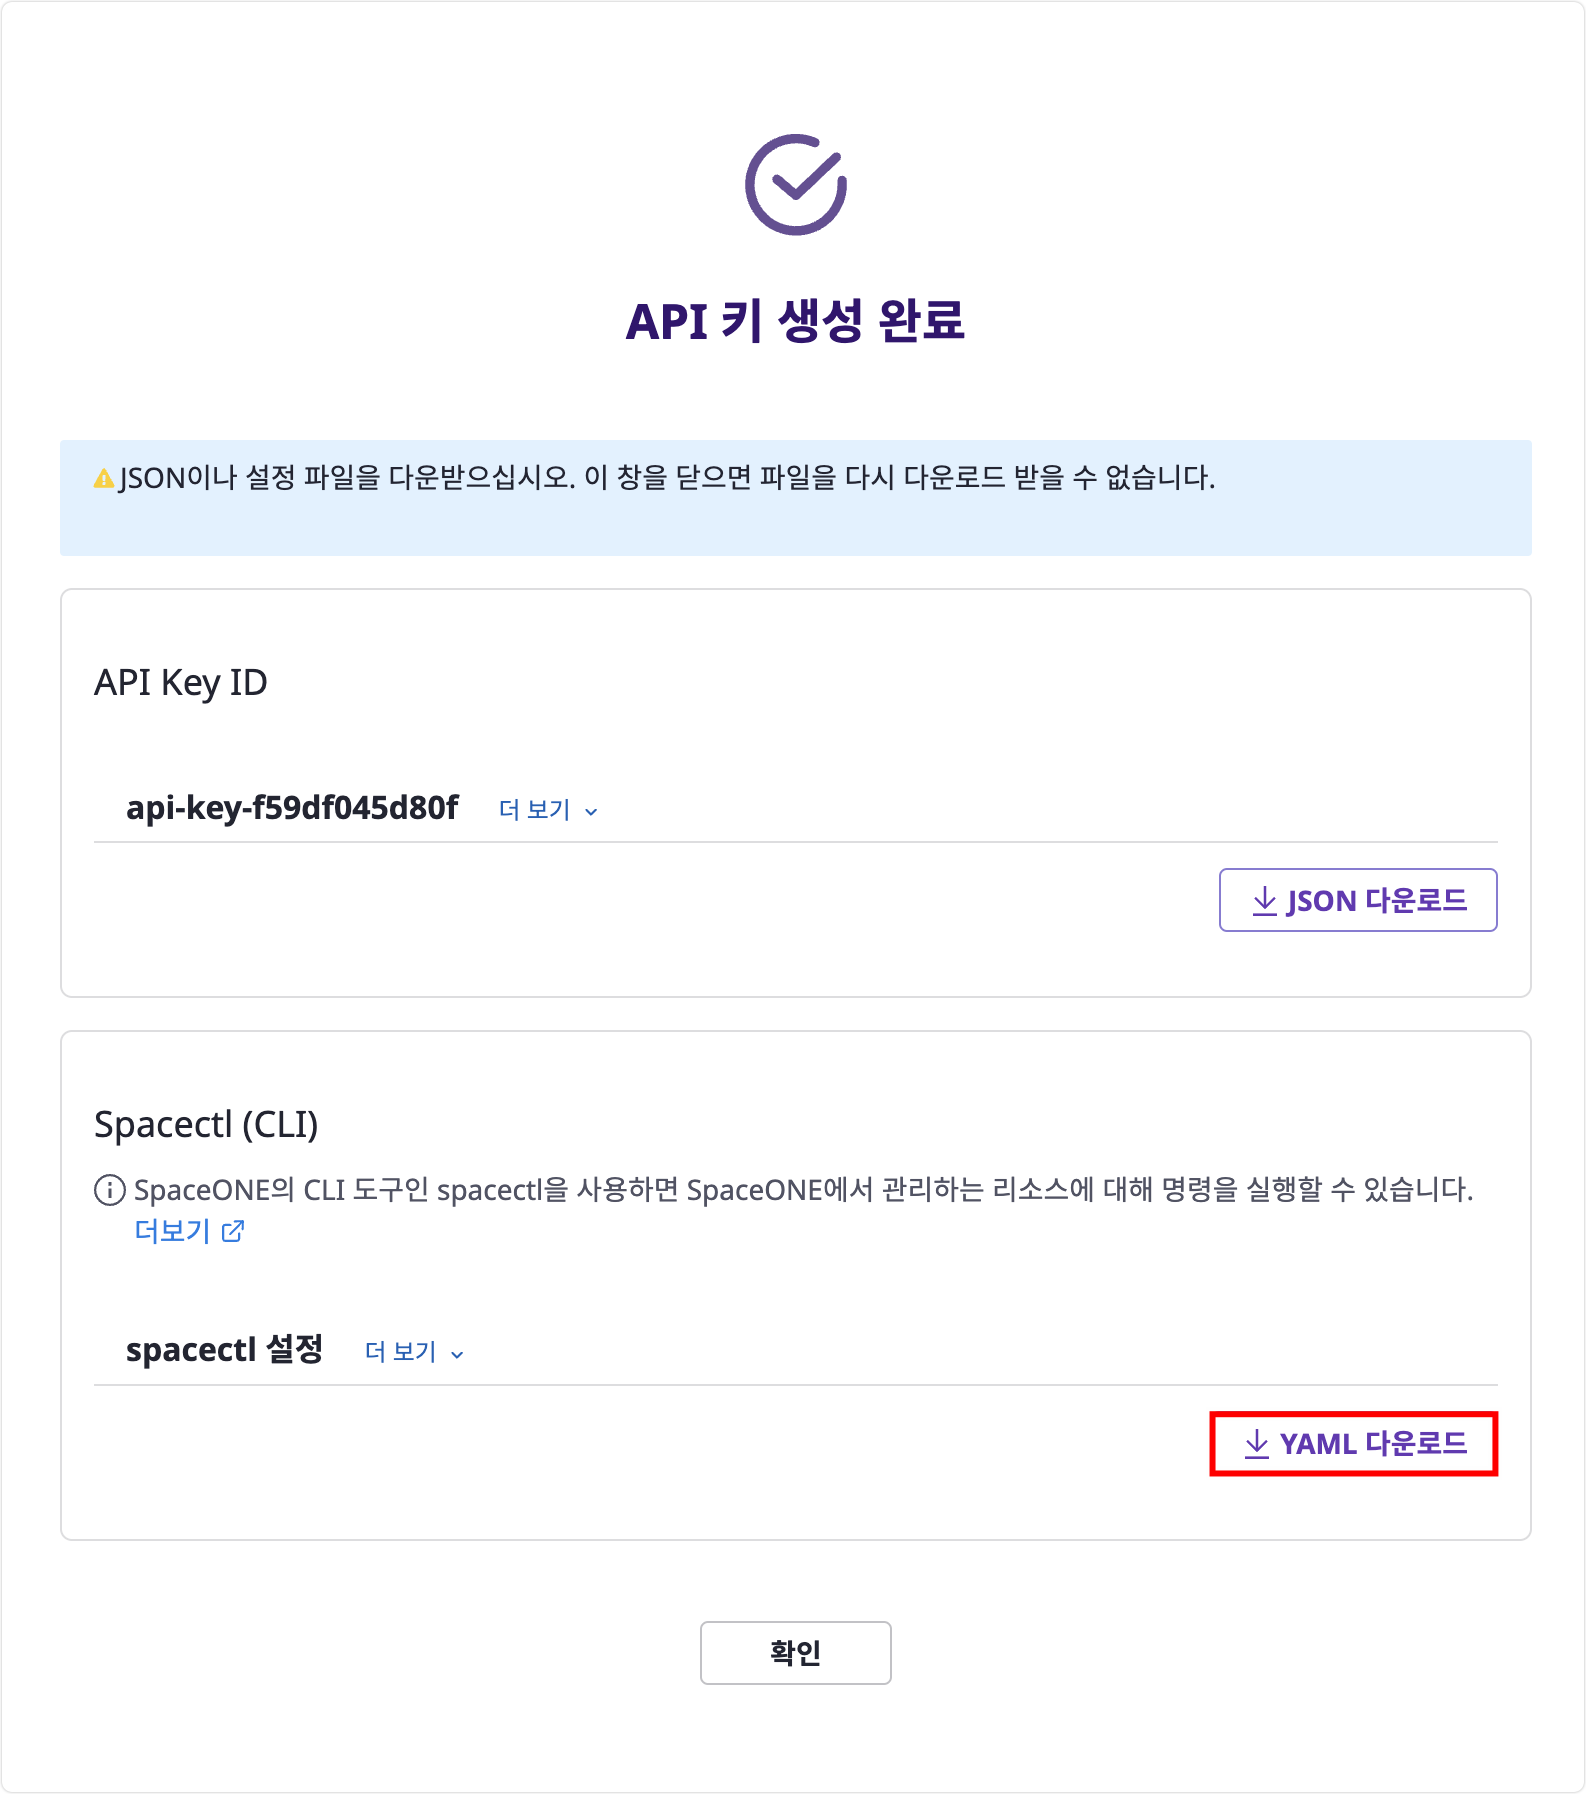
There are two ways to set spacectl (JSON or YAML), but we’ll learn how to set it with YAML. After completing API key generation, click [YAML Download] button in API Key Generation Complete Modal.
You will download spacectl_config.yml file.
9. spacectl Environment Configuration
| Language and Package | Version Information |
|---|---|
| Python | 3.11+ |
| cloudops-core | 2.0+ |
| cloudops-api | 2.0+ |
1) Package Installation
2)spacectl Installation
spacectl is a command line tool (CLI) that can execute commands for resources managed by CloudOps.
For detailed information on all supported configurations and commands, please refer to spacectl
document.
3) config Initialization
3-1) Use the downloaded spacectl_config.yml to initialize spacectl config. The Environment name can be set to whatever the user wants. (Here, we’ll set it to local as we’re going to perform local test.)
3-2) If you enter spacectl config init, a .cloudops directory will be created in the root directory. The structure of .cloudops directory is as follows.
- local.yml
- After
spacectl config init, whenever a new Environment is created, a YAML file corresponding to the Environment name will be created in theenvironmentsdirectory. environment.ymlfile shows the current Environment. Checklocal.yml.
api_key: eyJ...
endpoints: { }
3-3) Open local.yml file to check. The api_key should be a TOKEN starting with eyJ... and endpoints should be empty like {}.
If it’s empty, you cannot communicate with gRPC. Set gRPC endpoint.
4) Endpoint Setting
This setting is for communication to gRPC server running on local machine at port 50051 when gRPC server is running on local machine. The name is set to plugin.
api_key: eyJ...
endpoints:
  plugin: grpc://localhost:50051
Now, environment configuration for plugin development is complete. Please refer to this for plugin development document.
Cloudforet Deletion
If you want to delete Cloudforet, you can use the following command to remove the installed cloudforet.